ViewSonic VT2430 User Guide - Page 34
ViewSonic, Closed Caption Setting, Setting up Time menu - service manual
 |
UPC - 766907329711
View all ViewSonic VT2430 manuals
Add to My Manuals
Save this manual to your list of manuals |
Page 34 highlights
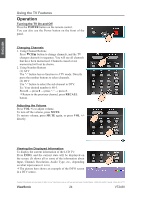
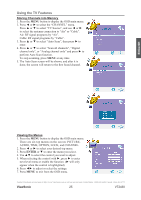
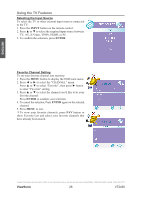
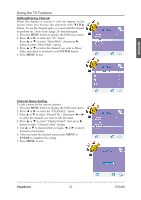
ENGLISH Using the TV Features Setting up Time menu 1. Press the MENU button to display the OSD main menu. 2. Press ◄ or ► to select the "TIME" menu. 3. Press ▲ or ▼ to select "Sleep Timer", and press ◄ or ► to set the "Sleep Timer" from 5~240 min, or Off. 4. Press ▲ or ▼ to select "Time Zone", and select the correct time zone of your area with ◄ or ►. The displayed time of "Clock" will be changed at the same time automatically. To adjust "Clock", select "Clock" and press ►. Use ◄ or ► to change between year/ month/ date/ hour/ minute, ▲ or ▼ to adjust. When you finish adjustment, select "OK" and press ENTER to complete the setting. *The "Clock" time can only be adjusted manually when "Auto Sync" is set to "Off". 5. Press ▲ or ▼ to select "DST" (Daylight Saving Time), and select On or Off with ◄ or ► according to the time zone of your area. The "Clock" time will change automatically. 6. Press ▲ or ▼ to select "Time Format", and ◄ or ► to select 12-hour or 24-hour. 7. Press MENU to exit. Closed Caption Setting 1. Press the MENU button to display the OSD main menu. 2. Press ◄ or ► to select the "OPTION" menu. Press ▲ or ▼ to select "Closed Caption", then press ► button to enter "Closed Caption" setting. 3. Press ▲ or ▼ to select CC Mode, Basic Selection, or Advanced Selection, and use ◄ or ► to make your choice. Basic Selection: To set basic analog closed caption options. (CC1~CC4, TEXT1~TEXT4, Off) Advanced Selection: To select closed caption signal formats and set up caption modes for digital TV channels. (Service1~6, Off) Contact ViewSonic service team at: http://www.ViewSonic.com or call our service team: United States 1-800-688-6688, Canada 1-866-463-4775 ViewSonic 29 VT2430
-
 1
1 -
2
-
3
-
4
-
5
-
6
-
7
-
8
-
9
-
10
-
11
-
12
-
13
-
14
-
15
-
16
-
17
-
18
-
19
-
20
-
21
-
22
-
23
-
24
-
25
-
26
-
27
-
28
-
 29
29 -
 30
30 -
 31
31 -
 32
32 -
 33
33 -
 34
34 -
 35
35 -
 36
36 -
 37
37 -
 38
38 -
 39
39 -
40
-
41
-
42
-
43
-
44
-
45
-
46
-
47
 |
 |
