Viking VRT LP/Propane Conversion Kit - LPKPDR - Installation Instructions - Page 11
Open Burner Type 3
 |
View all Viking VRT manuals
Add to My Manuals
Save this manual to your list of manuals |
Page 11 highlights
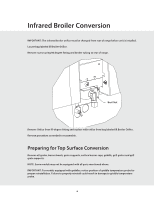
Surface Burner Conversion Open Burner Type 3 Adjustment Screw Air Shutter Locate bag labeled Open Burner Orifice Type 3. Remove screws securing open surface burner to burner box and remove open surface burner. NOTE: Igniter wire must be disconnected to remove burner. Loosen air shutter screw and adjust opening to 7/16" and tighten air shutter screw. Locate orifice mounted onto gas valve behind control panel. NOTE: This can be accessed through the burner box area. Control panel does not require removal. Use a 1/2" deep socket wrench to remove orifice by turning counterclockwise. IMPORTANT: If a valve pin is present, remove valve pin and discard. Install orifice from bag labeled Open Burner Orifice Type 3. IMPORTANT: The orifice tip must be located 3/16" inside the burner for proper gas mixture and combustion. The depth of the orifice can be adjusted by turning the orifice counterclockwise (more depth) or clockwise (less depth). Reconnect igniter wire and reinstall burner. Repeat steps until all surface burners have been converted. Reinstall all grates, grate supports and burner bowls. 11
-
 1
1 -
2
-
3
-
4
-
5
-
 6
6 -
 7
7 -
 8
8 -
 9
9 -
 10
10 -
 11
11 -
 12
12 -
 13
13 -
 14
14 -
 15
15 -
 16
16 -
17
-
18
-
19
-
20
 |
 |
