Vizio VW22L VW22LHDTV10T User Manual - Page 30
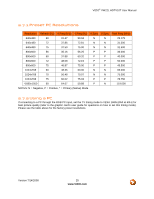
Picture Adjustment, Video Options, Contrast, Brightness, Sharpness, Color - parts
 |
View all Vizio VW22L manuals
Add to My Manuals
Save this manual to your list of manuals |
Page 30 highlights
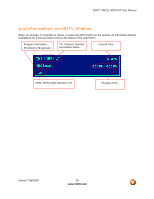
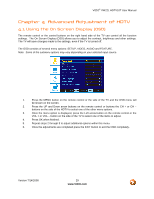
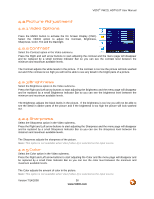
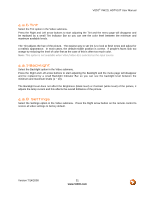
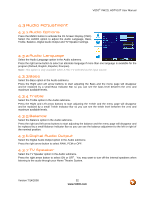
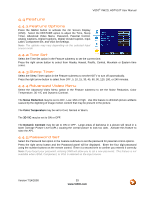
VIZIO® VW22L HDTV10T User Manual 4.2 Picture Adjustment 4.2.1 Video Options Press the MENU button to activate the On Screen Display (OSD). Select the VIDEO option to adjust the Contrast, Brightness, Sharpness, Color, Tint and the Backlight. 4.2.2 Contrast Select the Contrast option in the Video submenu. Press the Right and Left arrow buttons to start adjusting the contrast and the menu page will disappear and be replaced by a small Contrast Indicator Bar so you can see the contrast level between the minimum and maximum available levels. The Contrast adjusts the white levels in the picture. If the contrast is too low the picture will look washed out and if the contrast is too high you will not be able to see any detail in the bright parts of a picture. 4.2.3 Brightness Select the Brightness option in the Video submenu. Press the Right and Left arrow buttons to start adjusting the Brightness and the menu page will disappear and be replaced by a small Brightness Indicator Bar so you can see the brightness level between the minimum and maximum available levels. The Brightness adjusts the black levels in the picture. If the brightness is too low you will not be able to see the detail in darker parts of the picture and if the brightness is too high the picture will look washed out. 4.2.4 Sharpness Select the Sharpness option in the Video submenu. Press the Right and Left arrow buttons to start adjusting the Sharpness and the menu page will disappear and be replaced by a small Sharpness Indicator Bar so you can see the sharpness level between the minimum and maximum available levels. The Sharpness adjusts the sharpness of the picture. Note: This option is not available when VGA (Video 4) is selected as the input source. 4.2.5 Color Select the Color option in the Video submenu. Press the Right and Left arrow buttons to start adjusting the Color and the menu page will disappear and be replaced by a small Color Indicator Bar so you can see the color level between the minimum and maximum available levels. The Color adjusts the amount of color in the picture. Note: This option is not available when VGA (Video 4) is selected as the input source. Version 7/14/2008 30 www.VIZIO.com
-
 1
1 -
2
-
3
-
4
-
5
-
6
-
7
-
8
-
9
-
10
-
11
-
12
-
13
-
14
-
15
-
16
-
17
-
18
-
19
-
20
-
21
-
22
-
23
-
24
-
 25
25 -
 26
26 -
 27
27 -
 28
28 -
 29
29 -
 30
30 -
 31
31 -
 32
32 -
 33
33 -
 34
34 -
 35
35 -
36
-
37
-
38
-
39
-
40
-
41
-
42
-
43
-
44
 |
 |
