Vtech ATT E2525 User Manual
Vtech ATT E2525 - AT&T E2525 2.4 GHz DSS Expandable Cordless Phone Manual
 |
UPC - 650530003448
View all Vtech ATT E2525 manuals
Add to My Manuals
Save this manual to your list of manuals |
Vtech ATT E2525 manual content summary:
- Vtech ATT E2525 | User Manual - Page 1
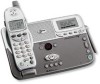
ATT-2525CIB-d2.qxd 12/30/2003 6:26 PM Page 1 User Manual (Part 2) 2.4 GHz Cordless Telephone/Answering System E2525 with Caller ID & Call Waiting - Vtech ATT E2525 | User Manual - Page 2
the battery before using the telephone See page 7 for easy instructions For customer service or product information, visit our web site at www.telephones.att.com or call 1-800-222-3111 Please also read Important Product Information Enclosed in product package Add new handsets to make your phone - Vtech ATT E2525 | User Manual - Page 3
ATT-2525CIB-d2.qxd 12/30/2003 6:26 PM Page 1 User Manual (Part 2) 2.4 GHz Cordless Speakerphone/ Answering System E2525 Table of contents Getting Started Quick reference 2 Parts checklist 4 Before you begin 5 Telephone base installation 6 Battery installation & charging ..........7 Wall - Vtech ATT E2525 | User Manual - Page 4
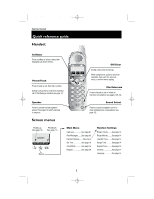
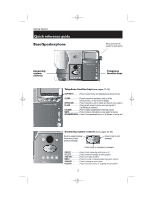
ATT-2525CIB-d2.qxd 12/30/2003 6:26 PM Page 2 Getting Started Quick reference guide Handset Softkeys Press a softkey to select a menu item displayed just above the key. Phone/Flash Press to begin a call, then dial a number. During a call, press to receive an incoming call, if Call Waiting is - Vtech ATT E2525 | User Manual - Page 5
ATT-2525CIB-d2.qxd 12/30/2003 6:27 PM Page 3 Getting Started Quick reference guide Base/Speakerphone Swivel antenna fully upright for best results TIME SET Press to set date and time MENU Press to review or change answering system options CHANGE Press to change a menu option RECORD Press to - Vtech ATT E2525 | User Manual - Page 6
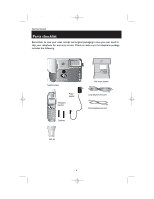
and original packaging in case you ever need to ship your telephone for warranty service. Check to make sure the telephone package includes the following: Telephone base Power adapter Telephone handset Batteries Wall mount bracket Long telephone line cord Short telephone line cord Belt clip 4 - Vtech ATT E2525 | User Manual - Page 7
ATT-2525CIB-d2.qxd 12/30/2003 6:27 PM Page 5 Getting Started Before you begin About Caller Identification Caller ID with Call Waiting features in this telephone let you see who's calling before you answer the phone, even when you're on another call. These features require services provided by your - Vtech ATT E2525 | User Manual - Page 8
ATT-2525CIB-d2.qxd 12/30/2003 6:27 PM Page 6 Getting Started Telephone base installation Install the speakerphone base as shown below. Choose a location away from - Vtech ATT E2525 | User Manual - Page 9
ATT-2525CIB-d2.qxd 12/30/2003 6:27 PM Page 7 Getting Started Battery installation & charging After installation, place the handset in the base and allow the batteries to charge for 8 hours before use. You can keep batteries charged by returning the handset to the base after each use. When battery - Vtech ATT E2525 | User Manual - Page 10
ATT-2525CIB-d2.qxd 12/30/2003 6:27 PM Page 8 Getting Started Wall mounting The speakerphone base can be installed on any standard wall-phone outlet as shown below. Plug power cord transformer into electrical outlet Place handset in base to charge for 8 hours before first use. Rotate antenna to - Vtech ATT E2525 | User Manual - Page 11
ATT-2525CIB-d2.qxd 12/30/2003 6:27 PM Page 9 Getting Started Belt clip & optional headset Install belt clip headset (purchased separately). For best results use an AT&T 2.5 mm headset. Snap belt clip into notches on side of handset. Rotate and pull to remove. Plug 2.5 mm headset into jack on side of - Vtech ATT E2525 | User Manual - Page 12
ATT-2525CIB-d2.qxd 12/30/2003 6:27 PM Page 10 HANDSET 1 REDIAL MENU MEM 1 XFER HOLD MUTE 1 XFER HOLD MUTE 1 BASE HANDSET 2 HANDSET 3 ^ OK V Telephone Operation Basic handset operation Making and answering calls To answer a call, press PHONE or any dial pad button. To make a call, press PHONE, - Vtech ATT E2525 | User Manual - Page 13
ATT-2525CIB-d2.qxd 12/30/2003 6:28 PM Page 11 Telephone Operation Speakerphone XFER HOLD MUTE XFER HOLD MUTE HANDSET 1 HANDSET 2 HANDSET resume speaking. Call transfer During a conversation you can transfer the call to a handset. Press XFER to display a list of sets. Use the ^V buttons to - Vtech ATT E2525 | User Manual - Page 14
ATT-2525CIB-d2.qxd 12/30/2003 6:28 PM Page 12 Telephone Operation Options while on calls To adjust volume or sound quality Volume Press VOLUME buttons on the handset Mute If you have Call Waiting service, you will hear a beep OFF at the handset (or MUTE at the base) while the phone is ringing. - Vtech ATT E2525 | User Manual - Page 15
down to select a station, or select GLOBAL PAGE to page all stations. Press OK to page the selected station. At a handset, press PHONE to answer an intercom page. At the base, the phone will ring once, then answer the intercom page automatically. When your intercom call is finished, press OFF at the - Vtech ATT E2525 | User Manual - Page 16
ATT-2525CIB-d2.qxd 12/30/2003 6:28 PM Page 14 Select MENU HANDSET 1 REDIAL MENU MEM Select HANDSET SETTINGS CALLS LOG PLAY MESSAGES HANDSET OK to save your selection. Low battery tone The handset is factory programmed to alert you with a tone when the battery is low and needs recharging. Use - Vtech ATT E2525 | User Manual - Page 17
ATT-2525CIB- an example of each. Press OK to save your selection. Keypad tone The handset is factory programmed to beep at each keypress. Use the ON/OFF menu . Change this to PULSE only if you do not have touch-tone dialing service. Press OK to save your selection. Contrast At this menu you can adjust - Vtech ATT E2525 | User Manual - Page 18
. The time will be set automatically only if you subscribe to Caller ID service provided by your local telephone company (see page 5). To set the answering system clock, see page 25. To turn clock on or off The handset time display is optional. To turn it on or off, select MENU, press - Vtech ATT E2525 | User Manual - Page 19
ATT-2525CIB-d2.qxd 12/30/2003 6:28 PM Page 17 PAT JOHNSON 123-456-7890 ^ EDIT V Phonebook Memory capacity The phonebook can store up to - Vtech ATT E2525 | User Manual - Page 20
ATT-2525CIB-d2.qxd 12/30/2003 6:28 PM Page 18 Enter number, then press MEM 555-1234 PAUSE MENU MEM Enter name, then press SAVE - Vtech ATT E2525 | User Manual - Page 21
ATT-2525CIB-d2.qxd 12/30/2003 6:28 PM Page 19 Press MEM to select phonebook REDIAL find Kevin, or three times to find Linda. To call a displayed number When you find the entry you want, press PHONE (or SPEAKER) to dial. Or press EDIT to modify the entry (see next page). Shortcut Press * at any time - Vtech ATT E2525 | User Manual - Page 22
ATT-2525CIB-d2.qxd 12/30/2003 6:28 PM Page 20 PAT WILLIAMS 555-1234 ^ NAME NUMBER Phonebooks To dial, edit or delete entries To dial a number When any phonebook entry is displayed, press PHONE (or SPEAKER) to dial the displayed number. To delete an entry Press EDIT, then DEL to display options: • - Vtech ATT E2525 | User Manual - Page 23
ATT-2525CIB-d2.qxd 12/30/2003 6:29 PM Page 21 CHRIS THOMPSON 123-555-6789 11:29 A Oct4 Handset: 50 entries Base: 50 entries Caller ID Logs How Caller ID works If you subscribe to Caller ID service provided by your local phone company, information about each caller will be displayed after the - Vtech ATT E2525 | User Manual - Page 24
ATT-2525CIB-d2.qxd 12/30/2003 6:29 PM Page 22 HANDSET 1 REDIAL MENU MEM CALLS LOG ^ OK V CHRIS THOMPSON 123-555-6789 11:29 A OCT4 N01 ^ CID V Display previous entry Display next entry CHRIS THOMPSON 123-555-6789 11:29 A OCT4 N01 DEL OPT# SAVE Caller ID Logs To review your call log - Vtech ATT E2525 | User Manual - Page 25
ATT-2525CIB-d2.qxd 12/30/2003 6:29 PM Page 23 CHRIS THOMPSON 123-555-6789 11 555-6789 ^ DIAL V Caller ID Logs To dial a call log entry When any Caller ID screen is displayed, press PHONE (or SPEAKERPHONE at the base) to dial the number exactly as it appears on the screen. Dialing options Caller ID - Vtech ATT E2525 | User Manual - Page 26
ATT-2525CIB-d2.qxd 12/30/2003 6:29 PM Page 24 14 Message counter Messages will remain available for replay until you delete them. Handset access In addition to the features described in this section, you can also use your handset to review or delete messages (see page 30). Press to start or - Vtech ATT E2525 | User Manual - Page 27
ATT-2525CIB-d2.qxd 12/30/2003 6:29 PM Page 25 Answering System Friday, 10:07 am, 2003" are dated correctly. "To change clock, press Time Set" The system uses voice prompts to guide you. Each time you press CHANGE, the day, hour, minute or year 2 TIME SET "Friday" advances by one. When - Vtech ATT E2525 | User Manual - Page 28
ATT-2525CIB-d2.qxd 12/30/2003 6:29 PM Page 26 12 Elapsed recording time (seconds) Press Outgoing announcements are the messages callers hear when calls are answered by the answering system. The phone is pre-programmed with an announcement that answers calls with "Hello. Please leave a message - Vtech ATT E2525 | User Manual - Page 29
ATT-2525CIB-d2.qxd 12/30/2003 6:29 PM Page 27 A "A" is displayed when Announce Only is activated 1 MENU "Change Announce Only" 2 CHANGE "Off" 3 CHANGE "On" 4 ( - Vtech ATT E2525 | User Manual - Page 30
ATT-2525CIB-d2.qxd 12/30/2003 6:29 PM Page 28 1 MENU Press until remote access code" Enter a 2-digit number (10-99) for remote Options: [enter 2-digit code] 19 access from another phone (see page 33). "Change message alert" Options: On / Off When on, the telephone beeps every 10 seconds when - Vtech ATT E2525 | User Manual - Page 31
ATT-2525CIB-d2.qxd 12/30/2003 6:29 PM Page 29 Number of messages waiting (or, during playback, message number • Press PLAY/STOP to stop playback. To delete all messages To delete all messages, press and hold DELETE while the phone is idle (not during a call, or during message playback). 29 - Vtech ATT E2525 | User Manual - Page 32
messages" MESSAGE PLAYBACK PRESS OFF TO END < DEL > Repeat Delete Skip Answering System Operation Message playback (at handset) Follow the steps at left to use your handset to review or delete voice messages. Listening options When you select PLAY MESSAGES you will hear messages through the - Vtech ATT E2525 | User Manual - Page 33
ATT-2525CIB-d2.qxd 12/30/2003 6:30 PM Page 31 12 Elapsed recording time (seconds) Press to stop recording 1 RECORD "Now recording..." 2 Speak into microphone - Vtech ATT E2525 | User Manual - Page 34
ATT-2525CIB-d2.qxd 12/30/2003 6:30 PM Page 32 12 Message window (Flashes when new messages are waiting) Answering System Operation Message window displays - Vtech ATT E2525 | User Manual - Page 35
ATT-2525CIB-d2.qxd 12/30/2003 6:30 PM Page 33 1 Dial your telephone number from any touch-tone phone 2 When system answers, enter 2- digit #9 Press during playback to delete current message. Review announcement #7 Press to review current outgoing announcement. Record announcement *7to begin - Vtech ATT E2525 | User Manual - Page 36
ATT-2525CIB-d2.qxd 12/30/2003 6:30 PM Page 34 Appendix Display screen status icons HANDSET 1 REDIAL MENU MEM Handset status icons Phone in use (external call) Phone in use (intercom call); flashes when handset is being paged Battery power level (see below) Ringer off T Answering system is - Vtech ATT E2525 | User Manual - Page 37
ATT-2525CIB-d2.qxd 12/30/2003 6:30 PM Page 35 Appendix Alert tones and indicator lights Alert tones "Beep-Beep-Beep-Beep-Beep" Handset battery is low. Place handset in (5 quick beeps) base to charge the battery. "Beep" (Single beep) Handset registration or programming command successfully - Vtech ATT E2525 | User Manual - Page 38
ATT-2525CIB-d2.qxd 12/30/2003 6:30 PM Page 36 Appendix Adding new handsets Your telephone can accommodate up to eight cordless handsets . You can add new handsets (Model E250, sold separately) at any time, but each must be registered with the base before use. Enter base ID, then press OK R ENTER - Vtech ATT E2525 | User Manual - Page 39
the base will allow you to make and receive calls from the cordless handset for up to 2.5 hours. Spare batteries require at least 24 hours to reach full charge. Slide latch left to open battery drawer Insert spare batteries, then close drawer Caution: Use only AT&T AA NiCad or NiMH rechargeable - Vtech ATT E2525 | User Manual - Page 40
phone, please try the suggestions below. For Customer Service, visit our web site at www.telephones.att.com, or call 1 800 222-3111. Telephone does not work at all • Make sure batteries batteries, then place the handset in the base to re-initialize. Phone , try placing the handset in the base for - Vtech ATT E2525 | User Manual - Page 41
ATT-2525CIB-d2.qxd 12/30/2003 6:30 PM Page 39 Appendix In case of difficulty If you lose a call while using the handset • You were probably out of range. Move closer to the base. Before placing another call, set the handset may be noise or interference on the phone line you are using. Press dial- - Vtech ATT E2525 | User Manual - Page 42
options, 28 handset access, 30 outgoing announcement, 26 memos, 31 message window, 32 play messages, 29, 30 remote access, 33 remote access code, 28, 33 Antenna, 7 B Battery charging, 7, 37 Battery installation, 7 Belt clip, 9 C Call logs, 21-23 Caller ID, 5, 21 add entries to phone directory, 22 - Vtech ATT E2525 | User Manual - Page 43
ATT ), 29, 30 Problems, 38 Q Quick reference guide, 2-3 R Receiving batteries, 37 Speakerphone, 10, 11 T Technical specifications, 42 Time, 16, 25 Timers, recording announcement, 26 recording memo, 31 Tones, base tones & alerts, 35 handset tones & alerts, 35 send tones during call, 12 Troubleshooting - Vtech ATT E2525 | User Manual - Page 44
ATT-2525CIB-d2.qxd 12/30/2003 6:30 PM Page 42 Appendix Technical specifications RF Frequency Band (Handset to Base) RF Frequency Band (Base to Handset) Channels Channel Spacing Output Power Operating Temperature Base Unit Voltage (AC Voltage, 60Hz) Base Unit Voltage (AC Adapter Output) Handset - Vtech ATT E2525 | User Manual - Page 45
ATT the card below. Cut along dotted line Fold here Call your phone number, then enter your 2-digit access code (preset to 19). Hang up #9 Delete message while message plays #7 Review announcement *7 Record announcement speak after beep #5 Cordless Speakerphone/Answering System E2525 - Vtech ATT E2525 | User Manual - Page 46
ATT-2525CIB-d2.qxd 12/30/2003 6:30 PM Page 44 - Vtech ATT E2525 | User Manual - Page 47
ATT-2525CIB-d2.qxd 12/30/2003 6:30 PM Page 45 - Vtech ATT E2525 | User Manual - Page 48
ATT-2525CIB-d2.qxd 12/30/2003 6:30 PM Page 46 www.telephones.att.com Copyright © 2003 Advanced American Telephones. All Rights Reserved. AT&T and the Globe Design are trademarks of AT&T Corporation, licensed to Advanced American Telephones. Printed in China. Issue 1.2 AT&T 12/30/03. - Vtech ATT E2525 | User Manual - Page 49
- Vtech ATT E2525 | User Manual - Page 50
- Vtech ATT E2525 | User Manual - Page 51
ATT-250CIB-d1.qxd 12/30/2003 2:02 PM Page 1 User Manual (Part 2) 2.4 GHz Expansion Handset E250 For use with AT&T models E2555 • E2525 • E2600B - Vtech ATT E2525 | User Manual - Page 52
d1.qxd 12/30/2003 2:02 PM Page 2 STOP! You must charge batteries and register the handset before use See pages 2-3 for easy instructions For customer service or product information, visit our web site at www.telephones.att.com or call 1-800-222-3111 Please also read Important Product Information - Vtech ATT E2525 | User Manual - Page 53
is disconnected. Parts checklist Remember to save your sales receipt and original packaging in case you ever need to ship your telephone for warranty service. Check to make sure the telephone package includes the following: Telephone handset Belt clip Power adapter Batteries Handset charger 1 - Vtech ATT E2525 | User Manual - Page 54
ATT-250CIB-d1.qxd 12/30/2003 2:03 PM Page 2 Battery installation & charging Install batteries as shown, then place the handset in the charger for at least 8 hours before use. You can keep batteries charged by returning the handset to the charger after each use. When battery power is fully depleted, - Vtech ATT E2525 | User Manual - Page 55
ATT-250CIB-d1.qxd 12/30/2003 2:03 PM Page 3 Registering the handset Enter base ID, then press OK ENTER BASE ID 123456789012345 < OK HANDSET 2 REDIAL MENU MEM Before using your new handset, you must register it with the base. During registration, you must enter the 15-digit ID number of the - Vtech ATT E2525 | User Manual - Page 56
ATT-250CIB-d1.qxd 12/30/2003 2:03 PM Page 4 Belt clip & optional headset Install belt clip as shown below mm headset (purchased separately). For best results use an AT&T 2.5 mm headset. Snap belt clip into notches on side of handset. Rotate and pull to remove. Plug 2.5 mm headset into jack on side of - Vtech ATT E2525 | User Manual - Page 57
ATT-250CIB-d1.qxd 12/30/2003 2:03 PM Page 5 Quick reference guide For complete instructions, please refer to the manual provided with your telephone. Softkeys Press a softkey to select a menu item displayed just above the key. Phone . Speaker Press to activate handset speakerphone. Press again to - Vtech ATT E2525 | User Manual - Page 58
ATT-250CIB-d1.qxd 12/30/2003 2:03 PM Page 6 www.telephones.att.com Copyright © 2003 Advanced American Telephones. All Rights Reserved. AT&T and the Globe Design are trademarks of AT&T Corporation, licensed to Advanced American Telephones. Printed in China. Issue 1.1 AT&T 12/30/03. - Vtech ATT E2525 | User Manual - Page 59
- Vtech ATT E2525 | User Manual - Page 60
-
 1
1 -
 2
2 -
 3
3 -
 4
4 -
 5
5 -
 6
6 -
 7
7 -
8
-
9
-
10
-
11
-
12
-
13
-
14
-
15
-
16
-
17
-
18
-
19
-
20
-
21
-
22
-
23
-
24
-
25
-
26
-
27
-
28
-
29
-
30
-
31
-
32
-
33
-
34
-
35
-
36
-
37
-
38
-
39
-
40
-
41
-
42
-
43
-
44
-
45
-
46
-
47
-
48
-
49
-
50
-
51
-
52
-
53
-
54
-
55
-
56
-
57
-
58
-
59
-
60
 |
 |
User Manual (Part 2)
2.4 GHz Cordless
Telephone/Answering
System E2525
with Caller ID & Call Waiting
ATT-2525CIB-d2.qxd
12/30/2003
6:26 PM
Page 1