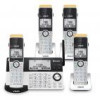
Vtech IS8151-4 Users Manual - Page 7
Before use
 |
View all Vtech IS8151-4 manuals
Add to My Manuals
Save this manual to your list of manuals |
Page 7 highlights
Install and charge the battery Install the battery Install the battery as shown below. THIS SIDE UP Once you have installed the battery, the handset LCD display indicates the battery status (see the following table). NOTES • For best performance, keep the handset in the telephone base or charger when not in use. • The battery is fully charged after 12 hours of continuous charging. • If you place the handset in the telephone base or the charger without plugging in the battery, the screen displays No battery. Battery indicators The screen is blank, or displays Place in charger and flashes. Battery status The battery has no or very little charge. The handset cannot be used. Action Charge without interruption (at least 30 minutes). MadNeEiDPnOACWSNhIiAOBnNRTTaCNI1/IBB8NaNFUt3ÉtaG3ReRb/4rNrEi2y/AqROVBPuRETaOé2cRPUTe8kTUIn3/HPI3NScEB4SSlChRi2oTECn(ScUIM-e2E.RpEDR4ilENEVeLTBs4E:U:0ASPT0P/TImELACREhIESE.NiSC-.ÔMTH)É VERS LE HAUT CR1952 MadNeEiDPnOACWSNhIiAOBnNRTTaCNI1/IBB8NaNFUt3ÉtaG3ReRb/4rNrEi2y/AqROVBPuRETaOé2cRPUTe8kTUIn3/HPI3NScEB4SSlChRi2oTECn(ScUIM-e2E.RpEDR4ilENEVeLTBs4E:U:0ASPT0P/TImELACREhIESE.NiSC-.ÔMTH)É VERS LE HAUT CR1952 The screen displays The battery has Low battery and flashes. enough charge to be used for a short time. Charge without interruption (about 30 minutes). The screen displays The battery is HANDSET X. charged. To keep the battery charged, place it in the telephone base or charger when not in use. NOTES • Use only supplied battery. • Charge the battery provided with this product only in accordance with the instructions and limitations specified in this manual. • If the handset will not be used for a long time, disconnect and remove the battery to prevent possible leakage. Charge the battery Place the handset in the telephone base or the charger to charge. When the battery is fully charged, you can expect the following performance: Operation Operating time While in use (talking*) 15 hours While not in use (standby**) 10 days * Operating times vary depending on your actual use and the age of the battery. ** Handset is not charging nor in use. 12 hrs Install belt clip To attach the belt clip Snap the belt clip into the slots on both sides of the cordless handset. To remove the belt clip Lift either of the belt clip tabs outwards from the handset. Improve the telephone signal strength > 1 m (3 feet) (3 feet) TV > 1 m > 1 m (3 feet) Before use After you install your telephone or power returns following a power outage and battery depletion, the handset and telephone base will prompt you to set the date and time, and to configure the Smart call blocker* and answering system through voice guide. Set date and time NOTE • Make sure you set the date and time including the year correctly; otherwise the answering system does not announce the correct day of the week for your recorded messages time stamp. 1. Use the dialing keys (0-9) to enter the month (MM), date (DD) and year (YY). Then press NEXT . 2. Use the dialing keys (0-9) to enter the hour (HH) and minute (MM). Then press q CID or p to choose AM or PM. 3. Press SAVE to save. Voice guide for Smart call blocker* / Answering system After the date and time setting is done or skipped, the handset and the telephone base will prompt if you want to set Smart call blocker. Press YES to start the Smart call blocker setup via voice guide. For more details, see Voice guide to set Smart call blocker section. To skip the setup, press NO, or press CANCEL on the handset or telephone base, and then press OK . After the Smart call blocker setting is done or skipped, the handset and the telephone base will then prompt if you want to set up the answering system. Press YES to start the answering system setup via voice guide. For more details, see Voice guide to set Answering system section. To skip the setup, press NO, or press CANCEL on the handset or telephone base, and then press OK . Check for dial tone Press HOME. If you hear a dial tone, the installation is successful. If you do not hear a dial tone: • Make sure the installation procedures described above are properly done. • It may be a wiring problem. If you have changed your telephone service to digital service from a cable company or a VoIP service provider, the telephone line may need to be rewired to allow all existing telephone jacks to work. Contact your cable/VoIP service provider for more information. NOTE • To avoid interference, place the telephone base in a central location of the house and at least 3 feet (1 meter) away from thick walls as well as other household appliances such as, TV, radio, microwave oven, Wi-Fi router, large mirror, metal furnture and fish tank. *Includes licenced QaltelTM technology. QaltelTM is a trademark of Truecall Group Limited. 6 7
-
 1
1 -
 2
2 -
 3
3 -
 4
4 -
 5
5 -
 6
6 -
 7
7 -
 8
8 -
 9
9 -
 10
10 -
 11
11 -
 12
12 -
13
-
14
-
15
-
16
-
17
-
18
-
19
-
20
-
21
-
22
-
23
-
24
-
25
-
26
-
27
-
28
-
29
-
30
-
31
-
32
-
33
-
34
-
35
-
36
-
37
-
38
-
39
-
40
 |
 |
