Weider 20ct English Manual - Page 20
Trouble-shooting And Maintenance
 |
View all Weider 20ct manuals
Add to My Manuals
Save this manual to your list of manuals |
Page 20 highlights
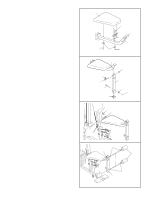
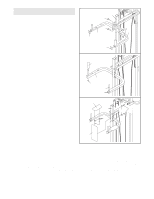
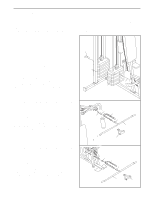
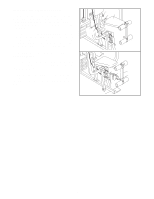
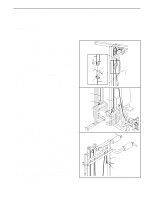
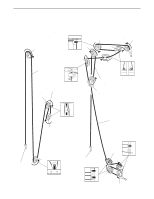
TROUBLE-SHOOTING AND MAINTENANCE Make sure all parts are properly tightened each time you use the weight system. Replace any worn parts immediately. The weight system can be cleaned using a damp cloth and mild non-abrasive detergent. Do not use solvents. TIGHTENING THE CABLES Woven cable, the type of cable used on the weight system, can stretch slightly when it is first used. If there is slack in the cables before resistance is felt, the cables should be tightened. Tightening the Medium and Short Cables 1 If any slack is felt when using the front weight stack, both the Medium Cable (58) and the Short Cable (23) will need to be tightened. Insert the weight pin into the middle of the weight stack. Slack can be removed from these cables three ways: 58 15 • See drawing 1. Tighten the 1/4" Nylon Locknut (2) that connects the end of the Short Cable (23) to the Long "U"-Bracket (57). • See drawing 1. Remove the 3/8" Nylon Locknut (21) and the 3/8" x 2" Bolt (12) from the 3 1/2" Pulley (15), Cable Trap (66), and Long "U"-Bracket (57). Re-attach the Pulley and Cable Trap to the lower hole in the Long "U"-Bracket. Be sure that the Cable Trap is in the proper position and that the Cable and Pulley move smoothly. 66 21 2 2 72 57 12 23 • See drawing 2. Tighten the 1/4" Nylon Locknut (2) 58 that connects the end of the Medium Cable (58) to 71 the Small "U"-Bracket (71). Tightening the Long Cable If any slack is felt when using the rear weight stack, the Long Cable (72) will need to be tightened. Insert the weight pin into the middle of the weight stack. Slack can be removed from this cable two ways: 2 71 2 • See drawing 2. Tighten the 1/4" Nylon Locknut (2) that connects the end of the Long Cable (72) to the Small "U"-Bracket (71). 3 • See drawing 3. Remove the 3/8" Nylon Locknut (21) and the 3/8" x 5" Bolt (not shown) from the "V"-Pulley (50) and Long Cable Trap (not shown). Re-attach the Pulley and Cable Trap to a lower hole in the Squat Upright (56). Be sure that the Cable Trap is in the proper position and that the Cable and Pulley move smoothly. 56 Do not overtighten the cables. The top weight will 21 be lifted off the weight stack. 50 Note: If a cable tends to slip off the pulleys often, the cable may have become twisted. Remove the cable and re-install it. If the cables need to be replaced, see ORDERING REPLACEMENT PARTS on the back cover of this manual. 20
-
 1
1 -
2
-
3
-
4
-
5
-
6
-
7
-
8
-
9
-
10
-
11
-
12
-
13
-
14
-
 15
15 -
 16
16 -
 17
17 -
 18
18 -
 19
19 -
 20
20 -
 21
21 -
 22
22 -
 23
23 -
 24
24 -
 25
25 -
26
-
27
 |
 |
