Weider 3550 User Manual - Page 9
end of a Weight Tube 43. Insert the Weight Tube
 |
View all Weider 3550 manuals
Add to My Manuals
Save this manual to your list of manuals |
Page 9 highlights
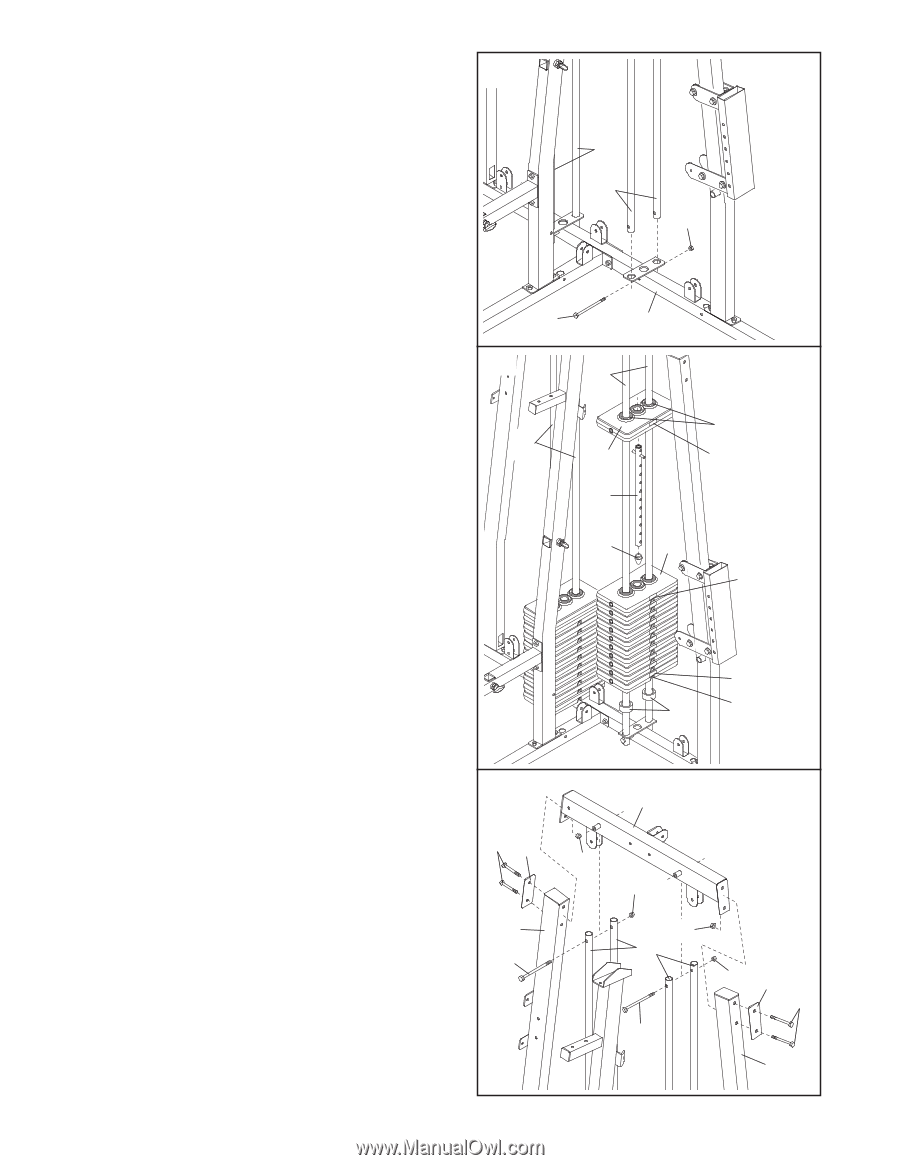
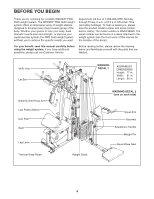
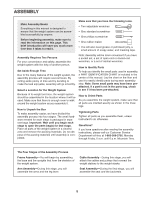
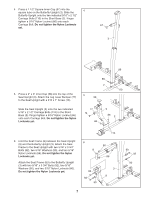
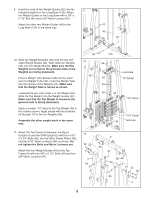
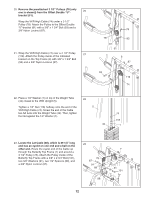
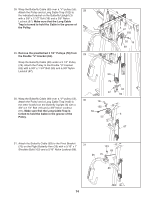
9. Insert the ends of two Weight Guides (42) into the 9 indicated bracket on the Long Base (120). Attach the Weight Guides to the Long Base with a 3/8" x 6 1/2" Bolt (95) and a 3/8" Nylon Locknut (87). Attach the other two Weight Guides (42) to the Long Base (120) in the same way. 42 42 87 10. Slide two Weight Bumpers (49) onto the two indicated Weight Guides (42). Next, slide ten Weights (44) onto the Weight Guides. Make sure that the Weights are turned so the grooved sides of the Weights are facing downward. Press a Weight Tube Bumper (48) into the lower end of a Weight Tube (43). Insert the Weight Tube into the centers of the Weights (44). Make sure that the Weight Tube is turned as shown. Lubricate the two outer holes in a Top Weight (45). Slide the Top Weight onto the Weight Guides (42). Make sure that the Top Weight is turned so the grooved side is facing downward. Apply a number "10" decal to the Top Weight (45) in the location shown. Apply decals with the numbers 20 through 110 to the ten Weights (44). Assemble the other weight stack in the same way. 95 10 42 120 42 Lubricate 45 "10" Decal 43 48 44 "20" Decal "110" Decal 49 Grooves 11. Attach the Top Frame (6) between the Squat Upright (4) and the VKR Upright (5) with four 5/16" x 3 3/4" Bolts (92), the two Short Frame Plates (52), and two 5/16" Nylon Locknuts (86) as shown. Do not tighten the Bolts and Nylon Locknuts yet. Attach the four Weight Guides (42) to the Top Frame (6) with two 3/8" x 6 1/2" Bolts (95) and two 3/8" Nylon Locknuts (87). 11 92 52 5 95 6 86 87 86 42 95 87 52 92 4 9
-
 1
1 -
2
-
3
-
 4
4 -
 5
5 -
 6
6 -
 7
7 -
 8
8 -
 9
9 -
 10
10 -
 11
11 -
 12
12 -
 13
13 -
 14
14 -
15
-
16
-
17
-
18
-
19
-
20
-
21
-
22
-
23
-
24
-
25
-
26
-
27
-
28
-
29
-
30
-
31
-
32
-
33
 |
 |