Weider Cts 2000 Club Series English Manual - Page 13
qFi>
 |
View all Weider Cts 2000 Club Series manuals
Add to My Manuals
Save this manual to your list of manuals |
Page 13 highlights
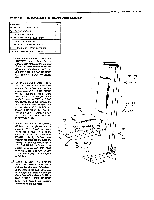
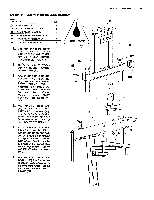
u Press the pointed RUBBER SELECTOR TUBE END PLUG (99) into the bottom end of the SELECTOR TUBE (11) and insert the Selector Tube into the center hole of the WEIGHT PLATES (10). • Turn the Selector Tube so that the Roll Pin sits into the groove in the top Weight Plate. Press PLASTIC GUIDE BUSHINGS (114) into the Guide Rod holes in the 20 LB. WEIGHT PLATE (113) (SEE DETAIL A) and fit it onto the GUIDE RODS (9) and atop the Weight Stack. NOTE: At this time, check to make sure all Plates are properly oriented so that the Selector Pin can be pinned at each Plate. u Assemble the PLASTIC GUIDE BRACKET (41) onto the top of the Weight Stack and fit around the top of the SELECTOR TUBE (11). Insert the WEIGHT SELECTOR PIN (100) into the Weight Stack at the bottom Plate until assembly is complete and the Cable system has been adjusted for proper tensioning. Remove the WEIGHT PLATE DECALS (123) from the backing sheet and affix to the edge of the WEIGHT PLATES (10) and (113) just to the side of the WEIGHT SELECTOR PIN (100) hole. Decals should progress from the lightest Weight on the top Plate to the heaviest Weight at the bottom. 9 41 0 0 0 113 11 0 o- 99 PAGE 16 WEIDER SPORTING GOODS 114 qFi> 113 19* DETAIL A 2 O O O O O O O C9 10 123 100 FRONT
-
 1
1 -
2
-
3
-
4
-
5
-
6
-
7
-
 8
8 -
 9
9 -
 10
10 -
 11
11 -
 12
12 -
 13
13 -
 14
14 -
 15
15 -
 16
16 -
 17
17 -
 18
18 -
19
-
20
-
21
-
22
-
23
-
24
-
25
-
26
 |
 |
