Weider Cts 2000 Club Series English Manual - Page 16
Washer, Nylon, Square, Plastic, Insert, Round
 |
View all Weider Cts 2000 Club Series manuals
Add to My Manuals
Save this manual to your list of manuals |
Page 16 highlights
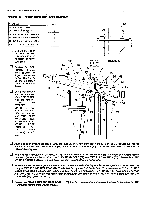
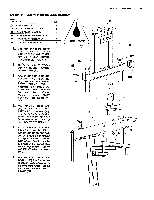
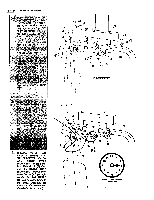
PAGE 19 WEIDER SPORTING GOODS STEP 6 LEG EXTENSION ASSEMBLY PART NAME QTY u Cap the bottom end of the LEG EXTENSION (19) with a 1 1/2" 49 5/16" X 2" EYE-BOLT 1 SQUARE PLASTIC CAP (84) and bolt the LEG EXTENSION (19) to 50 5/16" FLAT WASHER 51 5/16" NYLON LOCK NUT 52 5/16" X 2 1/4" HEX HEAD BOLT 1 the bolt hole location at the end of the SEAT FRAME (14) with a 2 5/16" X 2 1/4" HEX HEAD BOLT (52). Secure with a 5/16" NYLON LOCK NUT (51). Do not over tighten so that the Leg Extension will i be able to swing freely.. 84 1 1/2" SQUARE PLASTIC INSERT CAP 1 85 3/4" ROUND PLASTIC INSERT CAP 4 18 _,- 85 _17 85 14 20 51 85 22 19 C 0 O 85 52 49 18 e 50 51 84 ft) 20 Press a 314" ROUND INSERT CAP (85) Into the ends ofa 314" X 13 1/2" LONG PAD BAR (17). Wipe a smallamount of liquid dish detergent along the length of the Pad Bar. This will help in the assembly of the Foam Rollers. When the detergent dries, it willalso act as an adhesive. Insert the PadBarinto a 2 1/4" X 6" FOAM ROLLER (18). Insert a 3/4" ROUND PLASTIC INSERT CAP (85) Into each end of a 3/4" X 13" LONG ROUND PAD BAR (22). Wipe a smallamount ofliquid dish detergent along the length ofthe PadBar andpush into a 3" X 51/2" FOAM ROLLER (20). Insert the Pad Bar assembly into the larger access hole at the end of the SEAT FRAME (14) and slide on a second 2 1/4" X 6" FOAM ROLLER (18). u Insert the Pad Bar assembly into the bottom section of the LEG EXTENSION (19) and slide on another 3" X 5 1/2" FOAM ROLLER (20). : 6 ; c: e 1' /.0,..,j-A0. .1 • • ( 0 0 Tighten the 3 1/4" EYE-BOLT (49) pre-assembledinto the bottom ofthe LEG EXTENSION (19).
-
 1
1 -
2
-
3
-
4
-
5
-
6
-
7
-
8
-
9
-
10
-
 11
11 -
 12
12 -
 13
13 -
 14
14 -
 15
15 -
 16
16 -
 17
17 -
 18
18 -
 19
19 -
 20
20 -
 21
21 -
22
-
23
-
24
-
25
-
26
 |
 |
