Weider E2000 English Manual - Page 20
How to Use the Weight System - exercise station
 |
View all Weider E2000 manuals
Add to My Manuals
Save this manual to your list of manuals |
Page 20 highlights
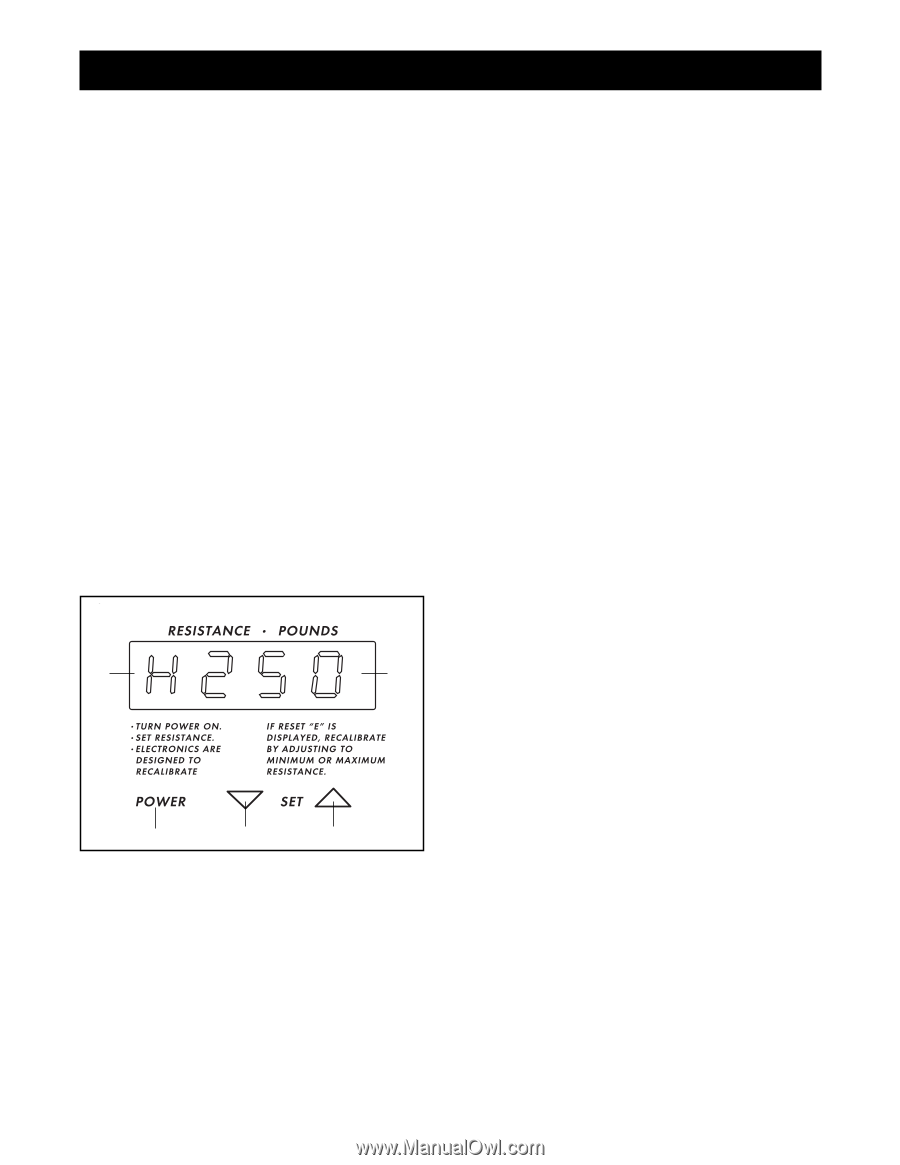
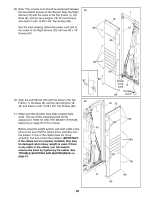
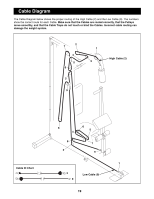
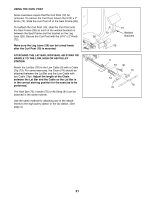
How to Use the Weight System The instructions below describe how each part of the weight system can be adjusted. Refer to the exercise posterS on the shroud and accompanying this manual to see how the weight system should be set up for each exercise. IMPORTANT: When attaching the lat bar or ankle strap, make sure that the attachments are in the correct starting position for the exercise to be performed. If there is any slack in the cables or chain as an exercise is performed, the effectiveness of the exercise will be reduced. PLUGGING IN THE POWER CORD Plug in the power cord to a 120-volt outlet. Keep the power cord away from walkways and heated surfaces. Turn on the power when using the weight system, or the weight system could be damaged. When you are finished using the weight system, always unplug the power cord. IMPORTANT: To prevent damage to the weight system, do not put any tension on the system while changing the weight. Do not push on the press arm, butterfly arms, or leg lever while adjusting the weight. If the lat or row bar is attached to the weight system, it may be helpful to support the weight of the bar with one hand while adjusting the weight. If at any time during console adjustment the motor binds or hesitates, stop running the console and refer to steps 38a to 38g on pages 16 and 17 to adjust the weight mechanism. DIAGRAM OF THE CONSOLE 2. Weight DisplayÑDisplays the current weight setting. 3. Power ButtonÑTurns the power on or off. 4. Weight Decrease ButtonÑDecreases the weight. 5. Weight Increase ButtonÑIncreases the weight. TURNING ON THE POWER AND RESETTING THE WEIGHT SYSTEM Press the power button. IMPORTANT: Each time the power is turned on, the console must be reset before the weight can be changed. The weight display will read ÒE---.Ó To reset the weight system, press the weight increase or decrease buttons until the display reads ÒH250Ó (maximum weight) or ÒL30Ó (minimum weight). See adjustment steps 38a to 38g on pages 16 and 17 if the motor binds or hesitates while resetting the console. CHANGING THE WEIGHT SETTING The weight can be changed from a minimum of 30 1 2 pounds, to a maximum of 250 pounds, in increments of 1 pound. To increase the weight, press the weight increase button. To decrease the weight, press the weight decrease button. The buttons can be held down to change the weight quickly. 3 4 5 1. Low/High Range IndicatorÑShows when the weight system is set at minimum or maximum weight for the press station. Note: The resistance has been maximized on the arm press and butterfly stations. The resistance shown on the console approximates the resistance in pounds. However, the ab station, low and high pulleys, and leg lever readings must be estimated by dividing the console reading in half to give you a reading in pounds. 20
-
 1
1 -
2
-
3
-
4
-
5
-
6
-
7
-
8
-
9
-
10
-
11
-
12
-
13
-
14
-
 15
15 -
 16
16 -
 17
17 -
 18
18 -
 19
19 -
 20
20 -
 21
21 -
 22
22 -
 23
23 -
 24
24 -
 25
25 -
26
-
27
-
28
 |
 |