Weider Pro 4950 English Manual - Page 25
Make sure the Adjustment Knob
 |
View all Weider Pro 4950 manuals
Add to My Manuals
Save this manual to your list of manuals |
Page 25 highlights
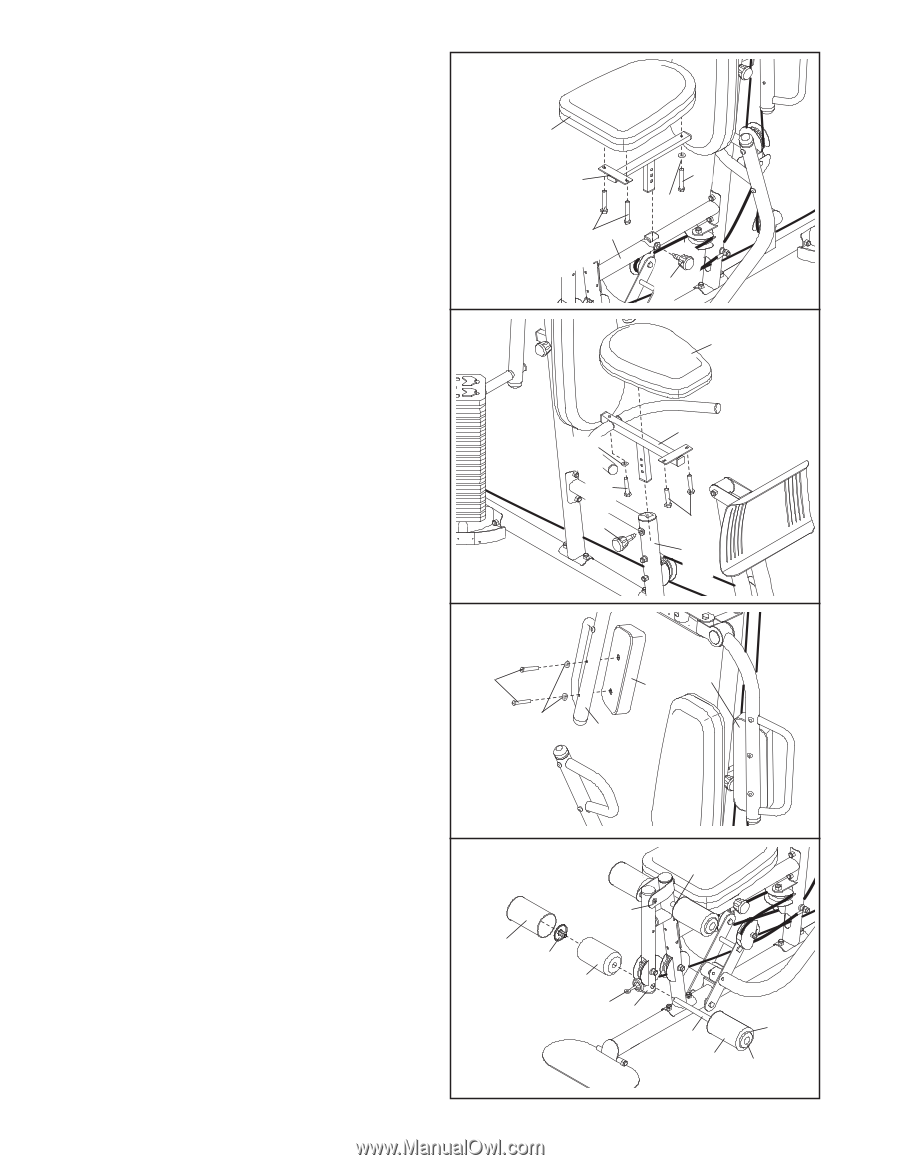
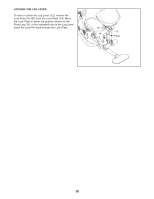
58. Attach the Right Seat (32) to the Right Seat 58 Frame (8) with two M6 x 16mm Screws (88), an M6 x 32mm Screw (89), and an M6 Washer (114). Insert the Right Seat Frame (8) into the Right Frame (9). Tighten the Seat Adjustment Knob (52) into the Right Frame and the Right Seat Frame. Make sure the Adjustment Knob passes through one of the holes in the Right Seat Frame. 59. Attach the Left Seat (129) to the Left Seat 59 Frame (125) with two M6 x 16mm Screws (88), an M6 x 45mm Screw (145), and an M6 Washer (114). Insert the Left Seat Frame (125) into the Left Frame (122). Tighten a Backrest Adjustment Knob (53) into the Left Frame and the Left Seat Frame. Make sure the Adjustment Knob passes through one of the holes in the Left Seat Frame. 32 8 88 9 89 114 52 129 114 145 53 125 88 122 60. Attach the Right Butterfly Pad (35) to the Right Butterfly Arm (26) with two M6 x 60mm Button Screws (91) and two M6 Washers (114). Repeat this step for the Left Butterfly Pad (34). 60 91 114 34 35 26 61. Insert a Pad Tube (13) through the indicated hole in the Leg Lever (12). Slide a Foam Pad (36) onto each end of the Pad Tube. Note: Lift the Leg Lever Cable (51) when inserting a Pad Tube through the hole in the bottom of the Leg Lever. Press a Pad Cap (37) into an end of each Foam Pad (36) and slide a Foam Cover (143) onto each Foam Pad. Repeat this step for the other Pad Tube (13) and the Front Leg (10). 61 10 143 37 36 51 12 13 13 143 36 37 25
-
 1
1 -
2
-
3
-
4
-
5
-
6
-
7
-
8
-
9
-
10
-
11
-
12
-
13
-
14
-
15
-
16
-
17
-
18
-
19
-
 20
20 -
 21
21 -
 22
22 -
 23
23 -
 24
24 -
 25
25 -
 26
26 -
 27
27 -
 28
28 -
 29
29 -
 30
30 -
31
-
32
-
33
-
34
-
35
-
36
-
37
-
38
-
39
-
40
-
41
-
42
-
43
-
44
 |
 |