Weider Pro 5000 Uk Manual - Page 7
Insert the Weight Tube 11 into a Weight 17.
 |
View all Weider Pro 5000 manuals
Add to My Manuals
Save this manual to your list of manuals |
Page 7 highlights
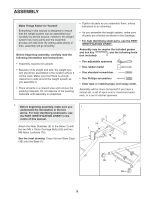
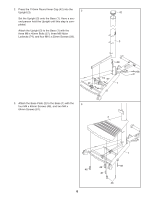
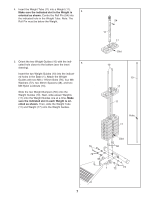
4. Insert the Weight Tube (11) into a Weight (17). Make sure the indicated slot in the Weight is 4 oriented as shown. Centre the Roll Pin (54) into the indicated hole in the Weight Tube. Note: The Roll Pin must be below the Weight. 5. Orient the two Weight Guides (10) with the indi- 5 cated hole closer to the bottom (see the inset drawing). Insert the two Weight Guides (10) into the indicated holes in the Base (1). Attach the Weight Guides with two M8 x 115mm Bolts (76), four M8 Washers (72), two 38mm Spacers (48), and two M8 Nylon Locknuts (74). Slide the two Weight Bumpers (50) onto the Weight Guides (10). Next, slide eleven Weights (17) onto the Weight Guides one at a time. Make sure the indicated slot in each Weight is oriented as shown. Then, slide the Weight Tube (11) and Weight (17) onto the Weight Guides. 54 11 17 Slot 10 10 17 11 Hole 17 Slot 76 50 72 48 1 72 74 7
-
 1
1 -
 2
2 -
 3
3 -
 4
4 -
 5
5 -
 6
6 -
 7
7 -
 8
8 -
 9
9 -
 10
10 -
 11
11 -
 12
12 -
13
-
14
-
15
-
16
-
17
-
18
-
19
-
20
-
21
-
22
-
23
-
24
 |
 |
