Weider Pro 545 English Manual - Page 10
Nylon Locknut. Note: The heads of the Carriage
 |
View all Weider Pro 545 manuals
Add to My Manuals
Save this manual to your list of manuals |
Page 10 highlights
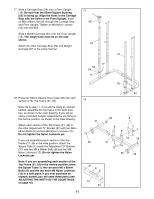
14. Insert a Weight Rest (37) into each Rear Upright 14 (19). Be sure that the Weight Rests are inserted at the same level on both sides. 37 19 19 37 15. Slide a Front Upright (18) onto the indicated M8 x 58mm Carriage Bolts (6) in either section of the Base (20, 55). A second person must hold the Upright at the location shown during the step. Partially tighten an M8 Nylon Locknut (12) onto each Carriage Bolt but do not fully tighten the Nylon Locknut. Note: The heads of the Carriage Bolts must lock into the square holes in each section of the Base in order to tighten the Nylon Locknuts; you may need to slide your fingers under the Base to hold the Carriage Bolts in place while you partially tighten the Nylon Locknuts. Assemble the other Front Upright (18) in the same manner. 15 18 12 A second person must hold each Upright here while the Nylon Locknuts are attached 18 20 6 12 16. Press two 60mm Square Bushings (53) into a Weight Carriage (52). Press a 1" Round Inner Cap (41) into the Weight Carriage. Assemble the other Weight Carriage (52) in the same manner. Press a 60mm Square Bushing (53) into the Carriage Stop (54). The drilled hole in the Square Bushing must be aligned with the drilled hole in the Carriage Stop. 16 41 52 53 55 53 6 53 54 Align these holes 10
-
 1
1 -
2
-
3
-
4
-
 5
5 -
 6
6 -
 7
7 -
 8
8 -
 9
9 -
 10
10 -
 11
11 -
 12
12 -
 13
13 -
 14
14 -
 15
15 -
16
-
17
-
18
-
19
-
20
-
21
-
22
-
23
-
24
 |
 |
