WestBend 41047 Instruction Manual - Page 12
Crust Color And, Thickness, Pan Problems, Machine Mechanics
 |
View all WestBend 41047 manuals
Add to My Manuals
Save this manual to your list of manuals |
Page 12 highlights
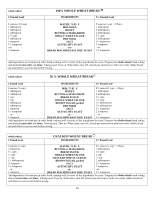
5. Gnarly, knotted top, not smooth. 6. Collapsed while baking. 7. Loaf uneven. 8. Heavy, dense texture. 9. Open, coarse, holey texture. -Not enough liquid. -Too much flour. -Tops may not all be perfectly shaped, but will not affect flavor. -May be caused by high altitude. -Exceeding capacity of bread pan. -Not enough salt used or omitted. -Too much yeast or wrong type used. -Warm, humid weather. -Dough too dry and not allowed to rise evenly in pan. BREAD TEXTURE -Too much flour. -Not enough yeast. -Not enough sugar. -Salt omitted. -Too much yeast. -Too much liquid. -Increase liquid by 1 tablespoon. -Measure flour accurately, leveling off measuring cup. See pg.5. -Having dough at proper condition is key to perfect loaves. See pg. 3. -See "High Altitude" section on pg. 6. -Do not use more ingredients than recommended for 1½ pound loaf. -Use amount recommended in recipe. -Measure right type of yeast accurately. -Reduce liquid by 1 tablespoon and reduce yeast by ¼ to ½ teaspoon. -Increase liquid by 1 tablespoon. -Measure accurately. See pg. 5. -Measure recommended amount. -Measure accurately. See pg. 5 -Add ingredients as listed in recipe. -Measure recommended amount. -Reduce liquid by 1 tablespoon. 10. Center of loaf is -Too much liquid. raw, not baked through. -Power outage during operation. -Forgot to put knead bar in pan. 11. Doesn't slice well, -Sliced while too hot. very sticky. -Not using proper knife. 12. Dark crust color/too thick. 13. Loaf is burned. CRUST COLOR AND THICKNESS -DARK crust setting used. -Bread maker malfunctioning. 14. Crust too light. -Bread not baked long enough. 15. Knead bar cannot be -Water must be added to bread pan for knead removed. bar to soak before it can be removed. -Reduce liquid by 1 tablespoon. -Bread maker will turn off automatically if power not restored within 10 seconds. You must remove the unbaked loaf and start over with fresh ingredients. -Always put knead bar on shaft in pan before adding ingredients. -Let cool on rack 15 to 30 minutes. -Use a good bread knife or electric knife. -Use LIGHT or MEDIUM crust color setting the next time. -See Warranty section for servicing. -Use darker crust color setting. -Follow cleaning instructions after use. You may need to twist bar slightly after soaking to loosen. PAN PROBLEMS 16.Bread sticks to pan/difficult to shake out. -Can happen over prolonged use. 17. Ingredients not mixed. MACHINE MECHANICS -Did not start bread maker. -Forgot to put knead bar in pan. 12 -Wipe inside of bread pan, from ribs down, lightly with vegetable oil or solid shortening. Or, add 1 teaspoon vegetable oil to liquid in pan before adding dry ingredients. Do not use a vegetable spray as sticking can worsen. Or, let bread sit in pan 10 minutes before shaking out. -Replacement pan may be ordered. See Warranty section. -After programming control panel, press start/stop button. -Knead bar must be on shaft in bottom of pan before adding ingredients.
-
 1
1 -
2
-
3
-
4
-
5
-
6
-
 7
7 -
 8
8 -
 9
9 -
 10
10 -
 11
11 -
 12
12 -
 13
13 -
 14
14 -
 15
15 -
 16
16 -
 17
17 -
18
-
19
-
20
-
21
 |
 |
