WestBend 41088 Instruction Manual - Page 14
Basic, Steps
 |
View all WestBend 41088 manuals
Add to My Manuals
Save this manual to your list of manuals |
Page 14 highlights
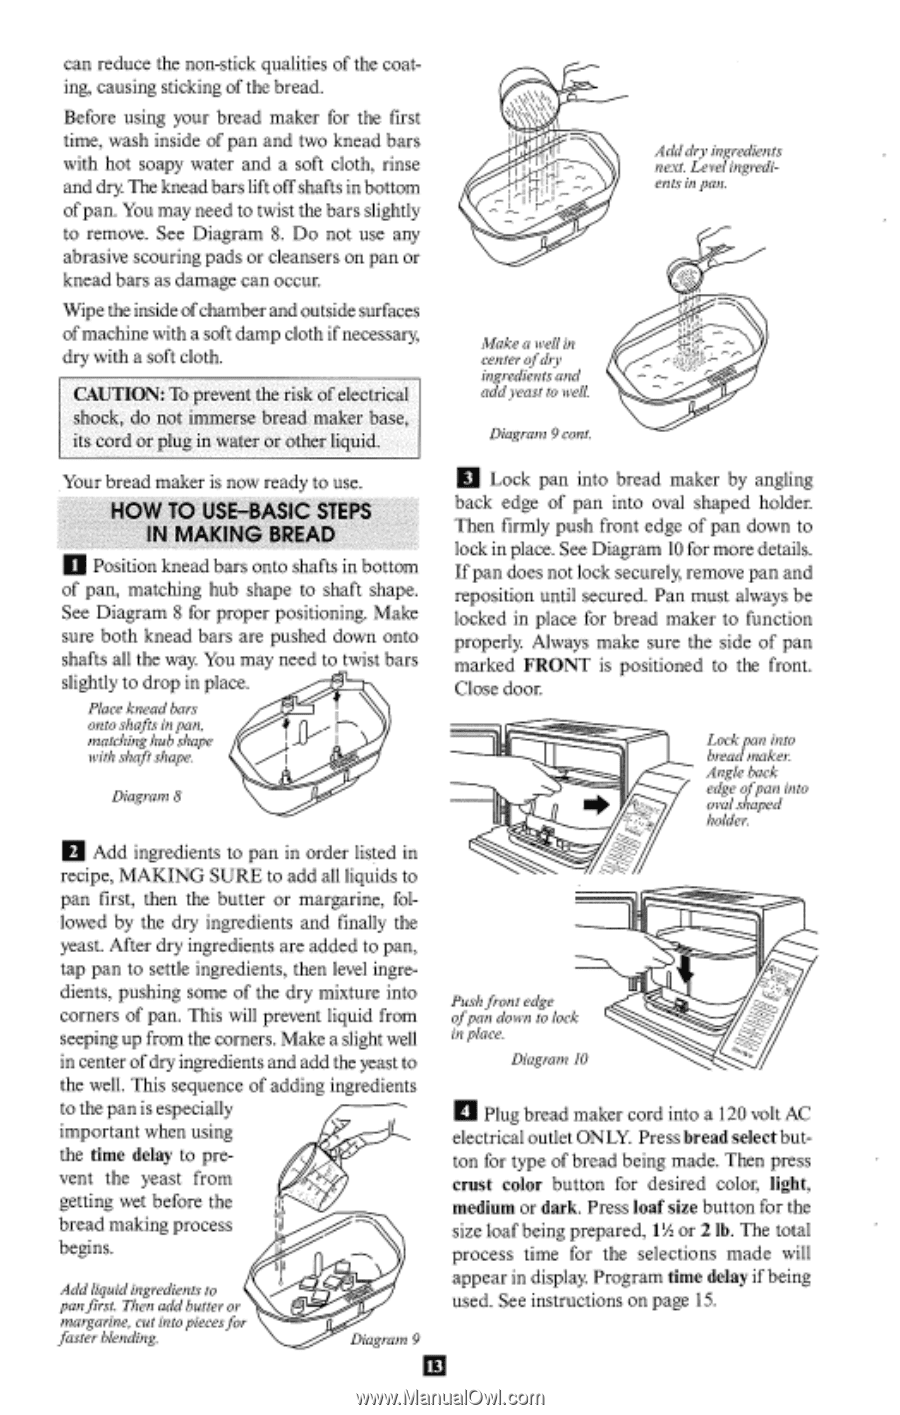
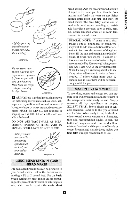
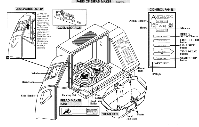
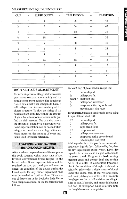
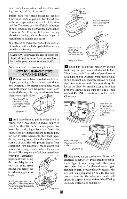
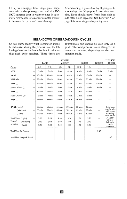
can reduce the non-stick qualities of the coating, causing sticking of the bread. Before using your bread maker for the first time, wash inside of pan and two knead bars with hot soapy water and a soft cloth, rinse and dry. The knead bars lift off shafts in bottom of pan. You may need to twist the bars slightly to remove. See Diagram 8. Do not use any abrasive scouring pads or cleansers on pan or knead bars as damage can occur. Wipe the inside of chamber and outside surfaces of machine with a soft damp cloth if necessary, dry with a soft cloth. CAUTION: To prevent the risk of electrical shock, do not immerse bread maker base, its cord or plug in water or other liquid. Your bread maker is now ready to use. HOW TO USE-BASIC STEPS IN MAKING BREAD El Position knead bars onto shafts in bottom of pan, matching hub shape to shaft shape. See Diagram 8 for proper positioning. Make sure both knead bars are pushed down onto shafts all the way. You may need to twist bars slightly to drop in place. Place knead bars onto shafts in pan, matching hub shape with shaft shape. 4 Diagram 8 U Add ingredients to pan in order listed in recipe, MAKING SURE to add all liquids to pan first, then the butter or margarine, fol- lowed by the dry ingredients and finally the yeast. After dry ingredients are added to pan, tap pan to settle ingredients, then level ingre- dients, pushing some of the dry mixture into corners of pan. This will prevent liquid from seeping up from the corners. Make a slight well in center of dry ingredients and add the yeast to the well. This sequence of adding ingredients to the pan is especially important when using the time delay to pre- vent the yeast from getting wet before the bread making process 6I° aIt.i begins. Add liquid ingredients to pan first. Then add butter or margarine, cut into piecesfor faster blending. Diagram 9 Add dry ingredients next. Level ingredients in pan. Make a well in center of dry ingredients and add yeast to well. Diagram 9 cont. U Lock pan into bread maker by angling back edge of pan into oval shaped holder. Then firmly push front edge of pan down to lock in place. See Diagram 10 for more details. If pan does not lock securely, remove pan and reposition until secured. Pan must always be locked in place for bread maker to function properly. Always make sure the side of pan marked FRONT is positioned to the front. Close door. Lock pan into bread maker. Angle back edge ofpan into oval shaped holder. Push front edge of pan down to lock in place. iyRb Diagram 10 4 Plug bread maker cord into a 120 volt AC electrical outlet ONLY. Press bread select button for type of bread being made. Then press crust color button for desired color, light, medium or dark. Press loaf size button for the size loaf being prepared, 112/ or 2 lb. The total process time for the selections made will appear in display. Program time delay if being used. See instructions on page 15.
-
 1
1 -
2
-
3
-
4
-
5
-
6
-
7
-
8
-
 9
9 -
 10
10 -
 11
11 -
 12
12 -
 13
13 -
 14
14 -
 15
15 -
 16
16 -
 17
17 -
 18
18 -
 19
19 -
20
-
21
-
22
-
23
-
24
-
25
-
26
-
27
-
28
-
29
-
30
-
31
-
32
-
33
-
34
-
35
-
36
-
37
-
38
-
39
-
40
-
41
-
42
-
43
-
44
-
45
-
46
-
47
-
48
-
49
-
50
-
51
-
52
-
53
-
54
-
55
-
56
-
57
-
58
-
59
-
60
-
61
-
62
-
63
-
64
-
65
-
66
-
67
-
68
 |
 |