Western Digital WDBABT0010HBK User Manual - Page 47
Registering Your Drive, Registration, First name, IF you want to .., THEN click .., AND see ..
 |
UPC - 718037762906
View all Western Digital WDBABT0010HBK manuals
Add to My Manuals
Save this manual to your list of manuals |
Page 47 highlights
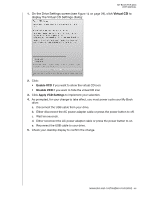
MY BOOK FOR MAC USER MANUAL To customize your drive settings for the best possible performance with the WD SmartWare software, on the Drive Settings screen (see Figure 15 on page 31): IF you want to . . . Use a password to keep others from accessing the files on your drive, Change your password, THEN click . . . Security Security Remove password protection from your drive, Register your drive to receive free technical support during the warranty period and be kept up-todate on the latest WD products, Run drive diagnostics and status checks, Specify an inactive time interval to turn off your drive, Erase your drive so you can retrieve the space and start over with a fresh set of backups, Enable (show) or disable (hide) the virtual CD icon for your drive, Security Registration Diagnostics Sleep Timer Drive Erase Virtual CD AND see . . . "Password Protecting Your Drive" on page 30. "Changing Your Password" on page 35. "Turning Off the Drive Lock Feature" on page 34. "Registering Your Drive" on page 42. "Checking Drive Health" on page 48. "Setting the Drive Sleep Timer" on page 43. "Erasing Your Drive" on page 43. "Showing or Hiding the Virtual CD Icon" on page 45 Registering Your Drive The WD SmartWare software uses your computer's Internet connection to register your drive. To register your drive to receive free technical support during the warranty period and be kept up-to-date on the latest WD products: 1. Make sure that your computer is connected to the Internet. 2. On the Drive Settings screen (see Figure 15 on page 31), click Registration to display the Register Drive dialog: 3. Type your first name in the First name box. MANAGING AND CUSTOMIZING YOUR DRIVE - 42
-
 1
1 -
2
-
3
-
4
-
5
-
6
-
7
-
8
-
9
-
10
-
11
-
12
-
13
-
14
-
15
-
16
-
17
-
18
-
19
-
20
-
21
-
22
-
23
-
24
-
25
-
26
-
27
-
28
-
29
-
30
-
31
-
32
-
33
-
34
-
35
-
36
-
37
-
38
-
39
-
40
-
41
-
 42
42 -
 43
43 -
 44
44 -
 45
45 -
 46
46 -
 47
47 -
 48
48 -
 49
49 -
 50
50 -
 51
51 -
 52
52 -
53
-
54
-
55
-
56
-
57
-
58
-
59
-
60
-
61
-
62
-
63
-
64
-
65
-
66
-
67
-
68
-
69
-
70
-
71
-
72
-
73
-
74
-
75
-
76
-
77
-
78
-
79
-
80
-
81
-
82
-
83
-
84
-
85
 |
 |
