Western Digital WDBACX0010BBK User Manual - Page 26
Retrieving Backed Up Files, About Retrieving Files, Retrieving a File
 |
View all Western Digital WDBACX0010BBK manuals
Add to My Manuals
Save this manual to your list of manuals |
Page 26 highlights
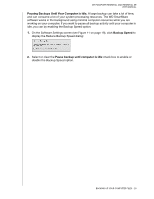
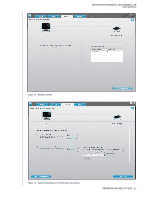
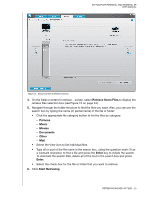
MY PASSPORT ESSENTIAL AND ESSENTIAL SE USER MANUAL 14 Retrieving Backed Up Files This chapter includes the following topics: About Retrieving Files Retrieving a File Retrieving a Folder Retrieving an Earlier Version of a File or Deleted Files Retrieving All Your Content About Retrieving Files The WD SmartWare software makes it easy for you to retrieve files that have been backed up on your My Passport drive and copy them to either: • Their original locations on your computer • A special retrieve folder Retrieve is generally a five-step process: 1. Choose the drive to retrieve files from on the Home screen. 2. Choose the backup that you want to retrieve files from. 3. Choose whether you want to copy the files to a special retrieval folder or to their original locations. 4. Choose what to retrieve, either individual files or folders, or everything. 5. Retrieve the files. Retrieving a File After selecting the drive on the Home screen, you can retrieve files or complete folders from your My Passport drive. To retrieve a file or folder from your drive: 1. Click the Retrieve tab to display the Retrieve screen (see Figure 12 on page 22). 2. In the Backed Up Volumes box, select the WD SmartWare volume that you want to retrieve a file or folder from and click Select Destination to display the Select a destination for retrieved files screen (see Figure 13 on page 22). 3. On the Select a destination for retrieved files screen: IF you want to copy your retrieved content to . . . Its original location, A retrieved content folder, THEN . . . a. Select the To the Original Places option. b. Click Select Files to display the Select content to retrieve... screen (see Figure 14 on page 23) and proceed to step 4 on page 23. a. Select the In a Retrieved Content Folder option. b. If you want to specify a different retrieve folder, click Browse and use the browse function to identify the new retrieve folder. c. Click Apply to save and implement the new retrieve folder. d. Click Select Files to display the Select content to retrieve... screen and proceed to step 4 on page 23. RETRIEVING BACKED UP FILES - 21
-
 1
1 -
2
-
3
-
4
-
5
-
6
-
7
-
8
-
9
-
10
-
11
-
12
-
13
-
14
-
15
-
16
-
17
-
18
-
19
-
20
-
 21
21 -
 22
22 -
 23
23 -
 24
24 -
 25
25 -
 26
26 -
 27
27 -
 28
28 -
 29
29 -
 30
30 -
 31
31 -
32
-
33
-
34
-
35
-
36
-
37
-
38
-
39
-
40
-
41
-
42
-
43
-
44
-
45
-
46
-
47
-
48
-
49
-
50
-
51
-
52
-
53
-
54
-
55
-
56
-
57
-
58
-
59
-
60
-
61
-
62
-
63
-
64
-
65
-
66
-
67
-
68
-
69
-
70
-
71
-
72
-
73
-
74
-
75
 |
 |