Whirlpool GI6SDRXXB User Instructions - Page 10
To Lock and Unlock
 |
View all Whirlpool GI6SDRXXB manuals
Add to My Manuals
Save this manual to your list of manuals |
Page 10 highlights
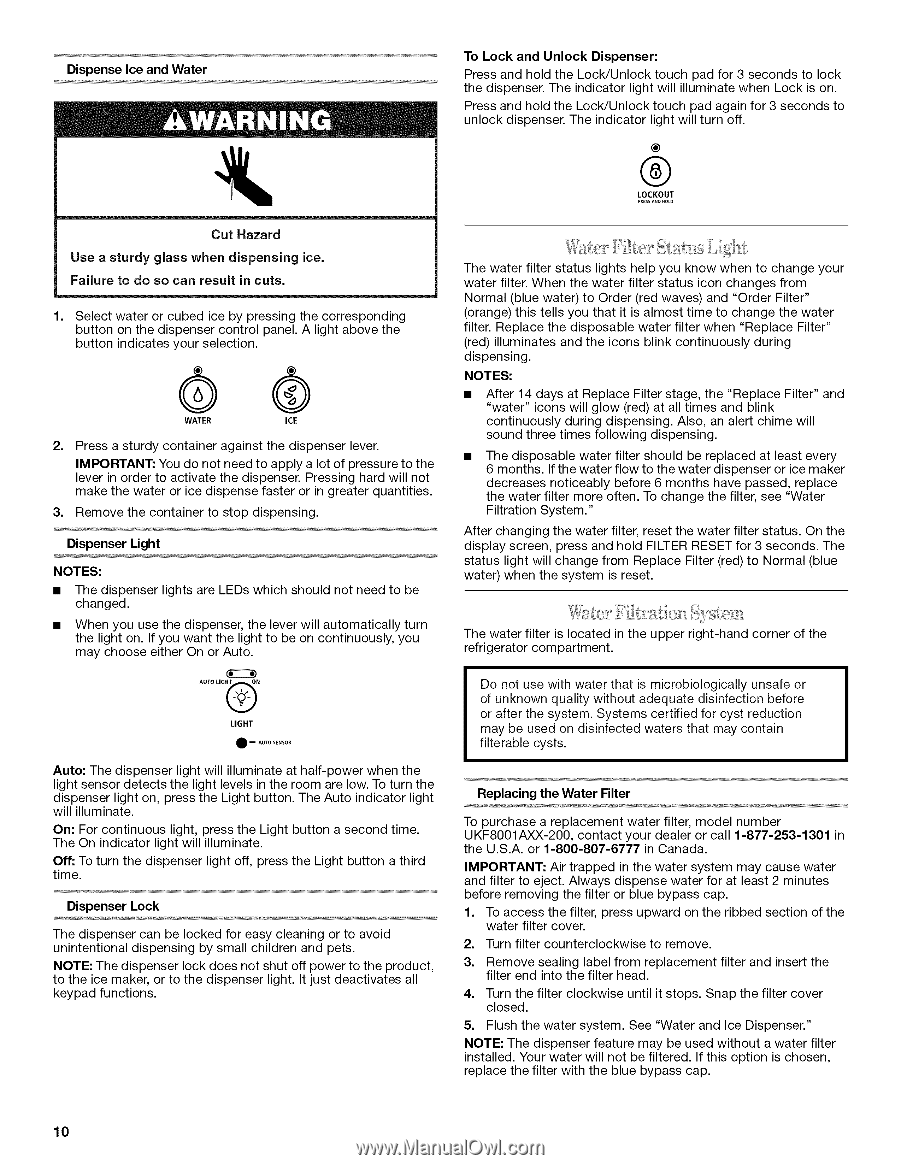
Dispense Ice and Water Cut Hazard Use a sturdy glass when dispensing ice. Failure to do so can result in cuts. 1. Select water or cubed ice by pressing the corresponding button on the dispenser control panel. A light above the button indicates your selection. O® WATER ICE 2. Press a sturdy container against the dispenser lever. IMPORTANT: You do not need to apply a lot of pressure to the lever in order to activate the dispenser. Pressing hard will not make the water or ice dispense faster or in greater quantities. 3. Remove the container to stop dispensing. Dispenser Light NOTES: • The dispenser lights are LEDs which should not need to be changed. • When you use the dispenser, the lever will automatically turn the light on. If you want the light to be on continuously, you may choose either On or Auto. AUTO LIG_N LIGHT 0- AUTOSENSOR Auto: The dispenser light will illuminate at half-power when the light sensor detects the light levels in the room are low. To turn the dispenser light on, press the Light button. The Auto indicator light will illuminate. On: For continuous light, press the Light button a second time. The On indicator light will illuminate. Off: To turn the dispenser light off, press the Light button a third time. Dispenser Lock The dispenser can be locked for easy cleaning or to avoid unintentional dispensing by small children and pets. NOTE: The dispenser lock does not shut off power to the product, to the ice maker, or to the dispenser light. It just deactivates all keypad functions. To Lock and Unlock Dispenser: Press and hold the LocWUnlock touch pad for 3 seconds to lock the dispenser. The indicator light will illuminate when Lock is on. Press and hold the LocWUnlock touch pad again for 3 seconds to unlock dispenser. The indicator light will turn off. ® ® LOCKOUT _ss A_D_OLD The water filter status lights help you know when to change your water filter. When the water filter status icon changes from Normal (blue water) to Order (red waves) and "Order Filter" (orange) this tells you that it is almost time to change the water filter. Replace the disposable water filter when "Replace Filter" (red) illuminates and the icons blink continuously during dispensing. NOTES: • After 14 days at Replace Filter stage, the "Replace Filter" and "water" icons will glow (red) at all times and blink continuously during dispensing. Also, an alert chime will sound three times following dispensing. • The disposable water filter should be replaced at least every 6 months. If the water flow to the water dispenser or ice maker decreases noticeably before 6 months have passed, replace the water filter more often. To change the filter, see "Water Filtration System." After changing the water filter, reset the water filter status. On the display screen, press and hold FILTER RESET for 3 seconds. The status light will change from Replace Filter (red) to Normal (blue water) when the system is reset. The water filter is located in the upper right-hand corner of the refrigerator compartment. Do not use with water that is microbiologically unsafe or of unknown quality without adequate disinfection before or after the system. Systems certified for cyst reduction may be used on disinfected waters that may contain filterable cysts. Replacing the Water Filter To purchase a replacement water filter, model number UKF8001AXX-200, contact your dealer or call 1-877-253-1301 in the U.S.A. or 1-800-807-6777 in Canada. IMPORTANT: Air trapped in the water system may cause water and filter to eject. Always dispense water for at least 2 minutes before removing the filter or blue bypass cap. 1. To access the filter, press upward on the ribbed section of the water filter cover. 2. Turn filter counterclockwise to remove. 3. Remove sealing label from replacement filter and insert the filter end into the filter head. 4. Turn the filter clockwise until it stops. Snap the filter cover closed. 5. Flush the water system. See "Water and Ice Dispenser." NOTE: The dispenser feature may be used without a water filter installed. Your water will not be filtered. If this option is chosen, replace the filter with the blue bypass cap. 10
-
 1
1 -
2
-
3
-
4
-
 5
5 -
 6
6 -
 7
7 -
 8
8 -
 9
9 -
 10
10 -
 11
11 -
 12
12 -
 13
13 -
 14
14 -
 15
15 -
16
-
17
-
18
-
19
-
20
-
21
-
22
-
23
-
24
-
25
-
26
-
27
-
28
-
29
-
30
-
31
-
32
-
33
-
34
 |
 |