Whirlpool GI6SDRXXB User Instructions - Page 7
Refrigerator - refrigerators
 |
View all Whirlpool GI6SDRXXB manuals
Add to My Manuals
Save this manual to your list of manuals |
Page 7 highlights
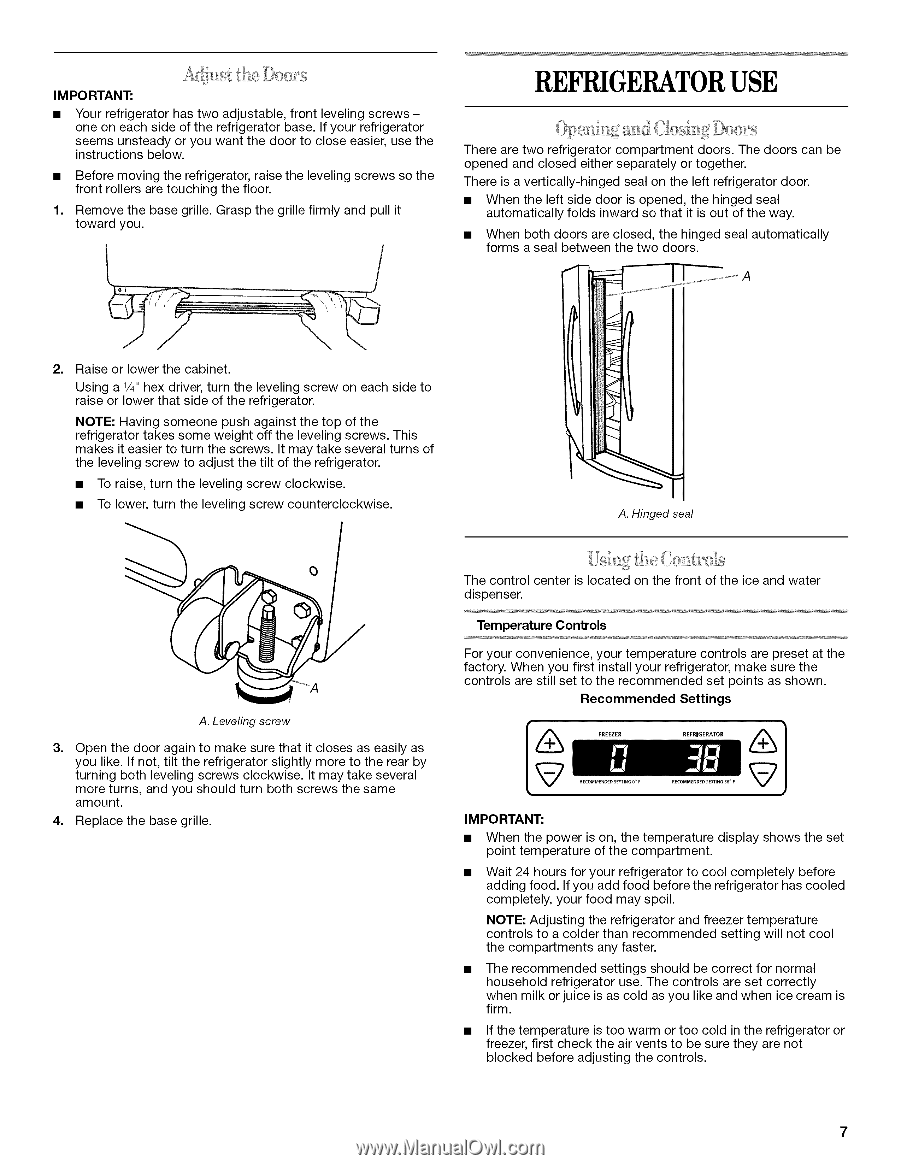
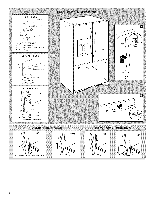
IM PO RTANT: Your refrigerator has two adjustable, front leveling screws one on each side of the refrigerator base. If your refrigerator seems unsteady or you want the door to close easier, use the instructions below. Before moving the refrigerator, raise the leveling screws so the front rollers are touching the floor. 1. Remove the base grille. Grasp the grille firmly and pull it toward you. REFRIGERATOURSE There are two refrigerator compartment doors. The doors can be opened and closed either separately or together. There is a vertically-hinged seal on the left refrigerator door. • When the left side door is opened, the hinged seal automatically folds inward so that it is out of the way. • When both doors are closed, the hinged seal automatically forms a seal between the two doors. A 2. Raise or lower the cabinet. Using a V4"hex driver, turn the leveling screw on each side to raise or lower that side of the refrigerator. NOTE: Having someone push against the top of the refrigerator takes some weight off the leveling screws. This makes it easier to turn the screws. It may take several turns of the leveling screw to adjust the tilt of the refrigerator. • To raise, turn the leveling screw clockwise. • To lower, turn the leveling screw counterclockwise. A. Hinged seal A. Leveling screw 3. Open the door again to make sure that it closes as easily as you like. If not, tilt the refrigerator slightly more to the rear by turning both leveling screws clockwise. It may take several more turns, and you should turn both screws the same amount. 4. Replace the base grille. The control center is located on the front of the ice and water dispenser. Temperature Controls For your convenience, your temperature controls are preset at the factory. When you first install your refrigerator, make sure the controls are still set to the recommended set points as shown. Recommended Settings IMPORTANT: • When the power is on, the temperature display shows the set point temperature of the compartment. Wait 24 hours for your refrigerator to cool completely before adding food. If you add food before the refrigerator has cooled completely, your food may spoil. NOTE: Adjusting the refrigerator and freezer temperature controls to a colder than recommended setting will not cool the compartments any faster. The recommended settings should be correct for normal household refrigerator use. The controls are set correctly when milk or juice is as cold as you like and when ice cream is firm. • If the temperature is too warm or too cold in the refrigerator or freezer, first check the air vents to be sure they are not blocked before adjusting the controls.
-
 1
1 -
 2
2 -
 3
3 -
 4
4 -
 5
5 -
 6
6 -
 7
7 -
 8
8 -
 9
9 -
 10
10 -
 11
11 -
 12
12 -
13
-
14
-
15
-
16
-
17
-
18
-
19
-
20
-
21
-
22
-
23
-
24
-
25
-
26
-
27
-
28
-
29
-
30
-
31
-
32
-
33
-
34
 |
 |