Whirlpool GI6SDRXXB User Instructions - Page 4
to60psi276 - washers
 |
View all Whirlpool GI6SDRXXB manuals
Add to My Manuals
Save this manual to your list of manuals |
Page 4 highlights
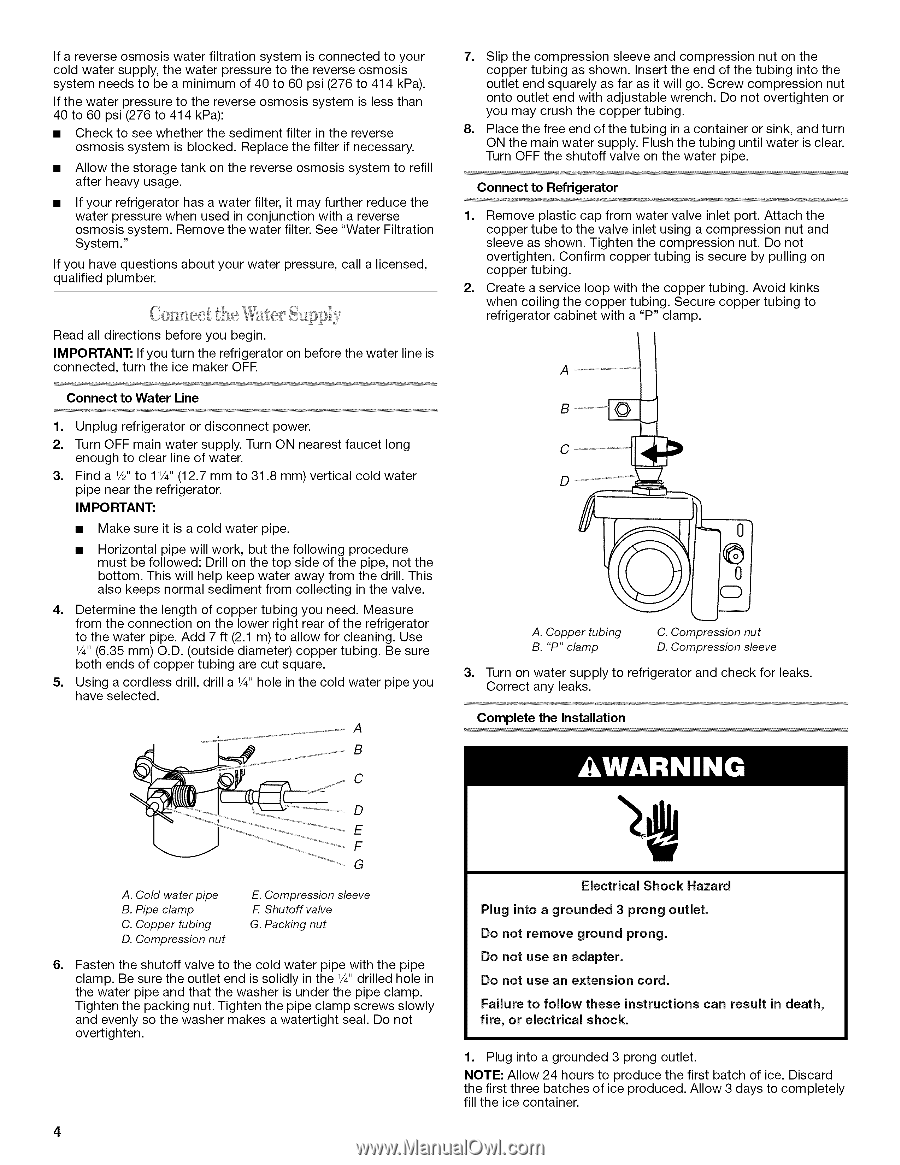
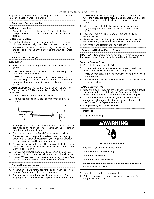
Ifareversoesmoswisatefriltratiosnystemisconnectetodyour 7. Slipthecompressisolneevaendcompressinountonthe coldwatesr upplyth, ewatepr ressurteothereversoesmosis coppetrubingasshownIn. serttheendofthetubingintothe systemneedtsobea minimumof40to60psi(276to414kPa). outleet ndsquarealysfarasitwillgo.Screwcompressinount Ifthewatepr ressutroethereversoesmosissystemislessthan 40to 60psi(276to414kPa): • Chectkoseewhethethr esedimenfiltterinthereverse osmossisystemisblockedR. eplactheefilterif necessary. • Allowthestoragteankonthereversoesmossisystemtorefill afterheavuysage. ontooutleet ndwithadjustabwlerenchD.onotovertighteonr youmaycrushthecoppetrubing. 8. Placethefreeendofthetubinginacontaineorsinka, ndturn ONthemainwatesr upplyF.lushthetubinguntiwl ateirsclear. TurnOFFtheshutofvfalveonthewatepr ipe. Connect to Refrigerator Ifyour efrigerathoar sawatefrilteri,t mayfurtherreductehe watepr ressuwrehenusedinconjunctiownithareverse 1. Remove plastic cap from water valve inlet port. Attach the osmossisystemR. emovtheewatefrilterS. ee"WateFriltration System." copper tube to the valve inlet using a compression nut and sleeve as shown. Tighten the compression nut. Do not Ifyouhavequestionasbouytourwatepr ressurcea, llalicensed, qualifiepdlumber. overtighten. Confirm copper tubing is secure by pulling on copper tubing. 2. Create a service loop with the copper tubing. Avoid kinks when coiling the copper tubing. Secure copper tubing to refrigerator cabinet with a "P" clamp. Readalldirectionbseforyeoubegin. IMPORTANIfyTo: uturntherefrigeratoonrbefortehewatelrineis connectetdu,rntheicemakeOr FE Connect to Water Line 1. Unplug refrigerator or disconnect power. 2. Turn OFF main water supply. Turn ON nearest faucet long enough to clear line of water. 3. Find a V2"to 1V4" (12.7 mm to 31.8 mm) vertical cold water pipe near the refrigerator. IM PO RTAN1"." • Make sure it is a cold water pipe. Horizontal pipe will work, but the following procedure must be followed: Drill on the top side of the pipe, not the bottom. This will help keep water away from the drill. This also keeps normal sediment from collecting in the valve. 4. Determine the length of copper tubing you need. Measure from the connection on the lower right rear of the refrigerator to the water pipe. Add 7 ft (2.1 m) to allow for cleaning. Use 1/4"(6.35 mm) O.D. (outside diameter) copper tubing. Be sure both ends of copper tubing are cut square. 5. Using a cordless drill, drill a V4"hole in the cold water pipe you have selected. B u D A. Copper tubing B. "P" clamp C. Compression nut D. Compression sleeve 3. Turn on water supply to refrigerator and check for leaks. Correct any leaks. Complete the Installation C D E F G A. Cold water pipe B. Pipe clamp C. Copper tubing D. Compression nut E. Compression sleeve F. Shutoff valve G. Packing nut 6= Fasten the shutoff valve to the cold water pipe with the pipe clamp. Be sure the outlet end is solidly in the V4"drilled hole in the water pipe and that the washer is under the pipe clamp. Tighten the packing nut. Tighten the pipe clamp screws slowly and evenly so the washer makes a watertight seal. Do not overtighten. Electrical Shock Hazard Plug into a grounded 3 prong outlet. Do not remove ground prong. Do not use an adapter. Do not use an extension cord. Failure to follow these instructions can result in death, fire, or electrical shock. 1. Plug into a grounded 3 prong outlet. NOTE: Allow 24 hours to produce the first batch of ice. Discard the first three batches of ice produced. Allow 3 days to completely fill the ice container.
-
 1
1 -
 2
2 -
 3
3 -
 4
4 -
 5
5 -
 6
6 -
 7
7 -
 8
8 -
 9
9 -
 10
10 -
11
-
12
-
13
-
14
-
15
-
16
-
17
-
18
-
19
-
20
-
21
-
22
-
23
-
24
-
25
-
26
-
27
-
28
-
29
-
30
-
31
-
32
-
33
-
34
 |
 |