Whirlpool GZ7930XHS Installation Guide - Page 2
Danger, Warning - downdraft
 |
UPC - 050946738802
View all Whirlpool GZ7930XHS manuals
Add to My Manuals
Save this manual to your list of manuals |
Page 2 highlights
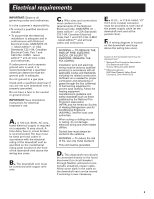
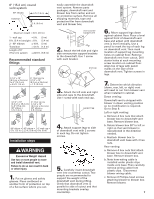
Before you start... Your safety and the safety of others are very important. We have provided many important safety messages in this manual and on your appliance. Always read and obey all safety messages. This is the safety alert symbol. This symbol alerts you to potential hazards that can kill or hurt you and others. All safety messages will follow the safety alert symbol and either the word "DANGER" or "WARNING". These words mean: DANGER You can be killed or seriously injured if you don't immediately follow instructions. WARNING You can be killed or seriously injured if you don't follow instructions. All safety messages will tell you what the potential hazard is, tell you how to reduce the chance of injury, and tell you what can happen if the instructions are not followed. IMPORTANT: Observe all governing codes and ordinances. Failure to meet codes and ordinances could lead to fire or electrical shock. Proper installation is your responsibility. Make sure you have everything necessary for correct installation. It is the responsibility of the installer to comply with the installation clearances specified on the model/serial rating plate. The model/serial rating plate is located on the front of the downdraft vent above the wiring box cover. Check location where downdraft vent will be installed. The location should be away from strong draft areas, such as windows, doors and strong heating vents or fans. Before making countertop cutout, check that downdraft vent and cooktop location will clear cabinet walls, backsplash, and rear wall studs inside cabinet. Mobile home installation The installation of this downdraft vent system must conform to the Manufactured Home Construction Safety Standards, Title 24 CFR, Part 328 (formerly the Federal Standard for Mobile Home Construction and Safety, Title 24, HUD, Part 280) or when such standard is not applicable, the Standard for Manufactured Home Installation 1982 (Manufactured Home Sites, Communities and Setups) ANSI A225.1/NFPA 501A*, or latest edition, or with local codes. All openings in the wall or floor where retractable downdraft vent is to be installed must be sealed. Electrical ground is required. See "Electrical requirements," page 3. When installing downdraft vent, the cabinet drawer will need to be removed and the drawer front installed permanently to cabinet. NOTE: Downdraft vent is installed directly behind the cooktop. Install downdraft vent first. Cabinet construction: Downdraft vent is designed for use in a cabinet with a depth of 24" (61 cm). Some installations require a countertop deeper than 25" (63.5 cm). See chart on page 5. The maximum depth of the overhead cabinet is 13" (33 cm). Overhead cabinets installed at either side of the downdraft vent must be 18" (45.7 cm) above the cooking surface. See cooktop Installation Instructions before making any cutouts and for the minimum distance between the front edge of the countertop and front edge of cooktop. The minimum horizontal distance between the overhead cabinets is the same as the width of the installed downdraft vent. When installing a 36" (91.4 cm) retractable downdraft vent with "Create-A-Cooktop" modules, the optional support must be installed on the front of the downdraft vent. See installation steps for details. Parts supplied for installation: • 1 top trim • 2 end caps • 2 lower support legs • 2 overcounter support brackets • 2 undercounter mounting brackets • 1 bag of fasteners • 1 metal cover • 1 backdraft damper • literature package • optional support and two screws (36" (91.4 cm) models only Parts needed for installation: • 2 U.L.- or C.S.A.-listed 1/2" (12.7 mm) conduit connectors (3 are required if the exterior-mounted vent motor is used.) • 1 wall cap for interior-mounted motor • vent system • power supply cable • wiring cable for optional remote blower kit. Tools needed for installation: • safety glasses • gloves • jig or keyhole saw • drill with 1/8" drill bit • pencil • measuring tape • flat-blade screwdriver • Phillips screwdriver • 3/8" (9.5 mm) nut driver or ratchet • level • pliers • metal snips • wire stripper or utility knife • caulking gun and weatherproof caulk • duct tape 2
-
 1
1 -
 2
2 -
 3
3 -
 4
4 -
 5
5 -
 6
6 -
 7
7 -
 8
8 -
9
-
10
-
11
-
12
-
13
-
14
-
15
-
16
-
17
-
18
-
19
-
20
-
21
-
22
-
23
-
24
-
25
-
26
-
27
-
28
-
29
-
30
-
31
-
32
 |
 |