Whirlpool UXD8630DYS Installation Guide - Page 15
Vent System Care
 |
View all Whirlpool UXD8630DYS manuals
Add to My Manuals
Save this manual to your list of manuals |
Page 15 highlights
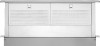
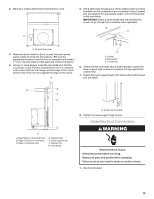
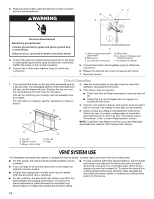
Operating Downdraft Vent To Use: 1. Push and hold the button on top of downdraft vent for a few seconds. (This slight delay helps avoid unintentional raising of the vent during cleaning of the cooktop area.) Retractable section of downdraft vent will rise. Blower will begin to vent immediately if blower control knob slider is set to an "On" position. NOTE: If a spill occurs on the cooktop that allows liquids to seep inside the downdraft vent, you must turn the downdraft vent off immediately. It is possible to cause damage to the downdraft vent if water is allowed inside the downdraft vent while it is operating. 2. Immediately turn off the downdraft vent at the speed control located on the right-hand side of the downdraft vent. 2. Slide the control slider on the right-hand side of the downdraft vent to adjust the blower motor speed. 3. Turn off the power supply to the downdraft vent at the circuit breaker box or fuse box. When Cooking Is Complete: 1. Push the button on top of the retractable downdraft vent. The blower will turn off, and the retractable section of the vent will return to the closed position. 4. Allow plenty of time for the downdraft vent to dry naturally. Do not open the downdraft vent to remove the water. VENT SYSTEM CARE Surface of Downdraft Vent To avoid damaging the finish, clean downdraft vent with soap and water. Do not use scouring powder or abrasive solutions. Exterior Surfaces: ■ To avoid damage to the exterior surface, do not use steel wool or soap-filled scouring pads. ■ Always wipe dry to avoid water marks. Cleaning Method: ■ Liquid detergent soap and water, or all-purpose cleanser ■ Wipe with damp soft cloth or nonabrasive sponge, then rinse with clean water and wipe dry. Filters Frequently remove and clean the filter(s) in the retractable section of the downdraft vent. This will improve the operating efficiency of the downdraft vent system. To Replace: 1. Remove each filter by pulling the spring release handle and then pulling down the filter. 2. Wash metal filters as needed in dishwasher or hot detergent solution. 3. Reinstall the filter by making sure the spring release handles are toward the front. Insert metal grease filter into upper track. 4. Pull the spring release handle down. 5. Push up on metal filter and release handle to latch into place. 6. Repeat steps 1-5 for the other filter. To Clean: 1. Remove the filter(s) and clean them in a dishwasher or in a hot detergent solution. The downdraft vent will not operate when the filters are not in place. 2. Dry the clean filter(s) and reinstall, making sure that they lock into place. If Retractable Downdraft Vent Does Not Operate After Clean Filters Have Been Installed: Push the filter in as far as it will go. When the filter is removed, the microswitch behind the filter is inactivated. This feature will not allow the vent system to operate until the filter is properly installed. A B C A. Spring release handles B. Left metal filter C. Right metal filter 15
-
 1
1 -
2
-
3
-
4
-
5
-
6
-
7
-
8
-
9
-
 10
10 -
 11
11 -
 12
12 -
 13
13 -
 14
14 -
 15
15 -
 16
16 -
 17
17 -
 18
18 -
 19
19 -
 20
20 -
21
-
22
-
23
-
24
-
25
-
26
-
27
-
28
-
29
-
30
-
31
-
32
-
33
-
34
-
35
-
36
 |
 |