Whirlpool WDF518SAH Installation Instructions - Page 16
Leveling Leg adjustment, Open and close door, Adjust door spring tension, Secure dishwasher,
 |
View all Whirlpool WDF518SAH manuals
Add to My Manuals
Save this manual to your list of manuals |
Page 16 highlights
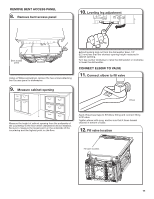
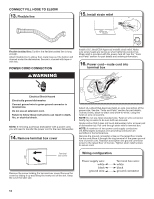
34. Leveling Leg adjustment 37. Secure dishwasher Screw to side cabinet Turn leg counter clockwise to raise the dishwasher or clockwise to lower the dishwasher. 35. Open and close door Open dishwasher door to prepare for securing the dishwasher to the countertop or side cabinet. NOTES: ■ The dishwasher must be secured to keep it from shifting when the door is opened or closed. ■ Do not drop screws into bottom of dishwasher. ■ Locate brackets installed in the "Choose Anchor Attachment Method" section, either on top or on the sides of the dishwasher. ■ If countertop anchoring: Secure dishwasher to the countertop with two Phillips-head screws (included). ■ If side anchoring: Drill pilot holes in cabinet to avoid splitting the wood. Secure dishwasher to cabinet with two Philips-head screws (included). Remove upper rack for easier access. See the User Guide for instructions on how to remove the upper rack if needed. 38. Sidemount attachment method Open and close the door to check spring tension of door. 36. Adjust door spring tension Door spring adjustment screws If needed adjust spring tension by using a Phillips-head screw driver. Turn screws clockwise to increase tension or counter clockwise to decrease door tension. If spring is adjusted to its maximum tension and door still falls rapidly after opened, it is recommended to install the springs supplied with the product inside the accessories bag. After springs are replaced, revisit the steps 35 & 36. AAdjdusjtumsetnmt caepnt cap ScrSewctroeswidetwoalsl ide wall Remove plastic caps covering screw holes on either side. 39. Drill pilot holes - - If side anchoring: Drill pilot holes in cabinet to avoid splitting wood. 16
-
 1
1 -
2
-
3
-
4
-
5
-
6
-
7
-
8
-
9
-
10
-
 11
11 -
 12
12 -
 13
13 -
 14
14 -
 15
15 -
 16
16 -
 17
17 -
 18
18 -
 19
19 -
 20
20 -
 21
21 -
22
-
23
-
24
-
25
-
26
-
27
-
28
-
29
-
30
-
31
-
32
-
33
-
34
-
35
-
36
-
37
-
38
-
39
-
40
-
41
-
42
-
43
-
44
-
45
-
46
-
47
-
48
-
49
-
50
-
51
-
52
-
53
-
54
-
55
-
56
-
57
-
58
-
59
-
60
-
61
-
62
 |
 |
