Xerox 6400S Setup Guide - Page 9
Network Scanning Setup, Prerequisites for Network Scanning Setup
 |
UPC - 095205743579
View all Xerox 6400S manuals
Add to My Manuals
Save this manual to your list of manuals |
Page 9 highlights
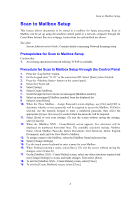
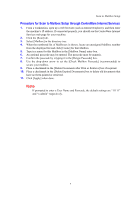
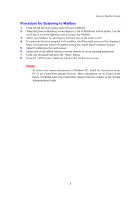
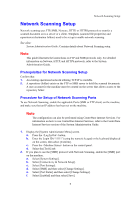
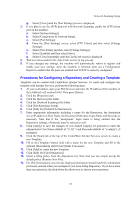
Network Scanning Setup Network Scanning Setup Network scanning uses FTP, SMB, Netware, HTTP, or HTTPS protocols to transfer a scanned document on to a server or a client. Templates (scanned file properties) and repositories (destination folders) need to be set up to enable network scanning. See also: System Administration Guide: Contains details about Network Scanning setup. Note This guide illustrates the instructions on FTP and SMB protocols only. For detailed information on Netware, HTTP, and HTTPS protocols, refer to the System Administration Guide. Prerequisites for Network Scanning Setup Confirm that: 1. An existing operational network utilizing TCP/IP is available. 2. A repository (folder) exists on the FTP or SMB server to hold the scanned documents. A user account for the machine must be created on the server that allows access to the repository folder. Procedure for Setup of Network Scanning Ports To use Network Scanning, enable the applicable Ports (SMB or FTP client) on the machine, and make sure that an IP address has been set on the machine. Note The configuration can also be performed using CentreWare Internet Services. For information on how to use CentreWare Internet Services, refer to the CentreWare Internet Services section of the System Administration Guide. 1. Display the [System Administrator Menu] screen. a. Press the button. b. Enter the Login ID ("11111") using the numeric keypad or the keyboard displayed on the screen, then select [Confirm]. c. Press the button on the control panel. d. Select the [Tools] tab. 2. If you plan to use the [SMB] protocol with Network Scanning, enable the [SMB] port on the machine. a. Select [System Settings]. b. Select [Connectivity & Network Setup]. c. Select [Port Settings]. d. Select [SMB] and then select [Change Settings]. e. Select [Port Status] and then select [Change Settings]. f. Select [Enabled] and then select [Save]. 9
-
 1
1 -
2
-
3
-
 4
4 -
 5
5 -
 6
6 -
 7
7 -
 8
8 -
 9
9 -
 10
10 -
 11
11 -
 12
12 -
 13
13 -
 14
14
 |
 |
