Xerox M20I User Guide - Page 32
Navigation Keys, Paper Supply, Status Map, Display, Job Status, Machine Status, Manual Group
 |
UPC - 095205244205
View all Xerox M20I manuals
Add to My Manuals
Save this manual to your list of manuals |
Page 32 highlights
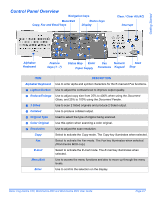
Getting Started Navigation Keys Use to scroll through the menu items and the options available for each menu item. Paper Supply Use to select a paper type and source. Each press of the Paper Supply key changes the selection. The Status Map indicates the selected tray. NOTE: Paper Tray 2 is available as an option. Status Map Document Feeder Error Bypass Paper Jam Tray 1 Tray 2 The Status Map identifies which paper tray is selected, when a paper tray is empty and when an error occurs. The Status Map has a light for each paper tray. A paper tray can be selected using the Paper Supply key. Each time the key is pressed, a different tray is selected and a green light displays to indicate the selected tray. When two tray lights display together, the Auto Tray Switching feature is active. This enables the machine to switch to a different tray if the current tray runs out of paper. If a paper tray is empty, the light will flash and if enabled, an error tone will sound. If an error occurs, a red light displays indicating the location of the error, and a message appears on the display providing further information. ) For a detailed description of the error messages, refer to "LCD Error Messages" on page 11-11. Display Job Status Machine Status Manual Group Manual Dial Speed Dial Pause/Redial Numeric Keypad Displays the current status and the menu prompts and selections. Use to view the current job status, add pages to jobs in memory and to delete jobs. Use to access setup menus and customise the machine. Use to manually enter multiple destinations for a fax job. (WorkCentre M20i only.) Use to dial a fax number manually. (WorkCentre M20i only.) Use to dial fax numbers and send faxes by entering a Speed Dial number which has been set up previously and stored in the machine's Dial Directory. (WorkCentre M20i only.) Use to redial the last phone number called or to add a pause when storing a number in the dial directory. (WorkCentre M20i only.) Use to enter alphanumeric characters. Page 2-8 Xerox CopyCentre C20, WorkCentre M20 and WorkCentre M20i User Guide
-
 1
1 -
2
-
3
-
4
-
5
-
6
-
7
-
8
-
9
-
10
-
11
-
12
-
13
-
14
-
15
-
16
-
17
-
18
-
19
-
20
-
21
-
22
-
23
-
24
-
25
-
26
-
 27
27 -
 28
28 -
 29
29 -
 30
30 -
 31
31 -
 32
32 -
 33
33 -
 34
34 -
 35
35 -
 36
36 -
 37
37 -
38
-
39
-
40
-
41
-
42
-
43
-
44
-
45
-
46
-
47
-
48
-
49
-
50
-
51
-
52
-
53
-
54
-
55
-
56
-
57
-
58
-
59
-
60
-
61
-
62
-
63
-
64
-
65
-
66
-
67
-
68
-
69
-
70
-
71
-
72
-
73
-
74
-
75
-
76
-
77
-
78
-
79
-
80
-
81
-
82
-
83
-
84
-
85
-
86
-
87
-
88
-
89
-
90
-
91
-
92
-
93
-
94
-
95
-
96
-
97
-
98
-
99
-
100
-
101
-
102
-
103
-
104
-
105
-
106
-
107
-
108
-
109
-
110
-
111
-
112
-
113
-
114
-
115
-
116
-
117
-
118
-
119
-
120
-
121
-
122
-
123
-
124
-
125
-
126
-
127
-
128
-
129
-
130
-
131
-
132
-
133
-
134
-
135
-
136
-
137
-
138
-
139
-
140
-
141
-
142
-
143
-
144
-
145
-
146
-
147
-
148
-
149
-
150
-
151
-
152
-
153
-
154
-
155
-
156
-
157
-
158
-
159
-
160
-
161
-
162
-
163
-
164
-
165
-
166
-
167
-
168
-
169
-
170
-
171
-
172
-
173
-
174
-
175
-
176
-
177
-
178
-
179
-
180
-
181
-
182
-
183
-
184
-
185
-
186
-
187
-
188
-
189
-
190
-
191
-
192
-
193
-
194
-
195
-
196
-
197
-
198
-
199
-
200
-
201
-
202
-
203
-
204
-
205
-
206
-
207
-
208
-
209
-
210
-
211
-
212
-
213
-
214
-
215
 |
 |
