Xerox N2125 User Guide - Page 112
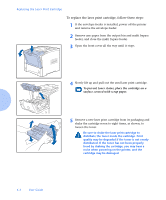
To replace the laser print cartridge, follow these steps, User Guide - printer cartridge
 |
UPC - 095205010176
View all Xerox N2125 manuals
Add to My Manuals
Save this manual to your list of manuals |
Page 112 highlights
Replacing the Laser Print Cartridge To replace the laser print cartridge, follow these steps: 1 If the envelope feeder is installed, power off the printer and remove the envelope feeder. 2 Remove any paper from the output bin and multi bypass feeder, and close the multi bypass feeder. 3 Open the front cover all the way until it stops. 4 Slowly lift up and pull out the used laser print cartridge. To prevent toner stains, place the cartridge on a surface covered with scrap paper. 5 Remove a new laser print cartridge from its packaging and shake the cartridge seven to eight times, as shown, to loosen the toner. Be sure to shake the laser print cartridge to distribute the toner inside the cartridge. Print quality may be degraded if the toner is not evenly distributed. If the toner has not been properly freed by shaking the cartridge, you may hear a noise when powering on the printer, and the cartridge may be damaged. 4-4 y User Guide
-
 1
1 -
2
-
3
-
4
-
5
-
6
-
7
-
8
-
9
-
10
-
11
-
12
-
13
-
14
-
15
-
16
-
17
-
18
-
19
-
20
-
21
-
22
-
23
-
24
-
25
-
26
-
27
-
28
-
29
-
30
-
31
-
32
-
33
-
34
-
35
-
36
-
37
-
38
-
39
-
40
-
41
-
42
-
43
-
44
-
45
-
46
-
47
-
48
-
49
-
50
-
51
-
52
-
53
-
54
-
55
-
56
-
57
-
58
-
59
-
60
-
61
-
62
-
63
-
64
-
65
-
66
-
67
-
68
-
69
-
70
-
71
-
72
-
73
-
74
-
75
-
76
-
77
-
78
-
79
-
80
-
81
-
82
-
83
-
84
-
85
-
86
-
87
-
88
-
89
-
90
-
91
-
92
-
93
-
94
-
95
-
96
-
97
-
98
-
99
-
100
-
101
-
102
-
103
-
104
-
105
-
106
-
 107
107 -
 108
108 -
 109
109 -
 110
110 -
 111
111 -
 112
112 -
 113
113 -
 114
114 -
 115
115 -
 116
116 -
 117
117 -
118
-
119
-
120
-
121
-
122
-
123
-
124
-
125
-
126
-
127
-
128
-
129
-
130
-
131
-
132
-
133
-
134
-
135
-
136
-
137
-
138
-
139
-
140
-
141
-
142
-
143
-
144
-
145
-
146
-
147
-
148
-
149
-
150
-
151
-
152
-
153
-
154
-
155
-
156
-
157
-
158
-
159
-
160
-
161
-
162
-
163
-
164
-
165
-
166
-
167
-
168
-
169
-
170
-
171
-
172
-
173
-
174
-
175
-
176
 |
 |
