Xerox XD105f User Guide - Page 48
J2 Drum Cartridge Replacement, When the J2 Status
 |
View all Xerox XD105f manuals
Add to My Manuals
Save this manual to your list of manuals |
Page 48 highlights
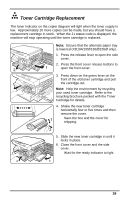
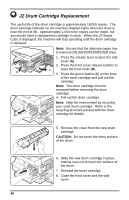
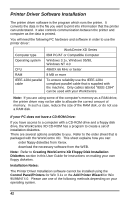
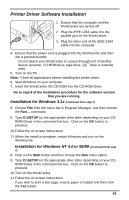
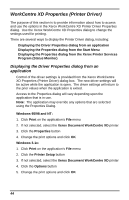
J2 Drum Cartridge Replacement The useful life of the drum cartridge is approximately 18,000 copies. The drum cartridge indicator on the machine diagram lights when the drum is near the end of life. Approximately 1,000 more copies can be made, but you should have a replacement cartridge in stock. When the J2 Status Code is displayed, the machine will stop operating until the drum cartridge is replaced. Note: Ensure that the alternate paper tray is lowered (XD104/105f/130df/155df only). C B 1. Press the release lever to open the side cover (A). 2. Press the front cover release buttons to A open the front cover (B). 3. Press the green button (C) on the front of the toner cartridge and pull out the cartridge. Note: The toner cartridge must be removed before removing the drum cartridge. 4. Pull out the drum cartridge. Note: Help the environment by recycling your used drum cartridge. Refer to the recycling brochure packed with the drum cartridge for details. 5. Remove the cover from the new drum cartridge. CAUTION: Do not touch the shiny surface of the drum. 6. Slide the new drum cartridge in place, making sure not to touch the surface of the drum. 7. Reinstall the toner cartridge. 8. Close the front cover and the side cover. 40
-
 1
1 -
2
-
3
-
4
-
5
-
6
-
7
-
8
-
9
-
10
-
11
-
12
-
13
-
14
-
15
-
16
-
17
-
18
-
19
-
20
-
21
-
22
-
23
-
24
-
25
-
26
-
27
-
28
-
29
-
30
-
31
-
32
-
33
-
34
-
35
-
36
-
37
-
38
-
39
-
40
-
41
-
42
-
 43
43 -
 44
44 -
 45
45 -
 46
46 -
 47
47 -
 48
48 -
 49
49 -
 50
50 -
 51
51 -
 52
52 -
 53
53 -
54
-
55
-
56
-
57
-
58
-
59
-
60
-
61
-
62
-
63
 |
 |
