Yamaha CLP-725 CLP-725 Owners Manual - Page 27
Changing the Initial Settings of the Recorded Song, Deleting Recorded Data
 |
View all Yamaha CLP-725 manuals
Add to My Manuals
Save this manual to your list of manuals |
Page 27 highlights
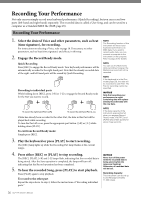
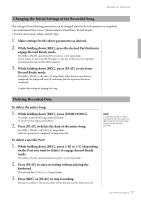
Recording Your Performance Changing the Initial Settings of the Recorded Song The settings of the following parameters can be changed after the Record operation is completed. • For individual Parts: Voice, Volume balance (Dual/Duo), Reverb Depth • For the entire Song: Tempo, Reverb Type 1. Make settings for the above parameters as desired. 2. While holding down [REC], press the desired Part button to engage Record Ready mode. The [REC], [PLAY] and selected Part ([+R] or [-L]) lamps flash. In this status, do not press [PLAY] again or any key. Otherwise, the originally recorded performance data will be deleted. 3. While holding down [REC], press [PLAY] to exit from Record Ready mode. The [REC], [PLAY], [+R] and [-L] lamps flash. After the Save operation is completed, the lamps will turn off, indicating that the operation has been completed. Confirm the setting by playing the Song. Deleting Recorded Data To delete the entire Song: 1. While holding down [REC], press [DEMO/SONG]. The [REC] and [PLAY] lamps flash alternately. To exit from this status, press [REC]. 2. Press [PLAY] to delete the data of the entire Song. The [REC], [PLAY], [+R] and [-L] lamps flash. After the operation is completed, all lamps turn off. To delete a specific Part: 1. While holding down [REC], press [+R] or [-L] (depending on the Part you want to delete) to engage Record Ready mode. The [REC], [PLAY] and selected Part ([+R] or [-L]) lamps flash. 2. Press [PLAY] to start recording without playing the keyboard. The selected Part ([+R] or [-L]) lamp flashes. 3. Press [REC] or [PLAY] to stop recording. All data recorded for the selected Part will be deleted, and the lamp turns off. NOTE If a User Song has not been recorded to the instrument, the [REC] and [PLAY] lamps flash quickly for about three seconds. 27 CLP-725 Owner's Manual
-
 1
1 -
2
-
3
-
4
-
5
-
6
-
7
-
8
-
9
-
10
-
11
-
12
-
13
-
14
-
15
-
16
-
17
-
18
-
19
-
20
-
21
-
 22
22 -
 23
23 -
 24
24 -
 25
25 -
 26
26 -
 27
27 -
 28
28 -
 29
29 -
 30
30 -
 31
31 -
 32
32 -
33
-
34
-
35
-
36
-
37
-
38
-
39
-
40
 |
 |
