Yamaha DPX 1000 MCXSP10 Manual - Page 13
Projection image position, Keystone, <Adjusting using the zoom>
 |
View all Yamaha DPX 1000 manuals
Add to My Manuals
Save this manual to your list of manuals |
Page 13 highlights
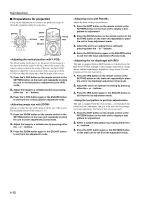
Installation I Projection image position Follow the instructions below to adjust the position of the projected image on the screen. This figure shows the limits within which the zoom function can alter projection distance in relation to the screen size. Within these limits, it is possible to adjust the image so that it fills the screen completely. (See page 12.) Wide Tele Lens center line It is possible to adjust the vertical position of the projected image on the screen up or down by half the height of the screen. For example, shifting V. POS fully up will bring the lower limit of the image above the centerline of the lens. (See page 12.) Projected image Shifted fully up Lens center line Shifted fully down When this unit is mounted on a tabletop, the position of the image can be adjusted by using the adjusters located on the underside of the unit. Adjust the height by rotating the movable part of the two screw-type adjusters at the front bottom of the case. The adjustment range of these adjusters is 3 cm (1-1/4 inch). Adjust with care as loosening them further may cause them to separate from the main unit. I Keystone When the unit is mounted at an angle to the screen, the image will be projected in a trapezoid manner. Use the keystone function in the keystone section of 4 in the menu to rectify this. (See page 21.) E-8
-
 1
1 -
2
-
3
-
4
-
5
-
6
-
7
-
 8
8 -
 9
9 -
 10
10 -
 11
11 -
 12
12 -
 13
13 -
 14
14 -
 15
15 -
 16
16 -
 17
17 -
 18
18 -
19
-
20
-
21
-
22
-
23
-
24
-
25
-
26
-
27
-
28
-
29
-
30
-
31
-
32
-
33
-
34
-
35
-
36
-
37
-
38
-
39
-
40
-
41
-
42
-
43
-
44
-
45
 |
 |
