Yamaha DPX 1000 MCXSP10 Manual - Page 17
Preparations for projection, <Using the test pattern to perform adjustments>
 |
View all Yamaha DPX 1000 manuals
Add to My Manuals
Save this manual to your list of manuals |
Page 17 highlights
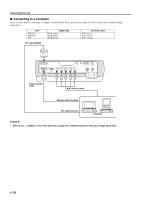
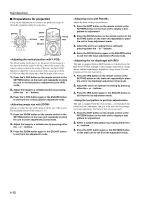
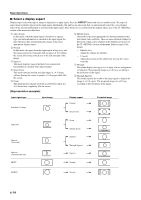
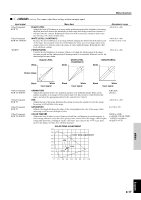
Basic Operations I Preparations for projection Carry out the adjustments necessary to the projection image to obtain the optimum setting for projection. STANDBY/ON ESCAPE ZOOM ESCAPE PATTERN ASPECT MENU V. POS SETTING IRIS SETTING ESCAPE INPUT LAMP COVER TEMP FAN AUTO V. POS ZOOM FOCUS IRIS SETTING PATT ESCAPE MENU FOCUS PATT ASPECT INPUT The initial setting on this unit is for projection of the image in a line directly from the center of the lens. Where the center of the screen is above or below the center of this line, use the V. POS function to adjust the vertical position of the image up or down. V. POS can adjust the image up to half the height of the screen. 1. Press the V. POS button on the remote control or the SETTING button on the main unit repeatedly to place the unit in vertical position adjustment (Lens shift) mode. 2. Adjust the image to a suitable position by pressing either the h or g buttons. 3. Press the V. POS button again or the ESCAPE button to exit from the vertical position adjustment mode. Enlarge or reduce the size of the image to fit the size of the screen. The maximum extent of this zoom is 1:1.6. 1. Press the ZOOM button on the remote control or the SETTING button on the main unit repeatedly to place the unit in zoom adjustment (Zoom) mode. 2. Adjust the image to a suitable size by pressing either the h or g buttons. 3. Press the ZOOM button again or the ESCAPE button to exit from the adjustment mode. Adjust the focus of the projected image. 1. Press the PATT button on the remote control or the PATTERN button on the main unit to display a test pattern for adjustment. 2. Press the FOCUS button on the remote control or the SETTING button on the main unit repeatedly to place the unit in focus adjustment mode. 3. Adjust the unit to an optimal focus setting by pressing either the h or g buttons. 4. Press the FOCUS button again or the ESCAPE button to exit from the focus adjustment (Focus) mode. This unit is equipped with an IRIS function to switch between the high levels of black and high contrast images important in a home theatre and the bright images needed for a large screen. Use this function as best suits your needs. 1. Press the IRIS button on the remote control or the SETTING button on the main unit repeatedly to place the unit in iris diaphragm adjustment (Iris) mode. 2. Adjust the unit to an optimal iris setting by pressing either the + or - buttons. 3. Press the IRIS button again or the ESCAPE button to exit from the iris adjustment mode. This unit is equipped with three test patterns: a crosshatch pattern useful for focus adjustment, and gray scale and color bar patterns for image adjustment. Use them as best suits your needs. 1. Press the PATT button on the remote control or the PATTERN button on the main unit to display a test pattern for adjustment. 2. Select a suitable test pattern by pressing either the + or - buttons. 3. Press the PATT button again or the PATTERN button on the main unit to exit from the adjustment mode. E-12
-
 1
1 -
2
-
3
-
4
-
5
-
6
-
7
-
8
-
9
-
10
-
11
-
 12
12 -
 13
13 -
 14
14 -
 15
15 -
 16
16 -
 17
17 -
 18
18 -
 19
19 -
 20
20 -
 21
21 -
 22
22 -
23
-
24
-
25
-
26
-
27
-
28
-
29
-
30
-
31
-
32
-
33
-
34
-
35
-
36
-
37
-
38
-
39
-
40
-
41
-
42
-
43
-
44
-
45
 |
 |