Yamaha DSP-A592 Owner's Manual - Page 16
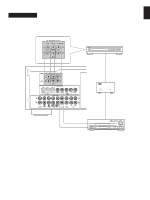
the 6CH DISCRETE INPUT DVD/LD TV/DBS terminals of this, DELAY/CENTER/REAR/SWFR
 |
View all Yamaha DSP-A592 manuals
Add to My Manuals
Save this manual to your list of manuals |
Page 16 highlights
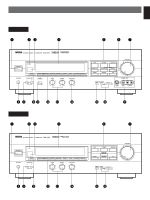
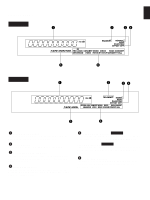
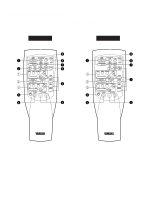
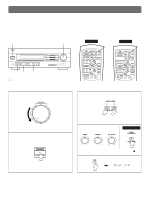
1 POWER switch Press this switch to switch the power on. Press it again to switch the power off. 2 Standby mode indicator While the power is on, pressing the POWER key on the remote control transmitter switches the unit to the standby mode. In this mode, this indicator is illuminated. 3 Remote control sensor Receives signals from the remote control transmitter. 4 Display panel Shows various information. (Refer to page 17 for details.) 5 Input selector buttons Select a program source to listen to or watch. When a button is pressed, the name of selected source appears on the display. 6 2CH/6CH selector button DSP-A592 only When the TV/DBS or DVD/LD input source is selected, pressing this button switches the input signals between 2 channel stereo signals and 6 channel discrete signals. When switched to "6CH", discrete signals from the unit connected to the 6CH DISCRETE INPUT DVD/LD TV/DBS terminals of this unit are selected as the input signals. 7 VOLUME control Used to raise or lower the volume level. 8 PHONES jack When you listen with headphones, connect the headphones to the PHONES jack. You can listen to the sound to be output from the main speakers through headphones. When listening with headphones privately, set both the SPEAKERS A and B switches to the OFF position and switch off the digital sound field processor (so that no DSP program name is illuminated on the display) by pressing the EFFECT button. PHONES 9 SPEAKERS switches Set the switch A or B (or both A and B) for the main speaker system (connected to this unit) you will use to the ON position. Set the switch for the main speaker system you will not use to the OFF position. 0 EFFECT button Switches on/off the digital sound field processor (including the Dolby Pro Logic Surround decoder). A BASS EXTENSION switch DSP-A592 only When this switch is pressed inward (ON), boosts bass frequency response at the main left and main right channels while maintaining overall tonal balance. If you do not have a subwoofer, the use of this switch will be effective to reinforce the bass frequencies. B DSP program selector buttons Select a DSP program. When a button is pressed, the name of selected program lights up on the display. C Tone controls These controls are effective only for the sound from the main speakers. BASS Used to increase or decrease the low frequency response. The 0 position produces flat response. TREBLE Used to increase or decrease the high frequency response. The 0 position produces flat response. D BALANCE control Adjusts the balance of the output volume to the left and right speakers to compensate for sound imbalance caused by speaker location or listening room conditions. E CENTER MODE button Selects a center channel output mode (NORMAL, WIDE or PHANTOM). (For details, refer to page 21.) F DELAY/CENTER/REAR/SWFR and TIME/LEVEL +/- buttons DSP-A592 Adjust the delay time (DELAY), the rear channel output level (REAR), center channel output level (CENTER) and the output level to the SUBWOOFER OUTPUT terminal (SWFR). Select the item which you want to adjust by pressing the DELAY/CENTER/REAR/SWFR button and adjust its time or level by pressing the TIME/LEVEL +/- button. DELAY/CENTER/REAR and TIME/LEVEL +/- buttons DSP-A492 Adjust the delay time (DELAY), the rear channel output level (REAR) and the center channel output level (CENTER). Select the item which you want to adjust by pressing the DELAY/CENTER/REAR button and adjust its time or level by pressing the TIME/LEVEL +/- button. G VIDEO AUX terminals DSP-A592 only Connect an auxiliary video or audio input source unit such as a camcorder to these terminals. If the connected video unit has a S video output terminal, connect it to the S VIDEO terminal to obtain a high resolution picture. The source connected to these terminals can be selected by the corresponding input selector button. 16
-
 1
1 -
2
-
3
-
4
-
5
-
6
-
7
-
8
-
9
-
10
-
 11
11 -
 12
12 -
 13
13 -
 14
14 -
 15
15 -
 16
16 -
 17
17 -
 18
18 -
 19
19 -
 20
20 -
 21
21 -
22
-
23
-
24
-
25
-
26
-
27
-
28
-
29
-
30
-
31
-
32
-
33
-
34
 |
 |