Yamaha DVD-C996GL DVD-C996GL Manual - Page 26
ON-SCREEN MENU, Operating On-Screen Menu
 |
View all Yamaha DVD-C996GL manuals
Add to My Manuals
Save this manual to your list of manuals |
Page 26 highlights
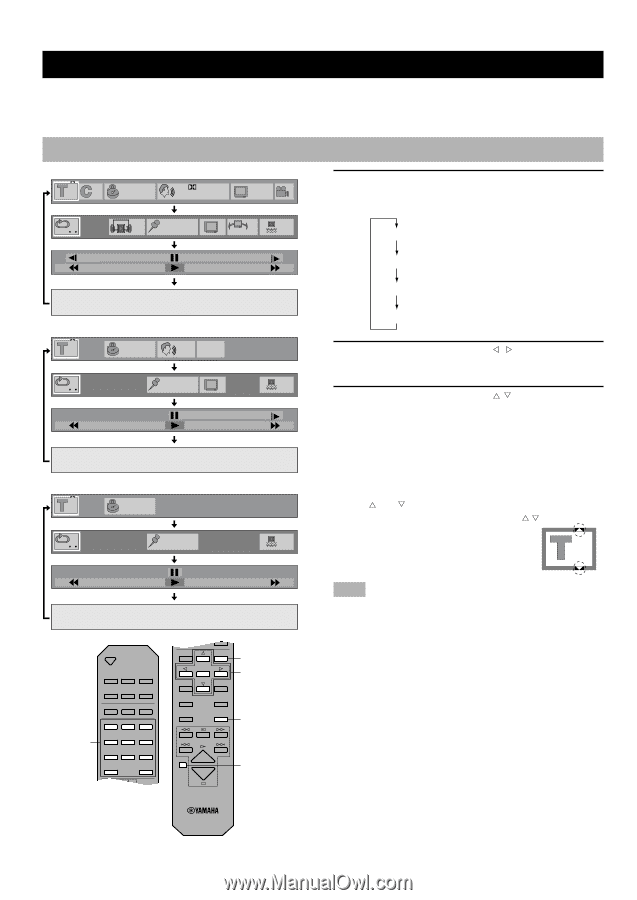
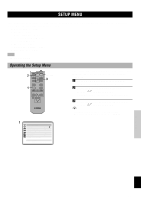
ON-SCREEN MENU This unit features On-Screen Menu icons (Graphical User Interface) that makes operation easy and intuitive. Graphics that represent the functions appear in alignment on the upper side of the video monitor. Operating On-Screen Menu DVD 1 30 1:06:37 Digital 1 ENG 3/2.1ch ON 1 ENG 1 OFF ***** N OFF ON -100 +100 Video CD 1 3:37 PBC L R OFF ***** N ON -40 +40 CD 1 3:37 1 Press ON SCREEN. Each time ON SCREEN is pressed, the screen changes and appears on the video monitor as below. Disc information screen Player's information screen Shuttle screen Off (screen goes off) 2 Press the cursor buttons ( , ) to select the item you want to adjust. The selected item is highlighted in yellow. 3 Press the cursor buttons ( , ) to change setting. • With some items, you need to press ENTER or w (PLAY) to determine the setting. • You can also use the numeric buttons when entering numbers to select a chapter, etc. • You can also use RETURN or CANCEL to turn the screen off. • and around the icon means that the item can be changed using the cursor buttons [ , ]. ***** ON 2 -50 +50 OPEN/ CLOSE Numeric buttons DISC1 DISC2 DISC3 DISC4 DISC5 DISC SKIP REPEAT A-B PLAY MODE 1 2 3 4 5 6 7 8 9 0 > =10 ANGLE RETURN ANGLE RETURN ENTER AUDIO SUBTITLE TOP MENU MENU SETUP ON SCREEN RETURN 2,3 1 CANCEL CANCEL Note • These screens may not be displayed, or partly cut off depending on the disc being played, or when the video monitor (TV)'s automatic zoom function is on. You can change their position lower at '4 On-Screen Message' on the SETUP MENU. 22
-
 1
1 -
2
-
3
-
4
-
5
-
6
-
7
-
8
-
9
-
10
-
11
-
12
-
13
-
14
-
15
-
16
-
17
-
18
-
19
-
20
-
 21
21 -
 22
22 -
 23
23 -
 24
24 -
 25
25 -
 26
26 -
 27
27 -
 28
28 -
 29
29 -
 30
30 -
 31
31 -
32
-
33
-
34
-
35
-
36
-
37
-
38
-
39
 |
 |