Yamaha DVD-S659 Owner's Manual - Page 31
Lip synchronization, Video setup menu, TV type, Setting the TV display, ENTER/OK, SETUP, 3 PAN SCAN
 |
View all Yamaha DVD-S659 manuals
Add to My Manuals
Save this manual to your list of manuals |
Page 31 highlights
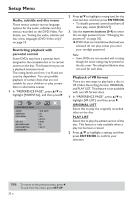
English Setup Menu ON Select this to level out the volume. This feature is only available for movies with the Dolby Digital mode. OFF Select this when you want to enjoy the full dynamic range of surround sound. 2 Press 3/4 to select a setting, and then press ENTER/OK to confirm your selection. Lip synchronization This feature allows you to delay the sound output in order to synchronize it with the video image. This may be necessary when you use certain LCD monitors or projectors. 1 In "AUDIO SETUP PAGE", press 1 / 2 to highlight [LIP SYNC], and then press 2. 2 Press 1 / 2 to adjust the delay time (between 00 ms and 200 ms), and then press ENTER/OK to confirm your selection. Video setup menu 1 Press SETUP. 2 Press 1 / 2 to select "VIDEO SETUP PAGE". 3 Press ENTER/OK to confirm your selection. TV type This menu contains the options for selecting the color system that matches your TV. For details, see "Step 3: Setting a TV type and display" on page 11. Setting the TV display Set the aspect ratio of this unit to match your TV. The format you select must be available on the disc. Otherwise, the TV display setting will not affect the picture during playback. 1 In "VIDEO SETUP PAGE", press 3/4 to highlight [TV DISPLAY], and then press 2. 2 Press 3/4 to highlight one of the following options. 4:3 PAN SCAN Select this if the aspect ratio of your TV is 4:3 and you want both sides of the picture to be trimmed or formatted to fit your TV screen. 4:3 LETTER BOX Select this if the aspect ratio of your TV is 4:3. In this case, a wide picture with black bands on the upper and lower portions of the TV screen are displayed. 16:9 Select this if you have a widescreen TV. VIDEO SETUP PAGE TV TYPE TV DISPLAY PROGRESSIVE PICTURE SETTING BLACK LEVEL CLOSED CAPTION HDMI SETUP TIPS: To return to the previous menu, press 1. To exit from the menu, press SETUP. 27 En
-
 1
1 -
2
-
3
-
4
-
5
-
6
-
7
-
8
-
9
-
10
-
11
-
12
-
13
-
14
-
15
-
16
-
17
-
18
-
19
-
20
-
21
-
22
-
23
-
24
-
25
-
 26
26 -
 27
27 -
 28
28 -
 29
29 -
 30
30 -
 31
31 -
 32
32 -
 33
33 -
 34
34 -
 35
35 -
 36
36 -
37
-
38
-
39
-
40
-
41
-
42
-
43
-
44
-
45
-
46
-
47
 |
 |
