Yamaha DVD-S659 Owner's Manual - Page 35
Preference setup menu, HDMI VIDEO, SETUP, ENTER/OK - troubleshooting
 |
View all Yamaha DVD-S659 manuals
Add to My Manuals
Save this manual to your list of manuals |
Page 35 highlights
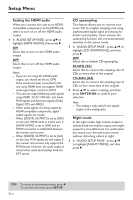
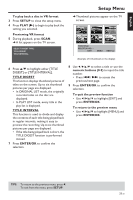
English Setup Menu HDMI VIDEO Enables you to adjust the resolution depending on the monitor you are using. Note: - For settings other than [AUTO], HDMI video output may not be display properly if a resolution output setting is not supported by the HDMI-compatible monitor you are using. In that case, follow the steps below to return to the initial setting: 1 Press OPEN/CLOSE / to open the disc tray. 2 Press 1. 3 Press ANGLE. Do not perform this operation while playing back a disc on this unit. 480P 480 progressive-scan video 576P 576 progressive-scan video 720P 720 progressive-scan video 1080I 1080 interlace video AUTO The resolution is automatically selected to match the monitor you are using. Notes: - You cannot set [TV TYPE] when making HDMI connections. - When disconnecting the HDMI cable, the setting of [TV TYPE] may be changed. If Component video, S-video and Composite video output does not display correctly, see "Troubleshooting" on page 38 to set the correct TV type again. Preference setup menu 1 Press STOP (9) twice to stop playback (if necessary), and then press SETUP. 2 Press 1 / 2 to select "PREFERENCE PAGE". 3 Press ENTER/OK to confirm your selection. PREFERENCE PAGE AUDIO SUBTITLE DISC MENU PARENTAL VR LIST MP3/JPEG NAV DIVX SUBTITLE PASSWORD TIPS: To return to the previous menu, press 1. To exit from the menu, press SETUP. 31 En
-
 1
1 -
2
-
3
-
4
-
5
-
6
-
7
-
8
-
9
-
10
-
11
-
12
-
13
-
14
-
15
-
16
-
17
-
18
-
19
-
20
-
21
-
22
-
23
-
24
-
25
-
26
-
27
-
28
-
29
-
 30
30 -
 31
31 -
 32
32 -
 33
33 -
 34
34 -
 35
35 -
 36
36 -
 37
37 -
 38
38 -
 39
39 -
 40
40 -
41
-
42
-
43
-
44
-
45
-
46
-
47
 |
 |
