Yamaha EL-100 Owner's Manual - Page 80
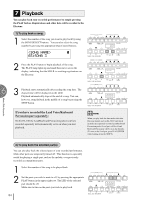
Separate recording for Lead Voice and/or Keyboard Percussion parts, RECORD/LEAD, RECORD/K.PERC.
 |
View all Yamaha EL-100 manuals
Add to My Manuals
Save this manual to your list of manuals |
Page 80 highlights
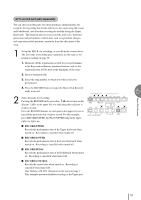
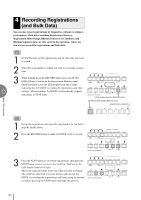
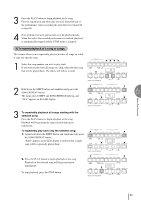
Separate recording for Lead Voice and/or Keyboard Percussion parts: The Lead voice and the Keyboard Percussion can be recorded/played RECORD back separately although they are not shown on the M.D.R. panel. PLAY SHIFT Separate recording for Lead Voice and/or Keyboard Percussion parts: Hold down the SHIFT button and simultaneously press the appropriate button in the top row in the procedure #2 above. The two buttons (indicated in the illustration at the right) function as Lead Voice and Keyboard Percussion selectors in the record mode. (LEAD) (K.PERC.) (LEAD) (K.PERC.) PAUSE REM.MEM. ■ RECORD/LEAD Records the performance data of the Lead voice when turned on. Recording is cancelled when turned off. ■ RECORD/K.PERC. Records the performance data of the Keyboard Percussion when turned on. Recording is cancelled when turned off. Keyboard percussion can be recorded/played back independently from rhythm section. NOTE: If you don't record the Lead Voice and Keyboard Percussion parts separately, the Lead part will be recorded as the Upper data and the Keyboard Percussion part will be recorded as the Lower/ Pedal data. Music Disk Recorder 6 3 Press the PLAY button, and start playing after numbers appear in the display. For this example, play the lower keyboard and pedalboard. 4 Press the STOP button when you are finished with your performance to stop recording. Now that you've recorded the first parts of your performance. Press the RECORD button to set up recording of the next part, Upper part in this case. 5 Press the RECORD button. In this case, the song (number) contains the performance data of the Lower and Pedal in addition to the registration and setup data. The small bars ("--") appear at the left part of LED display and flash along with the song number, warning you that the selected song number already contains recorded data. RECORD PLAY UPPER LOWER PEDAL CONTROL UPPER LOWER PEDAL CONTROL SHIFT SONG REPEAT FROM TO SONG COPY SONG DEL. PAUSE STOP PLAY SONG SELECT RECORD CUSTOM PLAY MUSIC DISK RECORDER TEMPO FORMAT 6 Press the RECORD button again to record another part (Upper part). The RECORD lamp lights up and the PLAY and CUSTOM PLAY lamps begins blinking, indicating that the Music Disk Recorder is ready to record. RECORD PLAY UPPER LOWER PEDAL CONTROL UPPER LOWER PEDAL CONTROL SHIFT SONG REPEAT FROM TO SONG COPY SONG DEL. PAUSE STOP PLAY SONG SELECT RECORD CUSTOM PLAY MUSIC DISK RECORDER TEMPO FORMAT 7 Press the RECORD buttons for each part in the upper left row to turn off the parts you have already recorded. In this case, press RECORD/LOWER, RECORD/PEDAL and RECORD/CONTROL to turn them off. RECORD PLAY UPPER LOWER PEDAL CONTROL UPPER LOWER PEDAL CONTROL SHIFT SONG REPEAT FROM TO SONG COPY SONG DEL. PAUSE STOP PLAY SONG SELECT RECORD CUSTOM PLAY 80 MUSIC DISK RECORDER TEMPO FORMAT
-
 1
1 -
2
-
3
-
4
-
5
-
6
-
7
-
8
-
9
-
10
-
11
-
12
-
13
-
14
-
15
-
16
-
17
-
18
-
19
-
20
-
21
-
22
-
23
-
24
-
25
-
26
-
27
-
28
-
29
-
30
-
31
-
32
-
33
-
34
-
35
-
36
-
37
-
38
-
39
-
40
-
41
-
42
-
43
-
44
-
45
-
46
-
47
-
48
-
49
-
50
-
51
-
52
-
53
-
54
-
55
-
56
-
57
-
58
-
59
-
60
-
61
-
62
-
63
-
64
-
65
-
66
-
67
-
68
-
69
-
70
-
71
-
72
-
73
-
74
-
 75
75 -
 76
76 -
 77
77 -
 78
78 -
 79
79 -
 80
80 -
 81
81 -
 82
82 -
 83
83 -
 84
84 -
 85
85 -
86
-
87
-
88
-
89
-
90
-
91
-
92
-
93
-
94
-
95
-
96
-
97
-
98
-
99
-
100
-
101
-
102
-
103
-
104
-
105
-
106
-
107
-
108
-
109
-
110
-
111
-
112
-
113
-
114
-
115
-
116
-
117
-
118
-
119
-
120
-
121
-
122
-
123
-
124
-
125
-
126
-
127
-
128
-
129
-
130
-
131
-
132
-
133
-
134
-
135
-
136
 |
 |
