Yamaha EL-100 Owner's Manual - Page 82
Recording Registrations (and Bulk Data
 |
View all Yamaha EL-100 manuals
Add to My Manuals
Save this manual to your list of manuals |
Page 82 highlights
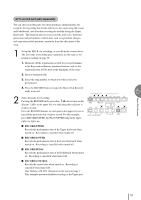
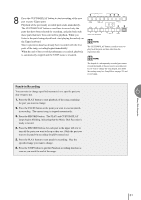
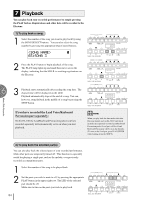
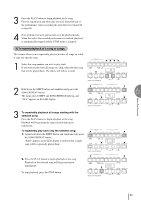
6 4 Recording Registrations (and Bulk Data) You can also record registrations by themselves, without recording a performance. Bulk data, including Registration Memory, Registration Shift settings, Rhythm Pattern (User rhythms), and Rhythm Sequence data, are also saved in the operation. There are two ways to record the registrations and bulk data: [1] 1 On the Electone, set the registrations and all other data you want to record. 2 Select the song number to which you wish to record the registrations. 3 While holding down the RECORD button, press the M./TO DISK (Memory) button on the Registration Memory panel. Small bars flash across the LED display from left to right, indicating that the M.D.R. is reading the registrations and other settings. After recording, the M.D.R. is automatically stopped and returns to STOP status. RECORD PLAY UPPER LOWER PEDAL CONTROL UPPER LOWER PEDAL CONTROL SHIFT SONG REPEAT FROM TO SONG COPY SONG DEL. PAUSE STOP PLAY SONG SELECT RECORD CUSTOM PLAY MUSIC DISK RECORDER TEMPO FORMAT 1. While holding down the RECORD button... 2. Press the M./TO DISK (Memory) button. M. / TO DISK REGISTRATION MEMORY 1 2 3 4 5 6 Music Disk Recorder [2] 1 Set up the registrations and select the song number as you did in steps #1 and #2 above. 2 Press the RECORD button to make the M.D.R. ready to record. RECORD PLAY UPPER LOWER PEDAL CONTROL UPPER LOWER PEDAL CONTROL SHIFT SONG REPEAT FROM TO SONG COPY SONG DEL. PAUSE STOP PLAY SONG SELECT RECORD CUSTOM PLAY MUSIC DISK RECORDER TEMPO FORMAT 3 Press the PLAY button to record the registrations, then press the STOP button as soon as you see the small bars flash across the LED display from left to right. This is the same procedure as the one when you start recording. The small bars that flash across the display indicate that the M.D.R. is recording the registrations and being set up for normal recording; pressing the STOP button interrupts this process. RECORD PLAY UPPER LOWER PEDAL CONTROL UPPER LOWER PEDAL CONTROL SHIFT SONG REPEAT FROM TO SONG COPY SONG DEL. PAUSE STOP PLAY SONG SELECT RECORD CUSTOM PLAY MUSIC DISK RECORDER TEMPO FORMAT 82
-
 1
1 -
2
-
3
-
4
-
5
-
6
-
7
-
8
-
9
-
10
-
11
-
12
-
13
-
14
-
15
-
16
-
17
-
18
-
19
-
20
-
21
-
22
-
23
-
24
-
25
-
26
-
27
-
28
-
29
-
30
-
31
-
32
-
33
-
34
-
35
-
36
-
37
-
38
-
39
-
40
-
41
-
42
-
43
-
44
-
45
-
46
-
47
-
48
-
49
-
50
-
51
-
52
-
53
-
54
-
55
-
56
-
57
-
58
-
59
-
60
-
61
-
62
-
63
-
64
-
65
-
66
-
67
-
68
-
69
-
70
-
71
-
72
-
73
-
74
-
75
-
76
-
 77
77 -
 78
78 -
 79
79 -
 80
80 -
 81
81 -
 82
82 -
 83
83 -
 84
84 -
 85
85 -
 86
86 -
 87
87 -
88
-
89
-
90
-
91
-
92
-
93
-
94
-
95
-
96
-
97
-
98
-
99
-
100
-
101
-
102
-
103
-
104
-
105
-
106
-
107
-
108
-
109
-
110
-
111
-
112
-
113
-
114
-
115
-
116
-
117
-
118
-
119
-
120
-
121
-
122
-
123
-
124
-
125
-
126
-
127
-
128
-
129
-
130
-
131
-
132
-
133
-
134
-
135
-
136
 |
 |
