Yamaha G1D Owner's Manual - Page 10
Set the pickup height., Attach the pickup., Check the height.
 |
View all Yamaha G1D manuals
Add to My Manuals
Save this manual to your list of manuals |
Page 10 highlights
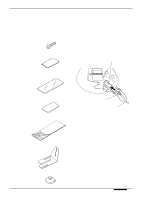
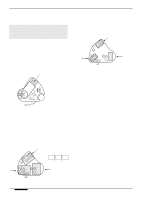
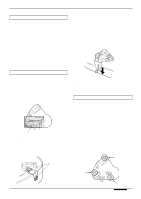
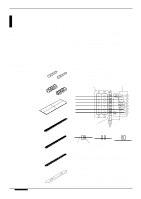
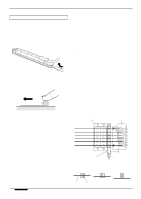
2. Set the pickup height. First make sure the truss rod and string height are adjusted properly, then tune the strings to their normal pitch. Adjust the height of the pickup - using the appropriate spacer or combination of spacers (see "NOTES" below) - so that the distance between the top of the pickup and the bottom of each string is about 1 millimeter (0.04") when each string is fretted at the highest note on the neck. The pickup height can be checked by using the supplied clearance gauge. The distance between the pickup and the bottom of the strings can be set less than 1 mm as long as the strings do not touch the pickup when fretted at the highest note on the neck. 1 millimeter (0.04") 3. Attach the pickup. Remove the strings from the guitar. Apply the double-sided tape to the bottom of the pickup and remove the backing. Remove the backing from the required pickup cushion/spacers and carefully attach them to the bottom of the pickup. Finally, carefully attach the pickup/spacer assembly to the guitar at the marked position, then re-string and tune the guitar. Pickup Cut Double-sided adhesive tape Bridge pickup Pickup Guitar body Bridge Spacers A, B Cushion Clearance gauge 1 millimeter (0.04") 20 millimeter (3/4") s NOTES • Don't remove the backing from the pickup cushion or spacers when initially setting up the pickup height. Please note that the cushion/spacer backing adds about 0.1 millimeter (0.004") to their thickness, so take this added thickness into account when using a number of spacers. • To compensate for differences in height between the first and sixth strings (e.g. if your guitar has an arched top), use an appropriate number of one-quarter or one-third width spacers under the lower end of the pickup (the spacers can be cut easily with a good pair of scissors). Cut Double-sided adhesive tape s NOTES • The re-usable double-sided adhesive pads (page 8) can be used in place of the bottom layer of adhesive tape (guitar side). Cut the pads to match the shape of the pickup, as required. 4. Check the height. Check the pickup height again, and play the guitar in all ranges to ensure that the strings do not come in contact with the pickup. If all is well, then the installation is complete. Cut spacers Installation 9
-
 1
1 -
2
-
3
-
4
-
 5
5 -
 6
6 -
 7
7 -
 8
8 -
 9
9 -
 10
10 -
 11
11 -
 12
12 -
 13
13 -
 14
14 -
 15
15 -
16
 |
 |
