Yamaha G1D Owner's Manual - Page 8
The Re-usable Adhesive Pads, Bracket Installation, Suction Cup Installation
 |
View all Yamaha G1D manuals
Add to My Manuals
Save this manual to your list of manuals |
Page 8 highlights
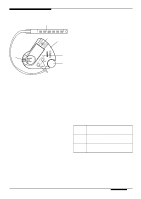
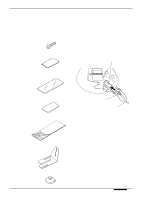
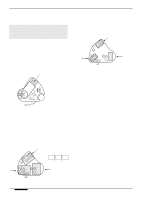
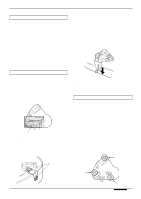
The Re-usable Adhesive Pads The re-usable adhesive pads can be used in the same way as the standard double-sided adhesive tape for controller unit installation. They can be reused many times, and if their adhesive qualities deteriorate due to accumulated dust and dirt, they can be restored to virtually like-new conditions by washing carefully with a neutral detergent. If you do repeatedly attach and remove the re-usable adhesive pads, it is a good idea to replace the original protective backing when the pads are not in use to keep them in top condition. An alternative method is to attach the bracket using the guitar's strap pin (the spacers should still be used to prevent the controller/bracket assembly from scratching the surface of the guitar). Loosen the strap pin on the guitar body by unscrewing its attachment screw by a few turns, slide the slot in the bracket under the pin as shown in the illustration, then tighten the pin screw until the bracket is held firmly in position. Bracket Installation This installation option has the advantages that no holes need to be drilled in the guitar. To use the bracket, first unscrew the two screws marked with arrows on the bottom of the controller unit, then use the same screws to attach the controller unit to the bracket as shown in the illustration. Next, attach the spacers (double-sided adhesive) to the bracket to protect the guitar surface from the screw heads, and attach the bracket to the guitar in the appropriate position, as shown in the illustration. s CAUTION! • Repeated loosening and tightening of the strap pin, or application of excessive force to the bracket, can cause the strap pin screw to become loose. Suction Cup Installation The supplied suction cups are a handy and fairly secure way to attach the controller unit to guitars with a flat top and a smooth, shiny finish. To use the suction cups, first insert the bases of the three suction cups into the large openings in the three holes on the bottom of the controller unit, then slide the bases of the cups toward the narrow section of the holes until they are held securely. Then, after making sure the surface of your guitar is free from dirt and grease, simply press the controller unit onto the guitar top at the appropriate location. The suction cups can be removed by slightly lifting the edge of each cup. Spacer (Double-sided adhesive tape) Installation 7
-
 1
1 -
2
-
 3
3 -
 4
4 -
 5
5 -
 6
6 -
 7
7 -
 8
8 -
 9
9 -
 10
10 -
 11
11 -
 12
12 -
 13
13 -
14
-
15
-
16
 |
 |
