Yamaha G1D Owner's Manual - Page 6
Hardware, Installation Procedure - guitar pickup
 |
View all Yamaha G1D manuals
Add to My Manuals
Save this manual to your list of manuals |
Page 6 highlights
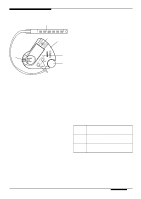
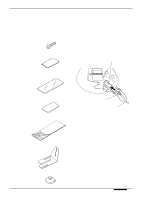
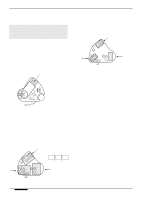
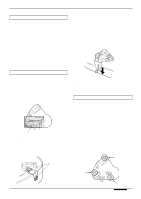
s Hardware The following parts are provided for installation of the controller unit. Please make sure you have all the parts. • Self-tapping round-head screw (3x16mm 1 • Double-sided adhesive tape 3 s Installation Procedure 1. Determine the optimum location for installation. Normally, the controller should be attached somewhere behind the guitar's bridge, as shown in the illustration. It should be accessible, but it should not interfere with your playing or any of the guitars controls or adjustments. Consider the following points carefully when deciding on the best location to install the controller: Pickup Controller • Re-usable double-sided adhesive pads (transparent). ..... 3 GUITAR MIX SYNTH UP DOWN VOL • Spacer (double-sided adhesive 6 • Velcro fastener 1 • Bracket 1 • Suction cups 3 Direct guitar's cable Multi-pin cable • The controller and pickup cable should not get in the way of your picking-hand at any time. Make sure the location you choose will not affect your playing style. • The controller should not block or hamper access to any of the guitar's controls: tone, volume, bridge adjustments (especially watch out for intonation/saddle screws accessed from the rear of the bridge). • The controller must be well within reach of both the pickup cable (when the pickup is in its final installed position) and the direct guitar cable • Neither the controller unit itself nor any of the connected cable plugs should extend beyond the body of the guitar to prevent accidental damage. Installation 5
-
 1
1 -
 2
2 -
 3
3 -
 4
4 -
 5
5 -
 6
6 -
 7
7 -
 8
8 -
 9
9 -
 10
10 -
 11
11 -
 12
12 -
13
-
14
-
15
-
16
 |
 |
