Yamaha G1D Owner's Manual - Page 7
Attach the controller., screw/adhesive tape, Mark and drill the controller, screw hole
 |
View all Yamaha G1D manuals
Add to My Manuals
Save this manual to your list of manuals |
Page 7 highlights
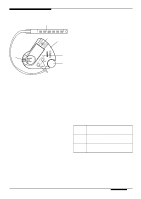
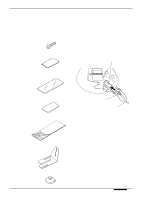
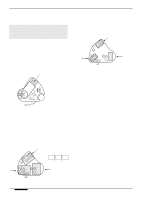
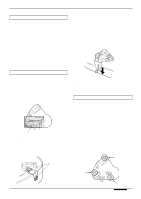
2. Mark and drill the controller screw hole (see "NOTES" below). s CAUTION! • Make sure the multi-pin cable and direct guitar's cable are disconnected from the controller before installation. While holding the controller unit in exactly the position it is to be installed, use a fine pen or scribe to mark the center of the screw hole (located in the multi-pin cable recess of the controller) on the body of your guitar. Then set the controller unit aside and carefully drill a 2-millimeter (1/16" inch, approx.) hole at the marked location. screw hole s NOTES • For acoustic or semi-acoustic guitars, or simply if the idea of drilling a hole in your guitar makes you shudder, the controller can be attached using only the adhesive tape, the Velcro faster, or any of the other installation options described below. Please note, however, that screw installation is the most secure method, and is recommended wherever possible. • The Velcro fastener is provided for players who will be frequently removing and reattaching the G1D. DO NOT use the adhesive pads if you use the Velcro fastener. Bottom side 3. Attach the controller. (screw/adhesive tape) Remove the protective backing from one side of the adhesive tape patches and attach them to the bottom of the controller as shown in the illustration. s NOTES • You can use the standard adhesive tape or the re- usable adhesive pads on just about any type of guitar. See "The Re-usable Adhesive Pads" below, for details. • The adhesive tape/pads may react chemically with the finish on some guitars, causing discoloration or otherwise marring the finish. It might be a good idea to try attaching a small piece of tape/pad at some location that is not obvious for a few days before actual installation. • If your guitar has an arched top or is shaped in such a way that the controller won't sit properly with only the standard adhesive tape, use as many of the spacers as required in the appropriate location(s) to position the controller as required. The spacers are adhesive on both sides, with protective backing like the standard adhesive tape. Next, carefully clean the area on the guitar body to which the controller is to be attached to eliminate dust, dirt, and particularly any oil or grease which might prevent the adhesive from sticking. Then remove the protective backing from the exposed side of the adhesive tape, and carefully attach the controller to the guitar making sure that the screw hole in the controller is perfectly aligned with the screw hole in the body of your guitar (if you drilled one). Press firmly - but don't use excessive force - to ensure that the tape sticks securely. Finally, screw the supplied self-tapping roundhead screw (3 x 16 mm) into the pre-drilled hole in the guitar body through the hole in the controller. Screw only "finger tight" - if you attempt to screw the screw in too far or too tight you might damage the controller and or your guitar! 6 Installation
-
 1
1 -
 2
2 -
 3
3 -
 4
4 -
 5
5 -
 6
6 -
 7
7 -
 8
8 -
 9
9 -
 10
10 -
 11
11 -
 12
12 -
13
-
14
-
15
-
16
 |
 |
