Yamaha HTR-4063 Owners Manual - Page 5
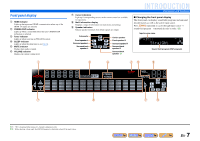
Part names and functions, Front panel - decoder off
 |
UPC - 027108935942
View all Yamaha HTR-4063 manuals
Add to My Manuals
Save this manual to your list of manuals |
Page 5 highlights
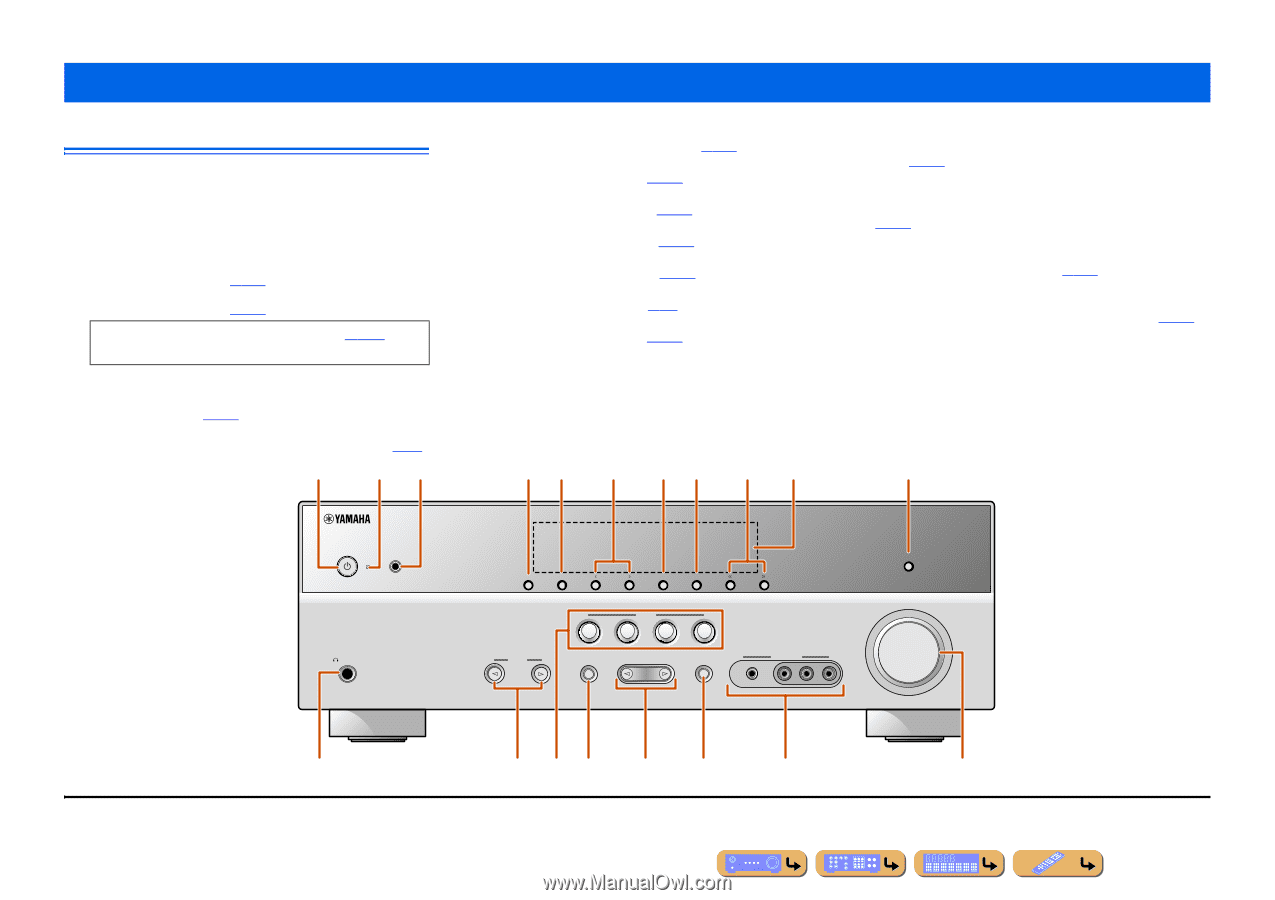
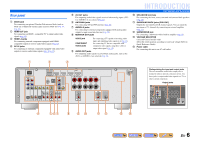
Part names and functions INTRODUCTION Front panel a A (Power) Switches this unit between on and standby mode. b HDMI Through/iPod Charge indicator Lights up in any of the following cases while the unit is in standby mode. • When Standby Through function is enabled and audio/video from an external component connected with HDMI is output to a TV during the standby mode (☞p. 55). J1 • When an iPod is charging in the Yamaha iPod universal dock during the standby mode (☞p. 41). When the HDMI Control functions are "On" (☞p. 55), then this stays on during standby mode. c YPAO MIC jack Connect the supplied YPAO microphone and adjust the speaker balance automatically (☞p. 23). d INFO Changes the information displayed on the front panel display (☞p. 7). a bc e MEMORY Registers FM/AM stations as preset stations (☞p. 36). J2 f PRESET j / i Selects an FM/AM preset station (☞p. 37). J2 g FM Sets the FM/AM tuner band to FM (☞p. 34). J2 h AM Sets the FM/AM tuner band to AM (☞p. 34). J2 i TUNING jj / ii Changes FM/AM tuner frequencies (☞p. 34). J2 j Front panel display Displays information on this unit (☞p. 7). k DIRECT Switches this unit to direct mode (☞p. 31). l PHONES jack For plugging headphones in. Sound effects applied during playback can also be heard through the headphones. m INPUT l / h Selects an input source from which to playback. Press either the left or right key repeatedly to cycle through the input sources in order. de f gh i j n SCENE Switches the input source and the sound field program with a single button (☞p. 29). When this unit is in standby mode, press this key to switch on. o TONE CONTROL Adjusts high-frequency/low-frequency output of speakers/headphones (☞p. 28). p PROGRAM l / h Switches between the sound field effect (sound field program) you are using and the surround sound decoder (☞p. 29). Press either the left or right key repeatedly to cycle through the input sources in order. q STRAIGHT Changes a sound field program to straight decoding mode (☞p. 30). r VIDEO AUX jacks For connecting video cameras, game consoles, and portable music players to this unit temporarily. Attach the supplied VIDEO AUX input cover when not using this jack. s VOLUME Adjusts the volume level. k YPAO MIC PHONES SILENT CINEMA INFO MEMORY PRESET FM AM TUNING INPUT BD DVD SCENE TV CD RADIO TONE CONTROL PROGRAM STRAIGHT VIDEO AUX PORTABLE VIDEO L AUDIO R DIRECT VOLUME l m no p q r s J 1 : During the standby mode, you can select the HDMI input (HDMI1-4) to output to a TV. When the input is changed correctly, HDMI Through/iPod Charge indicator blinks twice. J 2 : Usable when you have selected tuner input. En 5
-
 1
1 -
 2
2 -
 3
3 -
 4
4 -
 5
5 -
 6
6 -
 7
7 -
 8
8 -
 9
9 -
 10
10 -
 11
11 -
12
-
13
-
14
-
15
-
16
-
17
-
18
-
19
-
20
-
21
-
22
-
23
-
24
-
25
-
26
-
27
-
28
-
29
-
30
-
31
-
32
-
33
-
34
-
35
-
36
-
37
-
38
-
39
-
40
-
41
-
42
-
43
-
44
-
45
-
46
-
47
-
48
-
49
-
50
-
51
-
52
-
53
-
54
-
55
-
56
-
57
-
58
-
59
-
60
-
61
-
62
-
63
-
64
-
65
-
66
-
67
-
68
-
69
-
70
-
71
-
72
-
73
-
74
-
75
-
76
-
77
-
78
-
79
-
80
-
81
-
82
-
83
-
84
-
85
-
86
-
87
-
88
-
89
-
90
-
91
-
92
-
93
-
94
-
95
-
96
-
97
 |
 |