Yamaha HTR-5490 Owner's Manual - Page 10
Remote Control, SYSTEM POWER
 |
View all Yamaha HTR-5490 manuals
Add to My Manuals
Save this manual to your list of manuals |
Page 10 highlights
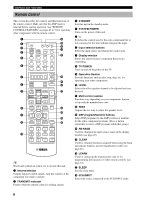
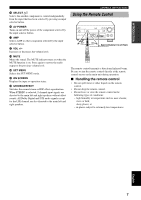
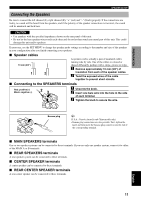
CONTROLS AND FUNCTIONS Remote Control This section describes the controls and their functions of the remote control. Make sure that the AMP mode is selected before starting operation. See "REMOTE CONTROL FEATURES" on pages 42 to 51 for operating other components with the remote control. 1 2 3 4 5 6 TRANSMIT RE-NAME CLEAR LEARN SYSTEM POWER STANDBY SLEEP 6CH INPUT A PHONO TUNER CD V-AUX CBL/SAT MD/TAPE CD-R D-TV/LD VCR 1 VCR2/DVR DVD r t y u i 7 8 9 0 q w e SELECT POWER TV REC DISC SKIP POWER AV AMP AUDIO + VOL - LEVEL TITLE TV INPUT + TV VOL SET MENU MENU A/B/C/D/E MUTE CH - TV MUTE SELECT CH + PRESET TEST RETURN HALL 1 TV VOL - CHURCH 2 PRESET ON SCREEN STEREO DISPLAY JAZZ CLUB EFFECT ROCK CONCERT 3 4 ENTERTAINMENT 5 TV SPORTS 6 MONO MOVIE 7 MOVIE THEATER 1 8 MOVIE THEATER 2 9 /DTS SUR. 10 0 SELECT 11 +10 6.1/ES 12 CHP/INDEX o p a s d f g h y Words and symbols in yellow are to operate this unit. 1 Infrared window Outputs infrared control signals. Aim this window at the component you want to operate. 2 TRANSMIT indicator Flashes while the remote control is sending signals. 3 STANDBY Sets this unit in the standby mode. 4 SYSTEM POWER Turns on the power of this unit. 5Å Switches the control area for the extra component that is not connected to this unit without changing the input. 6 Input selector buttons Select the input source and change the control area. 7 Display window Shows the selected source component that you are controlling. 8 TV POWER Turns on and off the power of the TV. 9 Operation Section Provides functions such as play, stop, skip, etc. for operating your other components. 0 LEVEL Selects the effect speaker channel to be adjusted and sets the level. q Multi control section Functions vary depending on your components that are set up with the manufacturer code. w TEST Outputs the test tone to adjust the speaker levels. e DSP program/Numeric buttons Select DSP programs for the AMP position or numbers for the other component positions. (Press a button repeatedly to select a DSP program within that group.) r RE-NAME Used for changing the input source name in the display window (see page 45). t CLEAR Used for clearing functions acquired when using the learn and rename features, and set manufacturer codes (see page 46). y LEARN Used for setting up the manufacturer code or for programming the functions of other remote controls (see page 44). u SLEEP Sets the sleep timer. i 6CH INPUT Selects the source connected to the 6CH INPUT jacks. 6
-
 1
1 -
2
-
3
-
4
-
 5
5 -
 6
6 -
 7
7 -
 8
8 -
 9
9 -
 10
10 -
 11
11 -
 12
12 -
 13
13 -
 14
14 -
 15
15 -
16
-
17
-
18
-
19
-
20
-
21
-
22
-
23
-
24
-
25
-
26
-
27
-
28
-
29
-
30
-
31
-
32
-
33
-
34
-
35
-
36
-
37
-
38
-
39
-
40
-
41
-
42
-
43
-
44
-
45
-
46
-
47
-
48
-
49
-
50
-
51
-
52
-
53
-
54
-
55
-
56
-
57
-
58
-
59
-
60
-
61
-
62
-
63
-
64
-
65
-
66
-
67
-
68
-
69
-
70
-
71
-
72
-
73
-
74
-
75
-
76
-
77
-
78
-
79
-
80
-
81
-
82
-
83
 |
 |
