Yamaha HTR-5490 Owner's Manual - Page 49
Changing the Source Name in the Display Window, One Button Clear
 |
View all Yamaha HTR-5490 manuals
Add to My Manuals
Save this manual to your list of manuals |
Page 49 highlights
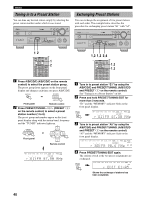
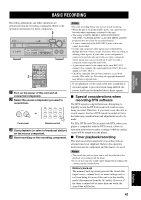
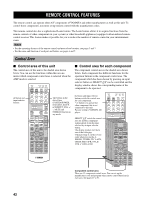
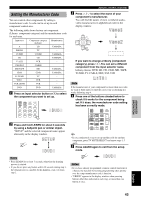
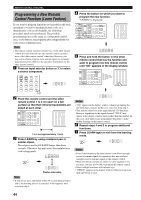
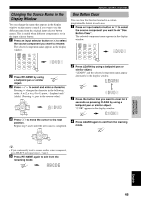
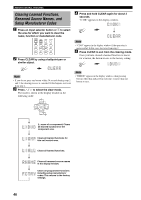
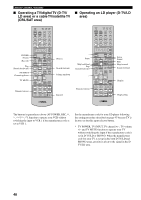
INTRODUCTION PREPARATION BASIC OPERATION REMOTE CONTROL FEATURES Changing the Source Name in the Display Window You can change the name that appears in the display window on the remote control if you want to use the different name from the original input selector button names. This is useful when different component is set in the input selector button. 1 Press an input selector button or Å to select the source component you want to rename. The selected component name appears in the display window. SYSTEM POWER STANDBY SLEEP 6CH INPUT A PHONO TUNER CD V-AUX CBL/SAT MD/TAPE CD-R D-TV/LD VCR 1 VCR2/DVR DVD 2 Press RE-NAME by using RE-NAME a ballpoint pen or similar object. 3 Press u / d to select and enter a character. Pressing d changes the character in the following order: A to Z, a to z, 0 to 9, space, - (hyphen) and / (slash). (Pressing u goes in the reverse order.) + TV VOL CH - PRESET TV MUTE SELECT TV VOL - CH + PRESET One Button Clear You can clear the function learned in a certain programmable button in each area. 1 Press an input selector button or Å to select the source component you want to do "One Button Clear". The selected component name appears in the display window. SYSTEM POWER STANDBY SLEEP 6CH INPUT A PHONO TUNER CD V-AUX CBL/SAT MD/TAPE CD-R D-TV/LD VCR 1 VCR2/DVR DVD 2 Press LEARN by using a ballpoint pen or similar object. "LEARN" and the selected component name appear alternately in the display window. LEARN 3 Press the button that you want to clear for 3 seconds as pressing CLEAR by using a ballpoint pen or similar object. "C:OK" appears in the display window. CLEAR 4 Press j / i to move the cursor to the next position. Repeat step 3 and 4 until the new name is completed. + TV VOL CH - PRESET TV MUTE SELECT TV VOL - CH + PRESET y • If you continuously want to rename another source component, press SELECT and repeat steps 1, 3 and 4. 5 Press RE-NAME again to exit from the renaming mode. RE-NAME 4 Press LEARN again to exit from the learning mode. LEARN ADVANCED OPERATION ADDITIONAL INFORMATION APPENDIX English 45
-
 1
1 -
2
-
3
-
4
-
5
-
6
-
7
-
8
-
9
-
10
-
11
-
12
-
13
-
14
-
15
-
16
-
17
-
18
-
19
-
20
-
21
-
22
-
23
-
24
-
25
-
26
-
27
-
28
-
29
-
30
-
31
-
32
-
33
-
34
-
35
-
36
-
37
-
38
-
39
-
40
-
41
-
42
-
43
-
 44
44 -
 45
45 -
 46
46 -
 47
47 -
 48
48 -
 49
49 -
 50
50 -
 51
51 -
 52
52 -
 53
53 -
 54
54 -
55
-
56
-
57
-
58
-
59
-
60
-
61
-
62
-
63
-
64
-
65
-
66
-
67
-
68
-
69
-
70
-
71
-
72
-
73
-
74
-
75
-
76
-
77
-
78
-
79
-
80
-
81
-
82
-
83
 |
 |
