Yamaha HTR-5840 Owners Manual - Page 25
Connecting the power supply cord, Speaker impedance setting
 |
View all Yamaha HTR-5840 manuals
Add to My Manuals
Save this manual to your list of manuals |
Page 25 highlights
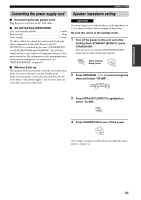
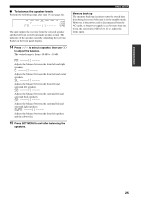
PREPARATION CONNECTIONS Connecting the power supply cord Speaker impedance setting ■ Connecting the AC power cord Plug the power cord into an AC wall outlet. ■ AC OUTLET(S) (SWITCHED) U.K. and Australia models 1 outlet Korea model None Other models 2 outlets Use these outlets to connect the power cords from your other components to this unit. Power to the AC OUTLET(S) is controlled by this unit's STANDBY/ON (or SYSTEM POWER and STANDBY). The outlet(s) supply power to any connected component whenever this unit is turned on. For information on the maximum power (total power consumption of components), see "SPECIFICATIONS" on page 81. ■ Memory back-up The memory back-up circuit prevents the stored data from being lost even if this unit is in the standby mode. However if the power cord is disconnected from the AC wall outlet, or the power supply is cut for more than one week, the stored data will be lost. CAUTION If you are using 4 or 6 ohm speakers, set the impedance to 4 or 6 ohms as follows before turning on the power. Be sure this unit is in the standby mode. 1 Turn off the power to this unit, and while holding down STRAIGHT (EFFECT), press STANDBY/ON. This unit turns on, and the ADVANCED SETUP menu appears in the front panel display. STRAIGHT EFFECT While holding down, press STANDBY /ON 2 Press PROGRAM l / h to move through the menu and select "SP IMP.". l PROGRAM h 3 Press STRAIGHT (EFFECT) repeatedly to select "4Ω MIN". STRAIGHT EFFECT 4 Press STANDBY/ON to turn off the power. STANDBY /ON The setting you made is reflected the next time this unit's power is turned on. 21
-
 1
1 -
2
-
3
-
4
-
5
-
6
-
7
-
8
-
9
-
10
-
11
-
12
-
13
-
14
-
15
-
16
-
17
-
18
-
19
-
 20
20 -
 21
21 -
 22
22 -
 23
23 -
 24
24 -
 25
25 -
 26
26 -
 27
27 -
 28
28 -
 29
29 -
 30
30 -
31
-
32
-
33
-
34
-
35
-
36
-
37
-
38
-
39
-
40
-
41
-
42
-
43
-
44
-
45
-
46
-
47
-
48
-
49
-
50
-
51
-
52
-
53
-
54
-
55
-
56
-
57
-
58
-
59
-
60
-
61
-
62
-
63
-
64
-
65
-
66
-
67
-
68
-
69
-
70
-
71
-
72
-
73
-
74
-
75
-
76
-
77
-
78
-
79
-
80
-
81
-
82
-
83
-
84
-
85
-
86
-
87
-
88
-
89
-
90
-
91
 |
 |
