Yamaha MG20XU Owner's Manual - Page 30
STEP 2, Setting Switches and Controls, Check the overall balance
 |
View all Yamaha MG20XU manuals
Add to My Manuals
Save this manual to your list of manuals |
Page 30 highlights
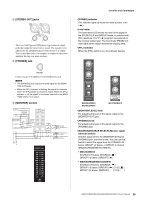
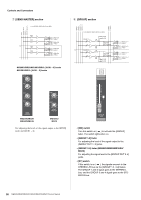
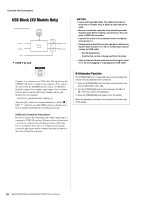
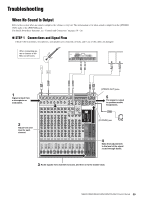
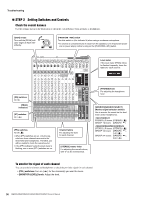
Troubleshooting STEP 2 Setting Switches and Controls Check the overall balance Use the settings shown in the illustration to check the overall balance from speakers or headphones. [GAIN] knobs Turn until the [PEAK] indicator begins to flash intermittently. [PHANTOM +48V] switch Turn this switch on (the indicator lit) when using a condenser microphone. • To prevent an unwanted burst of noise from the speakers, turn off powered speakers (or power amps) before turning on the [PHANTOM +48V] switch. Level meter If the level meter [PEAK] indicator flashes frequently, lower the faders for each channel. [ON] switches On (lit) [PEAK] indicators [ST] switches On ( ) [PFL] switches All off ( ) • When [PFL] switches are on, only the sig- nals from those channels are sent to the level meter and headphones. Therefore, you will be unable to check the overall sound. • If the [PFL] indicator below the level meter is flashing, one or more [PFL] switches are on. Channel faders For adjusting the level for each channel. [STEREO] master fader For adjusting the overall volume, with "0" as the nominal level. [PHONES] knob For adjusting the headphone level. [SOURCE]/[SOURCE SELECT] (Monitor signal selection switch) Use to monitor the sound via the level meter and/or headphones. • MG12XU/MG12 STEREO L/R buses: [STEREO] ( ) GROUP 1-2 buses: [GROUP] ( ) • MG20XU/MG20/MG16XU/MG16 STEREO L/R buses: [STEREO] ( ) GROUP 1-2 buses: [GROUP] ( ), [1-2] ( ) GROUP 3-4 buses: [GROUP] ( ), [3-4] ( ) To monitor the signal of each channel You can use the level meter and headphones to check the pre-fader signal for each channel. • [PFL] switches: Turn on ( ) for the channel(s) you want to check. • [MONITOR LEVEL] knob: Adjust the level. 30 MG20XU/MG20/MG16XU/MG16/MG12XU/MG12 Owner's Manual
-
 1
1 -
2
-
3
-
4
-
5
-
6
-
7
-
8
-
9
-
10
-
11
-
12
-
13
-
14
-
15
-
16
-
17
-
18
-
19
-
20
-
21
-
22
-
23
-
24
-
 25
25 -
 26
26 -
 27
27 -
 28
28 -
 29
29 -
 30
30 -
 31
31 -
 32
32 -
 33
33 -
 34
34 -
 35
35 -
36
-
37
-
38
-
39
-
40
 |
 |
