Yamaha MM6 Owner's Manual - Page 25
Playing Auto-accompaniment Chords
 |
UPC - 086792858098
View all Yamaha MM6 manuals
Add to My Manuals
Save this manual to your list of manuals |
Page 25 highlights
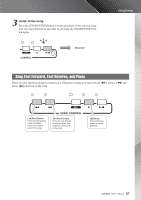
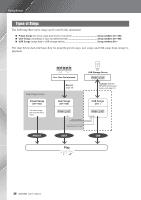
Playing Patterns Playing Auto-accompaniment Chords There are two types of auto-accompaniment chords: ● Easy Chords ● Standard Chords The instrument will automatically recognize the different chord types. This function is known as Multi Fingering. The keyboard to the left of the split point (default: 54/F#2) becomes the "accompaniment range". Play the accompaniment chords in this area of the keyboard. Split point (default: 54/F#2) Root Notes and the Corresponding Keys Db Eb F# G# Bb Db Eb F# CDE FGABCDE F Accompaniment Range ■Easy Chords This method lets you easily play chords in the accompaniment range of the keyboard using only one, two, or three fingers. C • To play a major chord Press the root note of the chord. Cm • To play a minor chord Press the root note together with the nearest black key to the left of it. C7 • To play a seventh chord Press the root note together with the nearest white key to the left of it. Cm7 • To play a minor seventh chord Press the root note together with the nearest white and black keys to the left of it (three keys altogether). ■Standard Chords This method lets you produce accompaniment by playing chords using normal fingerings in the accompaniment range of the keyboard. Standard Chord Fingerings [Examples for "C" chords] C Cadd9 C6 C(69) () () () () () CM7 CM(97) C (#11) M7 C (b5) C (b5) M7 Csus4 Caug CM7aug () () () Cm Cm add9 Cm6 Cm7 Cm(97) C(m117) CmM7 CmM(97) () () () () C(mb57) CmM(b75) Cdim Cdim7 C7 C(7b9) C(7b13) C(79) () C(7#11) C(713) C(7#9) C(7b5) () () () () () C7aug C7sus4 Csus2 () Notes enclosed in parentheses are optional; the chords will be recognized without them. ● Multi Fingering and Full Keyboard These let you select the accompaniment section of the keyboard for chord playing. When changing settings refer to "Specify Chords Over the Entire Keyboard Range" on page 56, and "Chord Fingering" on page 65. Multi Fingering: As explained above, the keys to the left of the split point (default: 54, F#2) become the accompaniment range. Playing Auto-accompaniment Chords. There are two ways of playing auto-accompaniment chords: Easy Chords and Standard Chords. The default setting (factory setting) is "Multi Fingering." Full Keyboard: This let you play the accompaniment chords freely from anywhere on the keyboard. MM6/MM8 Owner's Manual 25
-
 1
1 -
2
-
3
-
4
-
5
-
6
-
7
-
8
-
9
-
10
-
11
-
12
-
13
-
14
-
15
-
16
-
17
-
18
-
19
-
 20
20 -
 21
21 -
 22
22 -
 23
23 -
 24
24 -
 25
25 -
 26
26 -
 27
27 -
 28
28 -
 29
29 -
 30
30 -
31
-
32
-
33
-
34
-
35
-
36
-
37
-
38
-
39
-
40
-
41
-
42
-
43
-
44
-
45
-
46
-
47
-
48
-
49
-
50
-
51
-
52
-
53
-
54
-
55
-
56
-
57
-
58
-
59
-
60
-
61
-
62
-
63
-
64
-
65
-
66
-
67
-
68
-
69
-
70
-
71
-
72
-
73
-
74
-
75
-
76
-
77
-
78
-
79
-
80
-
81
-
82
-
83
-
84
-
85
-
86
-
87
-
88
-
89
-
90
-
91
-
92
-
93
-
94
-
95
-
96
-
97
-
98
-
99
-
100
-
101
-
102
-
103
-
104
-
105
-
106
-
107
-
108
-
109
-
110
-
111
-
112
-
113
-
114
 |
 |
