Yamaha MOX6 Owner's Manual - Page 20
Basic Operation, Moving the cursor, Changing (editing) parameter values, Functions and Sub-Functions
 |
UPC - 086792950884
View all Yamaha MOX6 manuals
Add to My Manuals
Save this manual to your list of manuals |
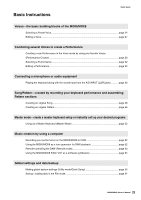
Page 20 highlights
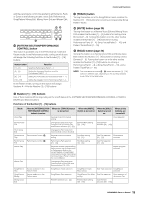
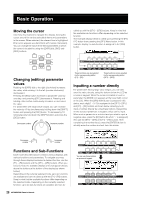
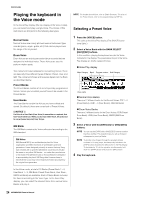
Basic Operation Moving the cursor Use these four buttons to navigate the display, moving the cursor around the various selectable items and parameters in the screen. When selected, the relevant item is highlighted (the cursor appears as a dark block with inverse characters). You can change the value of the item (parameter) at which the cursor is located by using the [DATA] dial, [INC] and [DEC] buttons. called up with the [SF1] - [SF6] buttons. Keep in mind that the available sub-functions differ depending on the selected function. The example display below is called up by pressing the [F5] LFO button then pressing the [SF1] Wave button. In this example display, no sub-function is assigned to the [SF6] button. Changing (editing) parameter values Rotating the [DATA] dial to the right (clockwise) increases the value, while rotating it to the left (counter-clockwise) decreases it. Pressing the [INC] button increases a parameter value by one step, and pressing [DEC] decreases it. Pressing and holding either button continuously increases or decreases the value. For parameters with large value ranges, you can increase the value by 10 by simultaneously holding down the [SHIFT] button and pressing the [INC] button. To decrease by 10, simultaneously hold down the [SHIFT] button and press the [DEC] button. Decreases number Increases number These functions can be selected via the corresponding button ([F1] - [F6]). These functions can be selected via the corresponding button ([SF1] - [SF6]). Inputting a number directly For parameters having large value ranges, you can also enter the value directly, using the buttons below the LCD as a numeric keypad. When the cursor is located on such a parameter, the [NUM] icon appears at the lower right corner of the LCD. When the [SF6] NUM button is pressed in this status, each digit (1 - 9, 0) is assigned to the [SF1] - [SF5] and [F1] - [F5] buttons as shown below, allowing you to input a number directly by using these buttons. Depending on the selected parameter, a negative value can be input. When such a parameter is selected and you wish to input a negative value, press the [F6] button (to which "-" is assigned) then use the [SF1] - [SF5] and [F1] - [F5] buttons. After completing the number input, press the [ENTER] button to actually enter the number and exit from this status. Decreases number Increases number Functions and Sub-Functions Each mode described above contains various displays, with various functions and parameters. To navigate your way through these displays and select a desired function, use the [F1] - [F6] buttons and the [SF1] - [SF6] buttons. When you select a mode, the available displays or menus appear directly above the buttons at the bottom of the display (as shown below). Depending on the currently selected mode, up to six functions are available and can be called up with the [F1] - [F6] buttons. Keep in mind that the available functions differ depending on the selected mode. Depending on the currently selected function, up to six sub-functions are available and can be 20 MOX6/MOX8 Owner's Manual You can use these buttons as a numeric keypad.
-
 1
1 -
2
-
3
-
4
-
5
-
6
-
7
-
8
-
9
-
10
-
11
-
12
-
13
-
14
-
 15
15 -
 16
16 -
 17
17 -
 18
18 -
 19
19 -
 20
20 -
 21
21 -
 22
22 -
 23
23 -
 24
24 -
 25
25 -
26
-
27
-
28
-
29
-
30
-
31
-
32
-
33
-
34
-
35
-
36
-
37
-
38
-
39
-
40
-
41
-
42
-
43
-
44
-
45
-
46
-
47
-
48
-
49
-
50
-
51
-
52
-
53
-
54
-
55
-
56
-
57
-
58
-
59
-
60
-
61
-
62
-
63
-
64
-
65
-
66
-
67
-
68
-
69
-
70
-
71
-
72
-
73
-
74
-
75
-
76
 |
 |
