Yamaha MOX6 Owner's Manual - Page 29
Changing the Arpeggio Type, assignment, Press the ARP [EDIT] button. - arpeggio instruction
 |
UPC - 086792950884
View all Yamaha MOX6 manuals
Add to My Manuals
Save this manual to your list of manuals |
Page 29 highlights
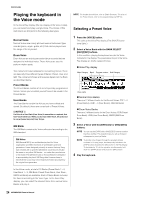
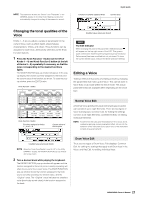
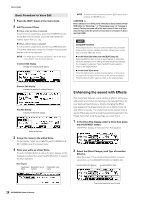
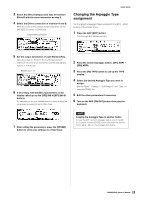
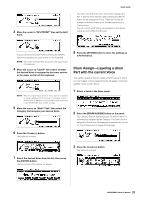
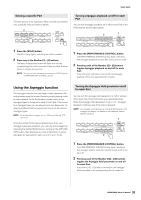
3 Select the Effect Category and Type of Insertion Effect B with the same instruction as step 2. 4 Select the Effect connection of Insertion A and B. Move the cursor to the position shown below then use the [INC]/[DEC] buttons or [DATA] dial. Insertion Effect connection Quick Guide Changing the Arpeggio Type assignment Try changing the Arpeggio Types assigned to the [SF1] - [SF6] buttons of the Preset Voice. 1 Press the ARP [EDIT] button. The Arpeggio Edit display appears. 5 Set the output destination of each Element/Key. Move the cursor to "EL:OUT" (for the Normal Voice) or "KEY:OUT" (For the Drum Voice) then use the [INC]/[DEC] buttons or [DATA] dial. Element Out 1 - 8 6 If necessary, edit the Effect parameters on the display called up via the [SF2] INS A/[SF3] INS B buttons. Try narrowing in on your desired sound by finely editing the parameters provided for each Effect Type. 2 Press the desired Arpeggio button, [SF1] ARP1 - [SF6] ARP6. 3 Press the [F2] TYPE button to call up the TYPE display. 4 Select the desired Arpeggio Type you want to assign. Edit the "Bank," "Category," "SubCategory," and "Type" by using the [DATA] dial. 5 Edit the other parameters if necessary. 6 Turn on the ARP [ON/OFF] button then play the keyboard. 7 After setting the parameters, press the [STORE] button to store your settings as a User Voice. HINT Copying the Arpeggio Type to another button To copy the ARP 1 button's Arpeggio Type to one of the ARP 2 - 6 buttons, hold the [STORE] button and press the desired button, [SF2] - [SF6], in the Arpeggio Edit display. 29 MOX6/MOX8 Owner's Manual
-
 1
1 -
2
-
3
-
4
-
5
-
6
-
7
-
8
-
9
-
10
-
11
-
12
-
13
-
14
-
15
-
16
-
17
-
18
-
19
-
20
-
21
-
22
-
23
-
 24
24 -
 25
25 -
 26
26 -
 27
27 -
 28
28 -
 29
29 -
 30
30 -
 31
31 -
 32
32 -
 33
33 -
 34
34 -
35
-
36
-
37
-
38
-
39
-
40
-
41
-
42
-
43
-
44
-
45
-
46
-
47
-
48
-
49
-
50
-
51
-
52
-
53
-
54
-
55
-
56
-
57
-
58
-
59
-
60
-
61
-
62
-
63
-
64
-
65
-
66
-
67
-
68
-
69
-
70
-
71
-
72
-
73
-
74
-
75
-
76
 |
 |
