Yamaha MOX6 Owner's Manual - Page 55
Using as a Master Keyboard, Registering the Edited Voice, Performance/Song/Pattern
 |
UPC - 086792950884
View all Yamaha MOX6 manuals
Add to My Manuals
Save this manual to your list of manuals |
Page 55 highlights
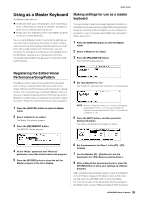
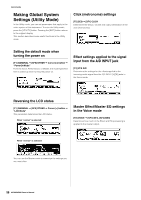
Quick Guide Using as a Master Keyboard The Master mode lets you: * Create and store up to 128 programs, each containing a Voice, a Performance, a Song, or a Pattern, and each of which can be instantly called up for use. * Assign up to four separate Zones in each Master program for use as a master keyboard. You can use the Master mode to memorize the settings you use most often including the information on which mode is used, and call up these settings instantly anytime you need them with a single button press. Furthermore, you can memorize the settings for controlling an external MIDI device by the Master, allowing you to change and control the connected external MIDI tone generator in sequence while performing live. Making settings for use as a master keyboard It is a good idea to memorize master keyboard functions to the Master when using external multiple MIDI tone generators. Simply by selecting a different Master, you can change the programs in your connected external MIDI tone generators. Here's how to do it: 1 Press the [MASTER] button to enter the Master mode. 2 Select a Master to be edited. 3 Press the [F3] ZONE SW button. The ZONE SW display appears. Registering the Edited Voice/ Performance/Song/Pattern The Master mode is ideal for live performance situations since it lets you instantly switch among needed Voices, Songs, Patterns and Performances without having to change modes. One convenient way of using the Master mode is to save your needed programs (Voices, Performances, etc.) to Masters in number order, according to the songs you intend to perform. Follow the instructions below to store programs. 1 Press the [MASTER] button to enter the Master mode. 2 Select a Master to be edited. The Master Play display appears. 3 Press the [F2] MEMORY button. The MEMORY display appears. 4 Set "ZoneSwitch" to "on." The "ZoneKnob" parameter also will be set to on automatically. NOTE When the "ZoneKnob" is set to "on," the Zone Edit settings are assigned to Knobs 1 - 8. If you want to assign the settings in the memorized mode to Knobs 1 - 8 yourself, set "ZoneKnob" to "off." 5 Press the [EDIT] button, and then press the Number [1] button. This calls up the Master Edit displays for Zone 1. 4 At the "Mode" parameter and "Memory" parameter, select the desired mode and program. 5 Press the [STORE] button to store the set the Master program in the store display. 6 Set the parameters for Zone 1 in the [F1] - [F5] displays. 7 Use the Number [2] - [4] buttons to set the parameters for other Zones as well as Zone 1. 8 After setting all the desired parameters, press the [STORE] button to store your settings as a Master program. After completing these settings, assign a name to the Master in the [F1] Name display of the Master Common Edit. After naming, press the [STORE] button to store the Master. For more information on the parameters which are edited in the Master mode, see the "Reference Manual" PDF document. 55 MOX6/MOX8 Owner's Manual
-
 1
1 -
2
-
3
-
4
-
5
-
6
-
7
-
8
-
9
-
10
-
11
-
12
-
13
-
14
-
15
-
16
-
17
-
18
-
19
-
20
-
21
-
22
-
23
-
24
-
25
-
26
-
27
-
28
-
29
-
30
-
31
-
32
-
33
-
34
-
35
-
36
-
37
-
38
-
39
-
40
-
41
-
42
-
43
-
44
-
45
-
46
-
47
-
48
-
49
-
 50
50 -
 51
51 -
 52
52 -
 53
53 -
 54
54 -
 55
55 -
 56
56 -
 57
57 -
 58
58 -
 59
59 -
 60
60 -
61
-
62
-
63
-
64
-
65
-
66
-
67
-
68
-
69
-
70
-
71
-
72
-
73
-
74
-
75
-
76
 |
 |
