Yamaha MT50 Owner's Manual - Page 18
Panning, Applying EQ, Adding Effects, Mixdown Recording
 |
View all Yamaha MT50 manuals
Add to My Manuals
Save this manual to your list of manuals |
Page 18 highlights
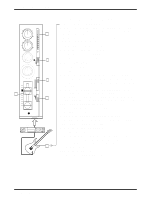
14 Chapter 3: Basic Recording PAN L R HIGH - + LOW - + REC ! To prevent accidentally erasing your original recording, remove the write-protect tabs from both sides of the audio cassette you used in your MT50. Panning Panning allows you to position sounds in the stereo mix (i.e., between the left and right speakers). There are no hard and fast rules about positioning instruments in the stereo image. Experiment! Some early Beatles recordings achieved remarkable effects by panning vocals, for example, hard right, while bass and guitar were panned hard left. 1. Turn the PAN control to the left to position a sound to the left, and to the right to position a sound to the right. Applying EQ The two-band equalizer enables you to boost or cut both high and low frequencies. Make sure you can hear desirable high frequencies, such as the hi-hats in the drum track. Don't let low frequencies, such as the bass track, become too "boomy," or overwhelm the mix. 1. Use the HIGH control to boost and cut high frequencies. 2. Use the LOW control to boost and cut low frequencies. Adding Effects If you have an effects processor, such as the Yamaha REV100 or FX770, you can connect it to the MT50 and apply effects to recorded sounds. 1. Connect the AUX SEND to the effects processor's input. 2. Connect the AUX RETURN to the effects processor's outputs. If you have a stereo effects processor, connect both the L(MONO) and R AUX RETURN connectors. If your effects processor has a mono output, connect to the L(MONO) connector. 3. Turn up an AUX control to send a sound to the effects processor. 4. Turn up the AUX RETURN control to add the processed sounds to the stereo mix. Mixdown Recording Once you're happy with the mix, you're ready to record it to the master recorder. 1. Set your master recorder ready to record. 2. Play the MT50 and set the recording level on the master recorder. 3. Stop MT50 and rewind the tape back to approximately 999. 4. Start recording on the master recorder. 5. Press PLAY on the MT50 to start playback. The stereo mix is recorded to the master recorder. 6. At the end of the song, stop the MT50 and master recorder. 7. Rewind the master recorder and play your masterpiece. MT50 User's Guide
-
 1
1 -
2
-
3
-
4
-
5
-
6
-
7
-
8
-
9
-
10
-
11
-
12
-
 13
13 -
 14
14 -
 15
15 -
 16
16 -
 17
17 -
 18
18 -
 19
19 -
 20
20 -
 21
21 -
 22
22 -
 23
23 -
24
-
25
-
26
-
27
-
28
-
29
-
30
-
31
-
32
-
33
-
34
-
35
-
36
-
37
-
38
-
39
-
40
-
41
-
42
-
43
-
44
-
45
-
46
-
47
-
48
-
49
-
50
-
51
-
52
-
53
-
54
-
55
-
56
-
57
-
58
-
59
-
60
-
61
-
62
-
63
-
64
-
65
-
66
-
67
-
68
-
69
-
70
-
71
-
72
-
73
-
74
-
75
-
76
-
77
-
78
-
79
-
80
-
81
-
82
-
83
-
84
-
85
-
86
-
87
-
88
-
89
-
90
-
91
-
92
-
93
-
94
-
95
-
96
-
97
-
98
-
99
-
100
-
101
-
102
-
103
-
104
-
105
-
106
-
107
-
108
-
109
-
110
-
111
-
112
-
113
-
114
-
115
-
116
-
117
-
118
-
119
-
120
-
121
-
122
-
123
-
124
-
125
-
126
-
127
-
128
-
129
-
130
-
131
-
132
-
133
-
134
-
135
-
136
-
137
-
138
-
139
-
140
-
141
-
142
-
143
-
144
-
145
-
146
-
147
-
148
-
149
-
150
-
151
-
152
-
153
 |
 |
